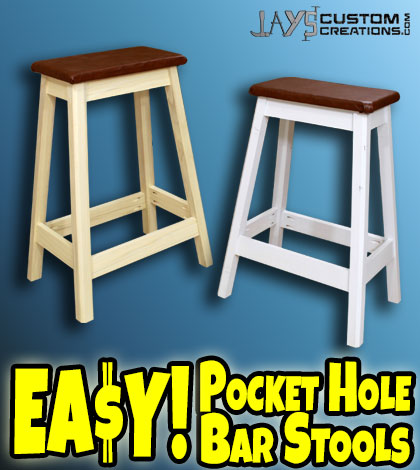
Have you ever wanted to make a bar stool? Maybe for your home or shop. This is an extremely easy DIY bar stool that anyone can make. You can probably batch out a set of 4 of these in a few hours. There are several options and variations for this bar stool so don’t be afraid to build it your own way. You don’t need a shop full of tools to make this either. In the video I used my table saw a lot but you can make this with a compound miter saw and a pocket hole jig. If you do not have a pocket hole jig I would strongly advise getting one. They are incredibly handy for making quick work of DIY projects. If you feel like you would be using it a lot (you probably will) than I recommend getting one like mine. They also make a less expensive clamp on version (affiliate links).
Shopping List
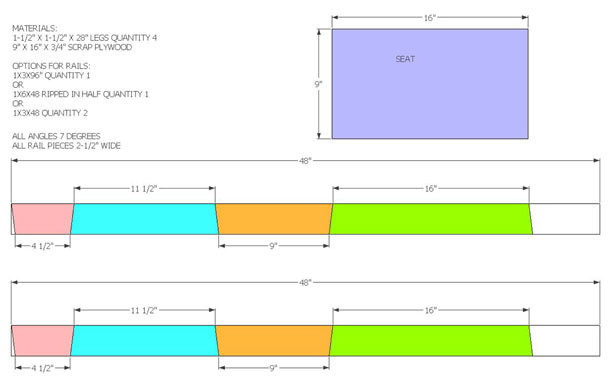
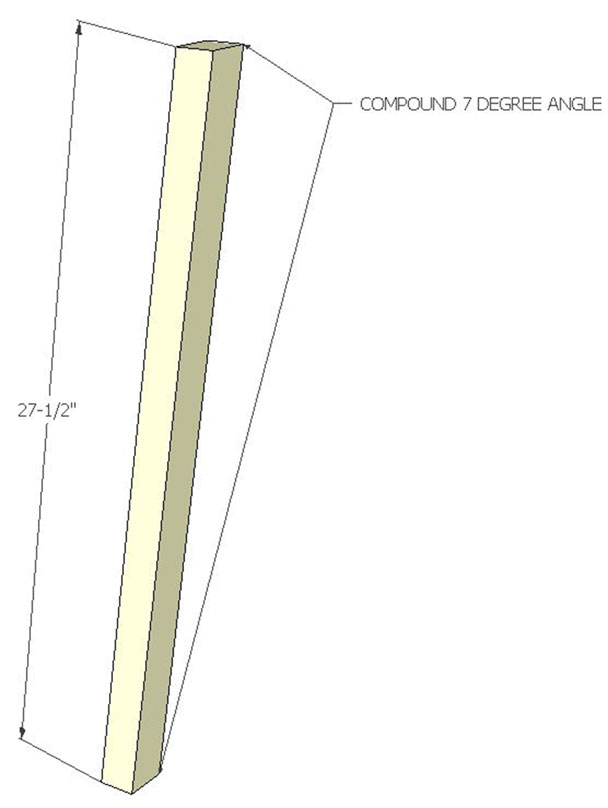
- Legs – 2x2x36” Quantity 4. Keep in mind that a 2×2 is actually 1-1/2×1-1/2”. You can actually get all 4 legs out of a single 2×4 if you want.
- Rails – You have several options for the rails. Either a 1x6x48”, a 1x3x96”, or two 1x3x48”.
- 9″x16″ piece of 3/4″ plywood if you don’t have any scrap.
- 38 1-1/4″ pocket hole screws.
- Material to upholster your seat if you choose to do so.
- Finish of choice.
Cut
Cut all of your materials to the layout diagram and the leg diagram. (larger image in the download at the end)
Bevel One Side (optional)
This step is optional. In the video you saw me bevel the top side of my top rails to 7°. This is so that the top surface of my top rails is flush with the bottom of the seat. If you don’t have a table saw or simply don’t want to do this step that’s fine. You can simply line up the top, outside edge of the rail with the top of the legs during assembly.
Leg Detail
If you want to route a leg detail on the outside of your legs now is the time. I used a simple chamfer on the outside edge of my legs. While I had the router going I also rounded all of the edges on the seat.
Pocket Holes
Arrange all of your rail pieces so that the good side is down. You want to drill the pocket holes on the bad side. Every rail gets two pocket holes on each end and the top rails get a few pocket holes drilled vertically into the short side to attach the seat. Two on the long top rails and one in the middle of the short top rails.
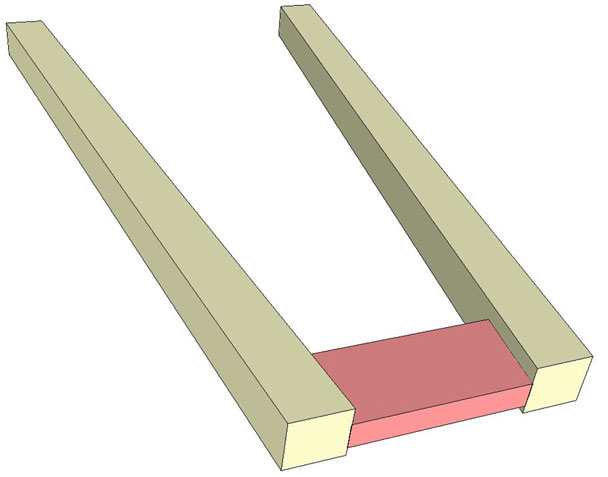
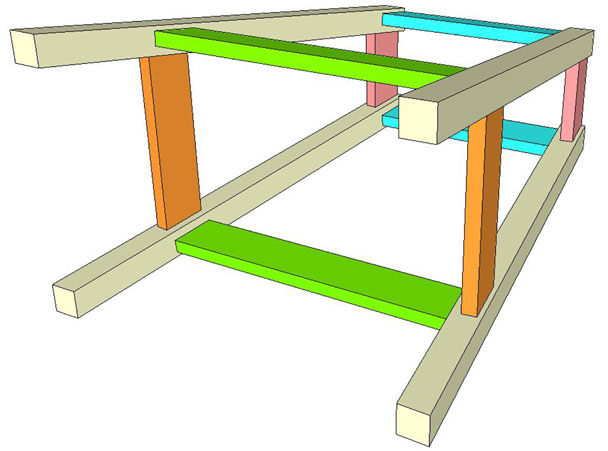
Assembly
You have to start assembly with the short top rails. If you start with the long top rails than you won’t have room for your drill when you get to the short top rails. I used a piece of scrap 1/4” plywood to space all of my rails off of the work surface. If you don’t have any 1/4” plywood just use two standard wood pencils. This gives a 1/4” reveal when it is all assembled. If you did not bevel the top side of your top rails make sure the outside top edge lines up with the top of the legs. Make sure the legs are in the correct orientation as well. Glue and screw the top rail in place. Do this for both sets of legs.
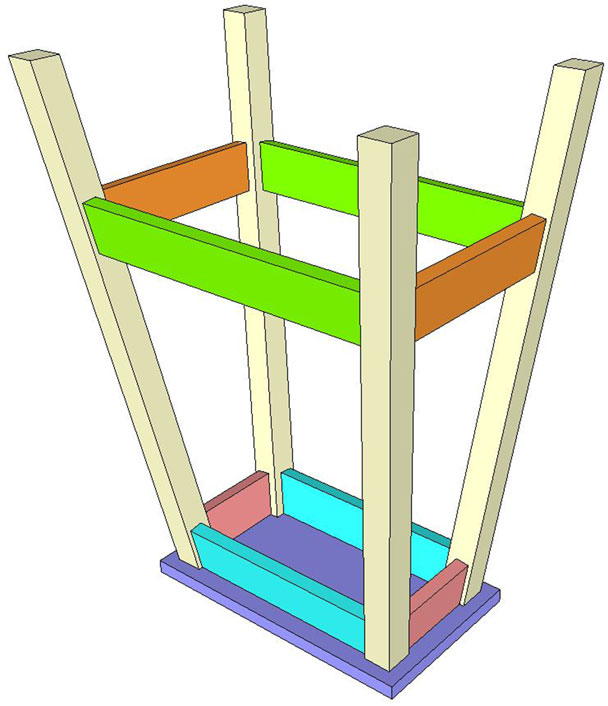
Attach both sets of legs to one another via the long top rails.
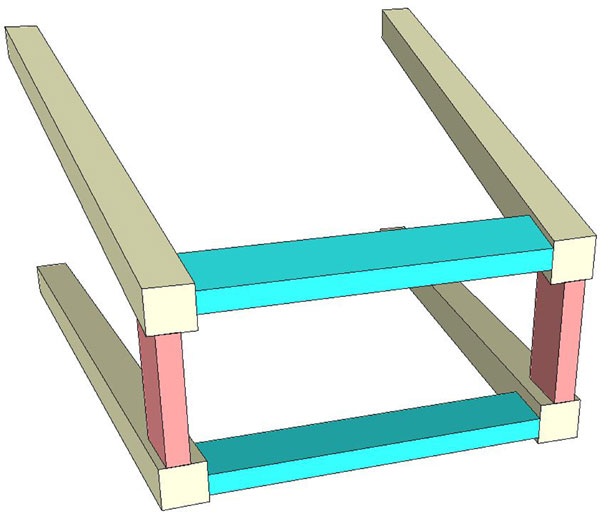
Attach all of your lower rails to the legs. Spacing isn’t 100% critical here. They are sized so that they will fit in an approximate location. Make sure that both long rails are at the same distance off of the bottom of the legs. Same with the short rails. The short rails wont be the same height as the long rails. I designed it this way to allow room for error.
Seat Options
You can upholster your seat or leave it as is. If you choose not to upholster your seat you may want to use a solid wood glue up. I upholstered mine with a cheap piece of fake leather. I find that a piece of carpet pad is the perfect amount of cushion for a bar stool. If you use carpet pad you may want to cover it with at least two layers of fabric though. Mine has a few lumpy areas that showed through. It doesn’t bother me though but I figured I’d let you know. Next, flip the stool upside down and attach the seat.
Finish
Before you finish you may consider plugging the exposed pocket holes in the bottom rails. I didn’t plug mine as they visually don’t bother me. Kreg Tool Company makes plugs that you can buy if you want them. Apply your finish of choice. I painted one that I made previously with good results but left this one unfinished for now. I will eventually try my luck at a weathered paint finish.
Download
Although this plan is free to you remember that it isn’t free to produce. If you would like to show your thanks please consider using the donate button at the bottom of this page. If you liked this project and found it useful please share it so others can do so as well. Thanks for stopping by folks and have a great day!


I love your sketch up drawings and your generally clarity of illustration.
Jay. I am having a little difficulty with assembly of the stool. I have double checked all lengths and angles. I am confused about how the legs are oriented. During assembly of the top pieces i notice the tops of the legs and the top rails are not flush compared when i put the seat on it. Is the top suppose to be completely flat when the seat is placecd on top. Glad i have tried dry fitting everything.
Thanks. Larry
Hey Larry. Yes, the seat should rest flush on top of the top rails and the tops of the legs.
Love this build, Jay. Interestingly I just made a short bench with, what seems to be, the same 7 degree “sweet spot” angles.
Very cool. Id love to see pics!
Jay
Still having a problem with assembly of the top part of the stool. Could i send u some pics of my stool and the problem i am having? Maybe u could point out what i am doing wrong.
Thanks.
Sure. I sent you an email.
How did you make your jig to cut the legs?
I made your pocket hole bar stools and i’m very happy the way they turned out , 1st time using my dewalt miter saw to cut anything other then 90* sense i got it for Christmas. thanks
Great project Jay, your video production and plans are very professionally done….Thanks for sharing.
Thank you for the feedback Jim. I appreciate it.
I wanted bar stools to match a farm house style table that I made. These stools were the perfect candidate. The plans were easy to follow and the finished product dwarfs store bought stools. Thanks Jay for posting the articles, you do great work.
Made it in a shorter version! Awesome plans, thanks!
Great plans and project. Thanks!
I would love to post a photo, but it doesn’t look like I can.
If I had thousands of dollars worth of power tools and saw tables wouldn’t i be rich enough to just go and buy a stool? How about showing us how to make a stool with a handsaw and a screwdriver?
I think you miss the point of the video and do not understand who my audience is. Have a good day.
Hi, thanks for this…was wondering how I could alter the plans and build this all with 2×4 cedar boards?
Nice plan and well thought illustrations. I already built three for my backyard and just can’t get all the legs even and still wobbly. I’d like to build more for my kitchen bar but have to figure out how to keep all the legs even so I’ll try building one again this time applying angle on the top rails.
To eliminate the wobble, place the stool on a known flat surface. Then find the high leg. Measure how high it is off the ground and remove half that much from the opposite corner.
Hey Jay
I cannot find the plans for the half lap bar stool
You’re commenting on the article for the pocket hole bar stools. Try the article for the half lap bar stools. https://jayscustomcreations.com/2014/09/how-to-make-a-half-lap-bar-stool-from-2x4s/