")
The goal of this shop tour series is to get a better look at how other people setup and use their shop space as well as to promote other creators. If you like what you see be sure to leave them a comment here and subscribe to any or all of their content links to see more. If you would like to be featured in this series along with your shop send an email with the subject FEATURE MY SHOP to jay@jayscustomcreations.com. Enjoy!
Andrew Milacci – The HandToolery
YouTube: https://www.youtube.com/channel/UC33RmG_ubJcNF7k474XLssg
Etsy: https://www.etsy.com/shop/TheHandToolery
Instagram: @thehandtoolery (https://www.instagram.com/thehandtoolery/)
Facebook: https://www.facebook.com/TheHandToolery
Hi! I’m Andrew Milacci (pronounced “mah-LAY-see”) of The HandToolery YouTube Channel. Welcome to my shop! I’ve been making YouTube videos for just over a year know; I’ve been woodworking for about 4 years, but I’ve always enjoyed tinkering and getting my hands dirty. My channel content is mostly hand tool related, with videos about build projects, tool making, tool and product reviews, and even some DIY/home improvement videos. I’ve also got an Etsy store where I sell plans for some of the projects I’ve made. In the past year, I’ve been really pleased to see a few of my videos do pretty well: one where I make a dovetail saw handle (that’s at about 80k views, here: https://www.youtube.com/watch?v=uz_jni42FZ0) and another where I make a marking gauge (70K views, here: https://www.youtube.com/watch?v=byWNlcJGgbI). Before I move on to the shop tour, I’d like to say thanks to Jay for featuring my shop!
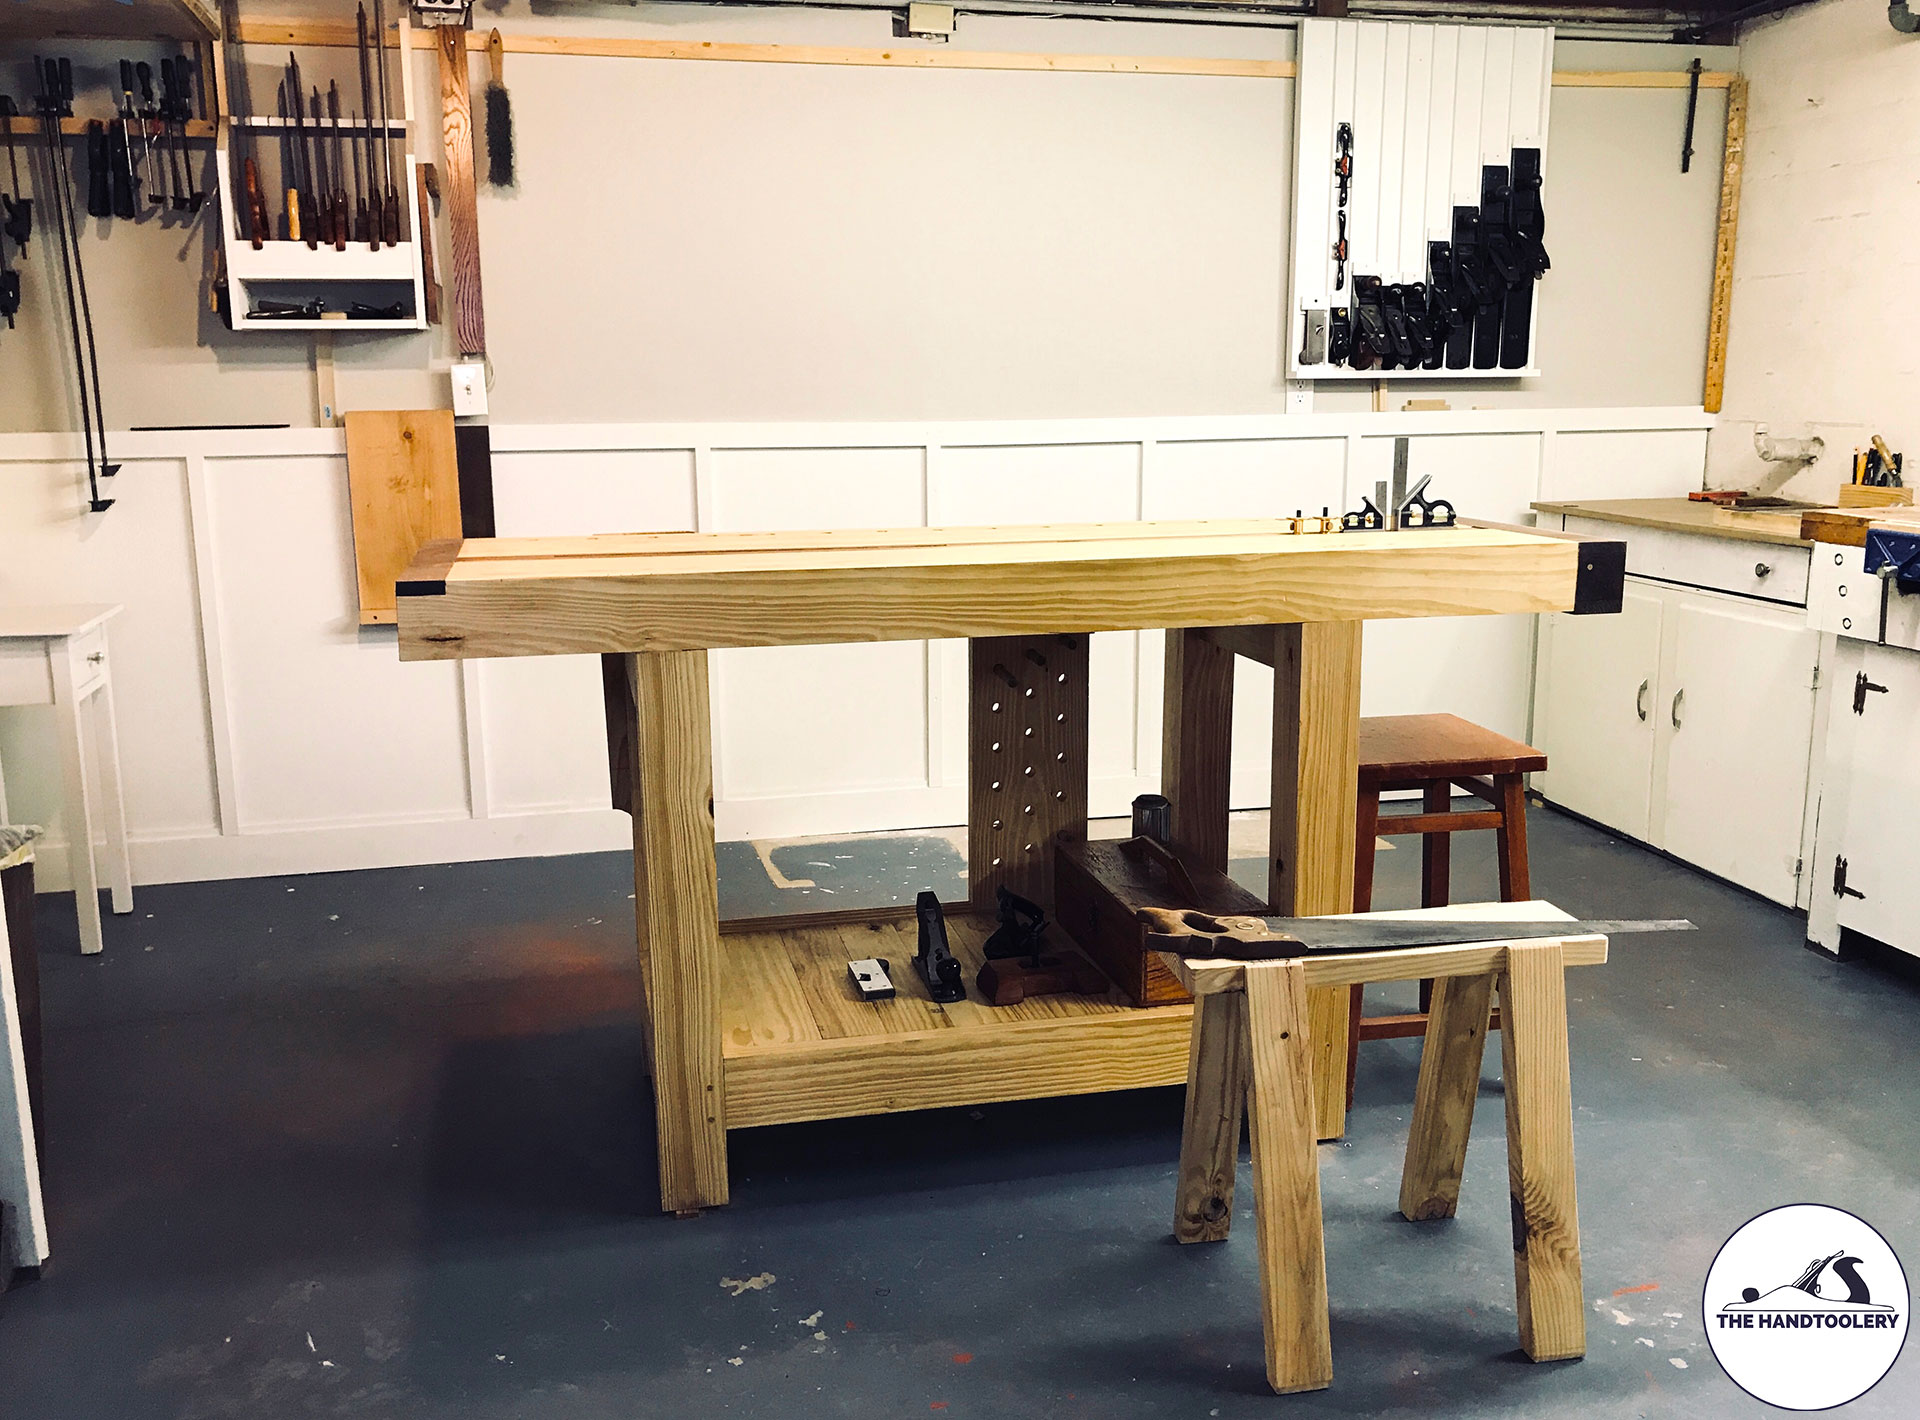
Ok—now onto the tour! My shop is in my basement, and while it’s not cramped for me since I do hand tool work, mostly, I can’t imagine you getting much in there in the way of larger machines. The shop is just about 15’ x 15’, with about 10’ of useable width, since on one side (the right of when you walk in) there is that long workbench, and on the other (the left when you walk in) there is my lumber storage and some cabinet storage. As you can see, the workshop revolves around my split-top Roubo workbench, for which I’ve made an in-depth tour of it (link for the workbench tour: https://www.youtube.com/watch?v=qKVjpbn1f2k). In front of that you can see my saw bench that is made from the offcuts from the Roubo Bench, and I’ve got a video of this build, too (build video here: https://www.youtube.com/watch?v=Ju-bsBedZk0). In the background you can see my planes, my saws, and other things I use all the time in my work flow, but before we get to that, let me take you around the shop.
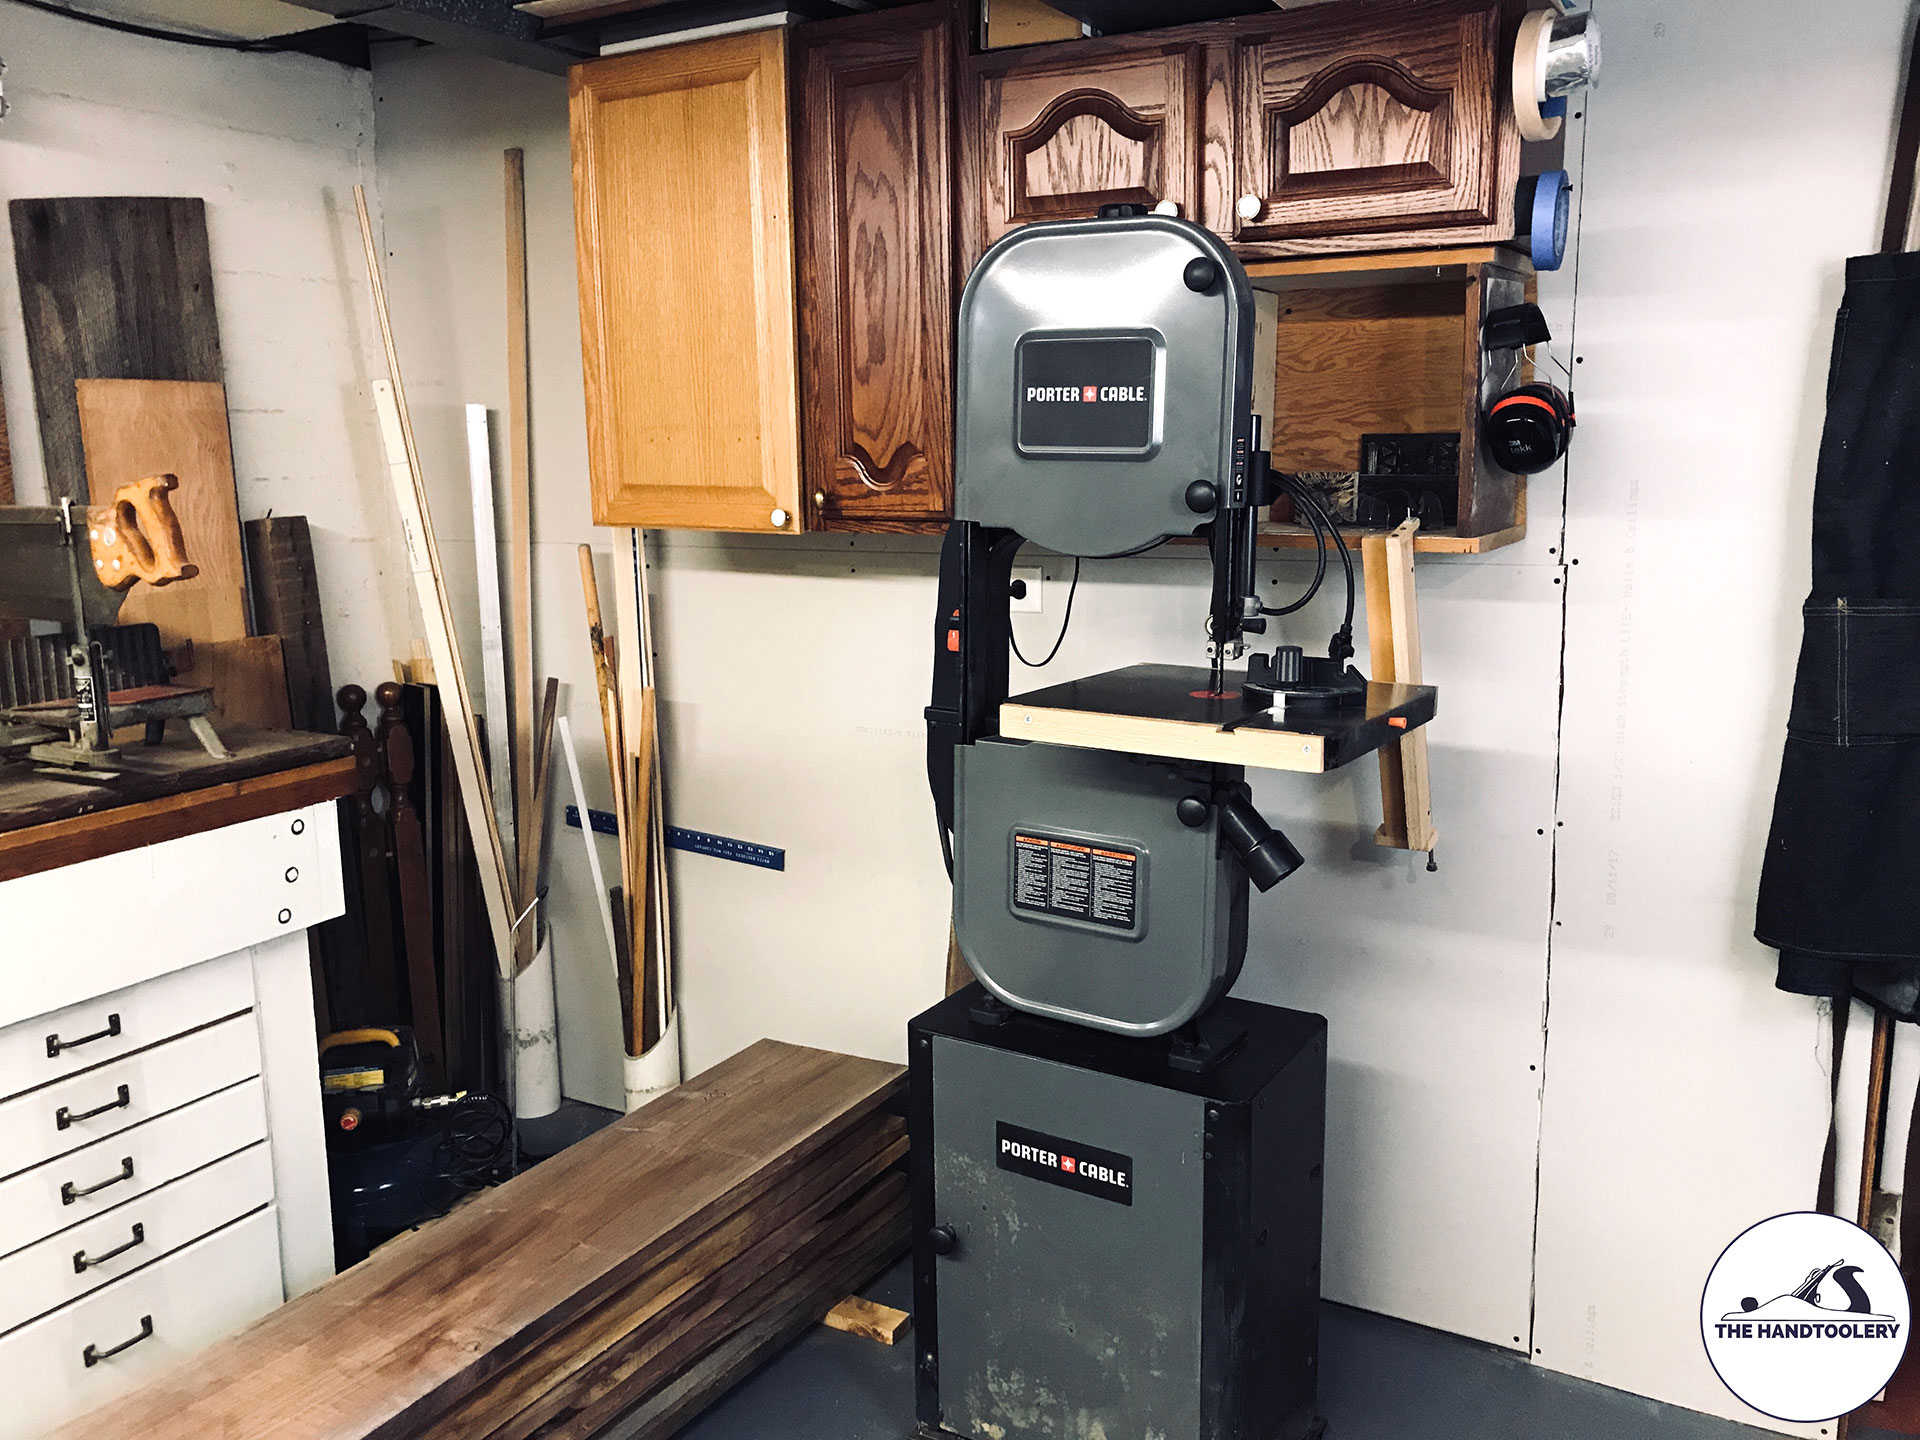
When you walk in, to the right you have my aprons hanging up, but what really “stands” out—sorry about the pun—is my free-standing Porter Cable bandsaw that I picked up at a reasonable price on Craigslist. I had to clean it quite a bit, but it works great! On the ground, you can see my next project: a walnut sideboard. This will be an in-depth build series, and I’m waiting for the walnut to acclimate to the shop. Very soon I’ll begin that build, so if you’re interested in seeing my sketchup preview of the sideboard, I’ve got a quick video intro to the project here: https://www.youtube.com/watch?v=SD8VbwoJ8vU
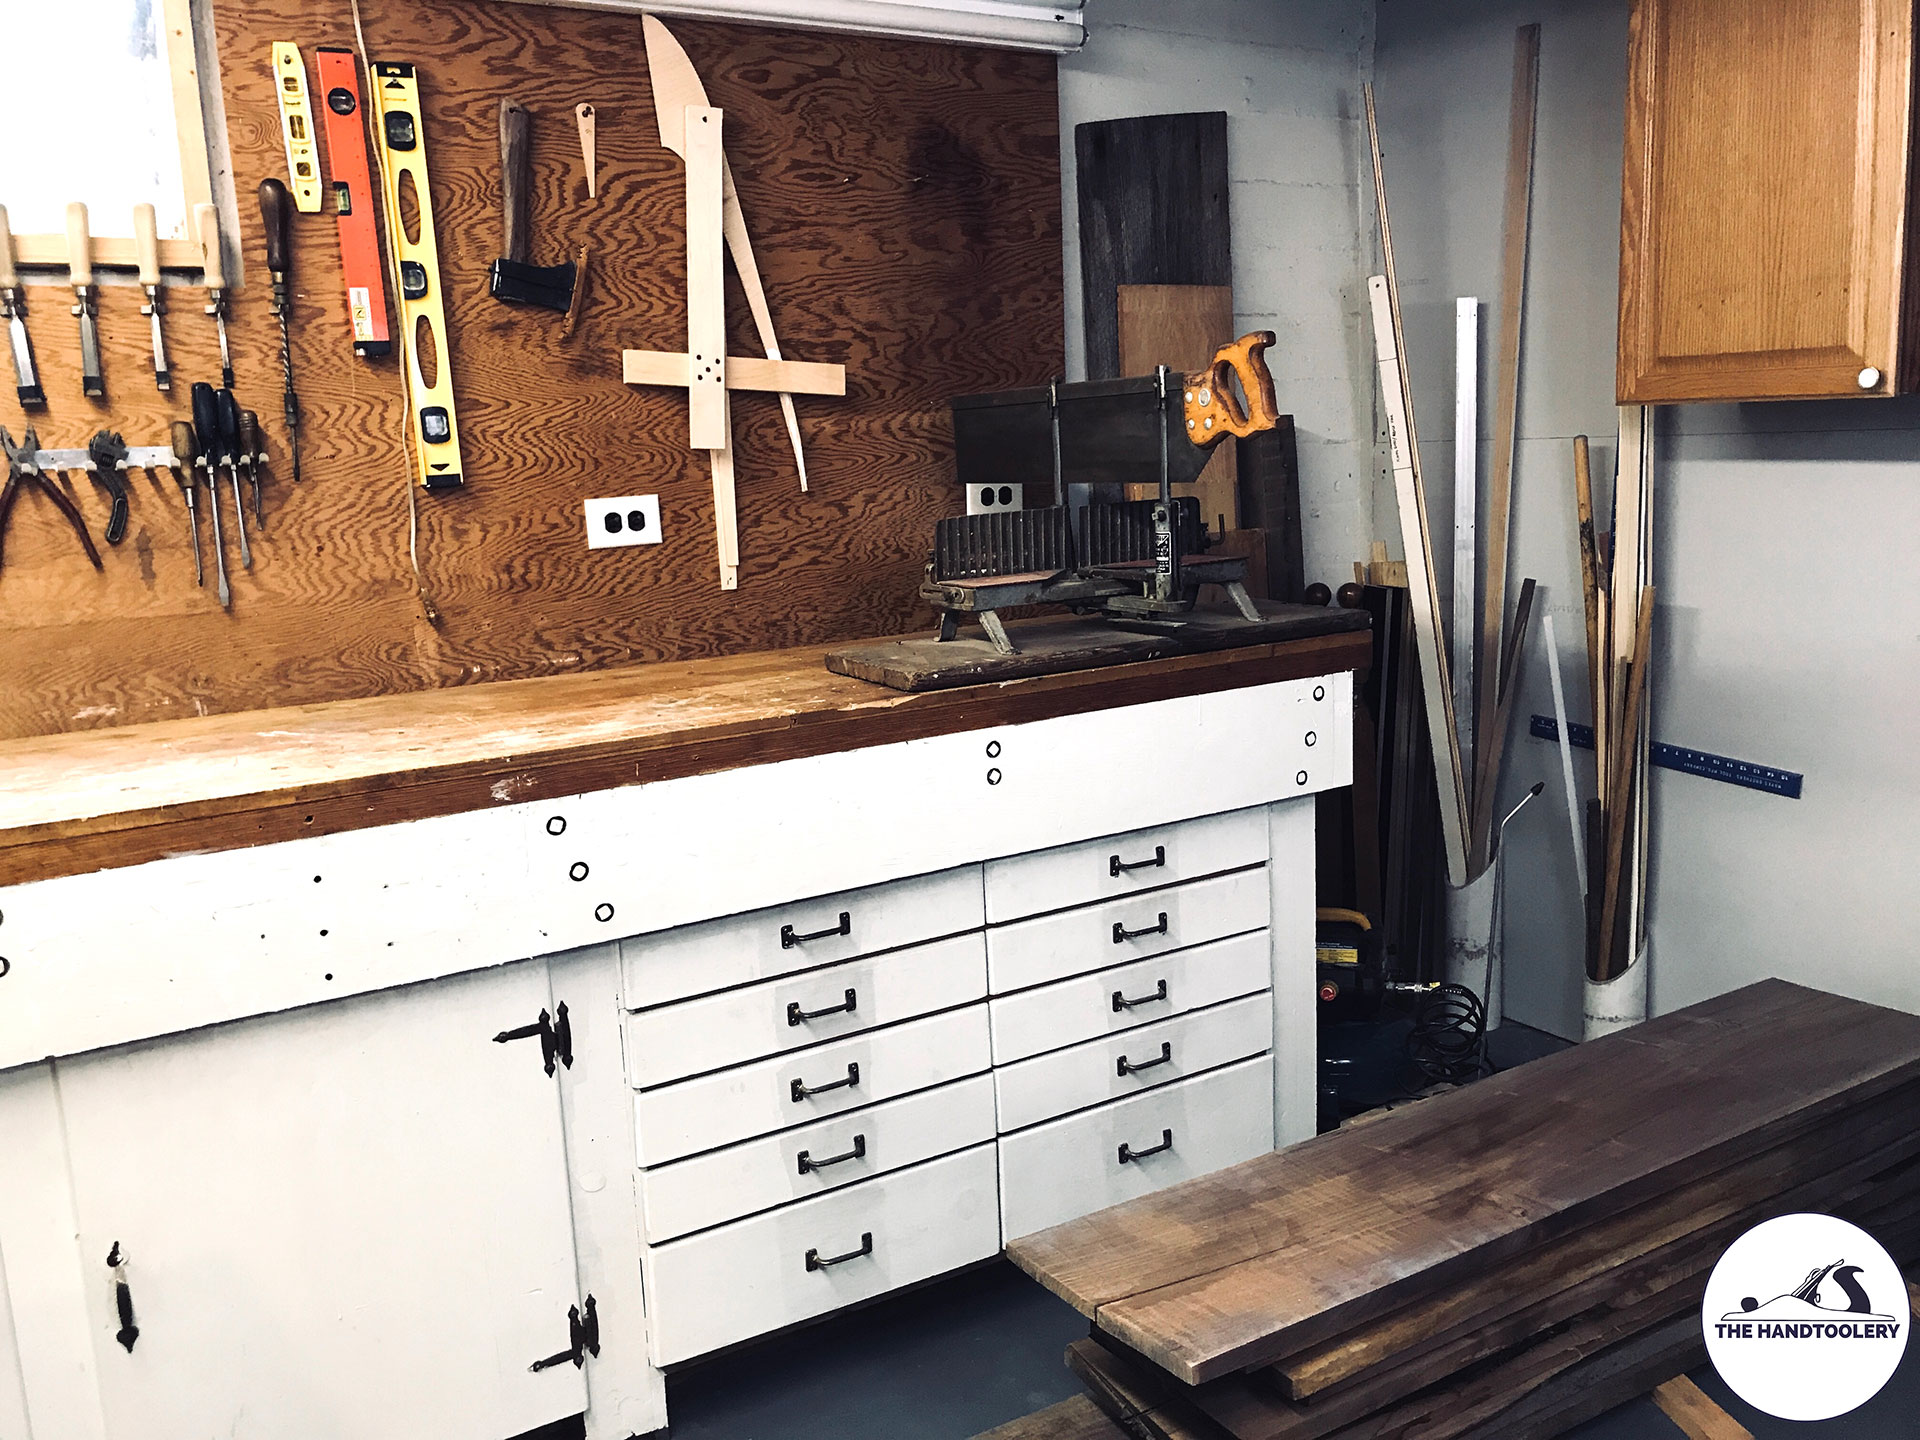
Just a little further along, you can see the corner and the workbench areas. The corner has some reclaimed lumber from a 19th-century barn that will probably become a farm-style bench. Also, you can see the long pieces standing on end, housed in 4-inch PVC pipe that I screwed into studs. I call this my “stick stock”; I can’t even tell you how often I find just the thing I need in that corner. The mitre saw on the bench is another craigslist find: it’s a Millers Falls Langdon Acme saw. It’s really solid and is missing a few parts. I’ve been able to make some of them on my own, and I think I should be able to make the rest, too. I’ve just not been too motivated because it’s 100% functional at this point and cuts really well. Moving toward the left of the image, you can see some of the templates I use for furniture legs and whatnot, as well as other miscellaneous tools. The drawers are full of screws, nails, random parts, electrical components, and small electric tools.
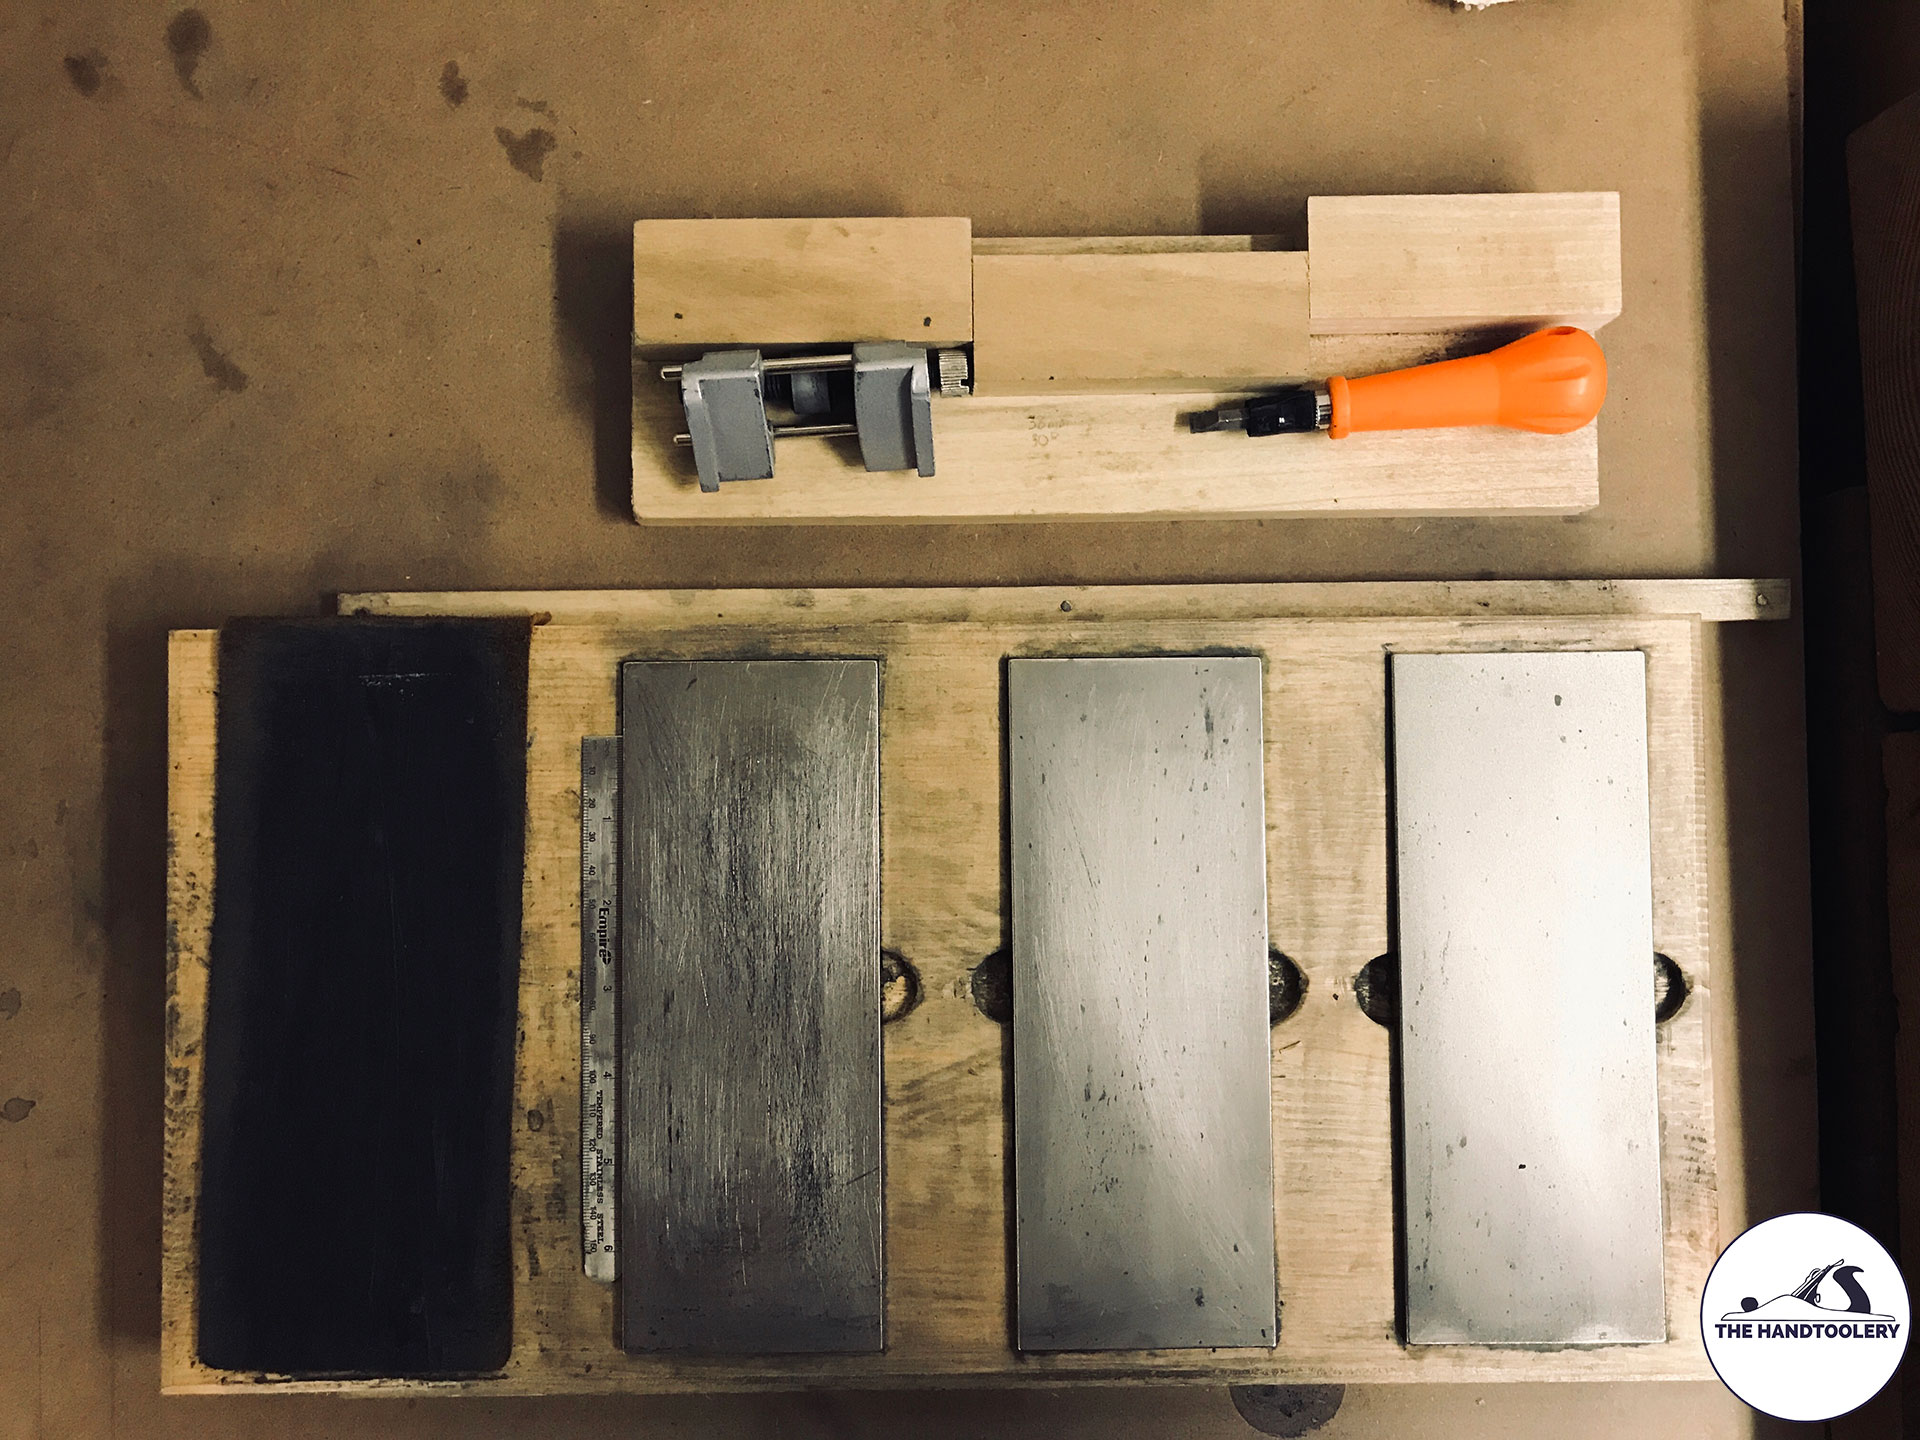
The back-right of the shop is my sharpening station and my plane till. Let’s check out my sharpening set up first.

Here is my sharpening station, which consists of some stones inset into a piece of wood. I cover my sharpening set up in its own video (here: https://www.youtube.com/watch?v=VCb0B-yapUI), but in short, I’ve got the DMT course, extra fine, and extra-extra fine diamond stones. I’ve got a Woodcraft, cheap-o sharpening guide and a shop-made jig to consistently set it up for the angles I most need: 22.5, 25, 30 degrees. The strop is a piece of leather from Michaels, and all of that is housed on a piece of 2×10. With this set up, I’ve gotten excellent results, and I don’t see myself changing it any time soon.
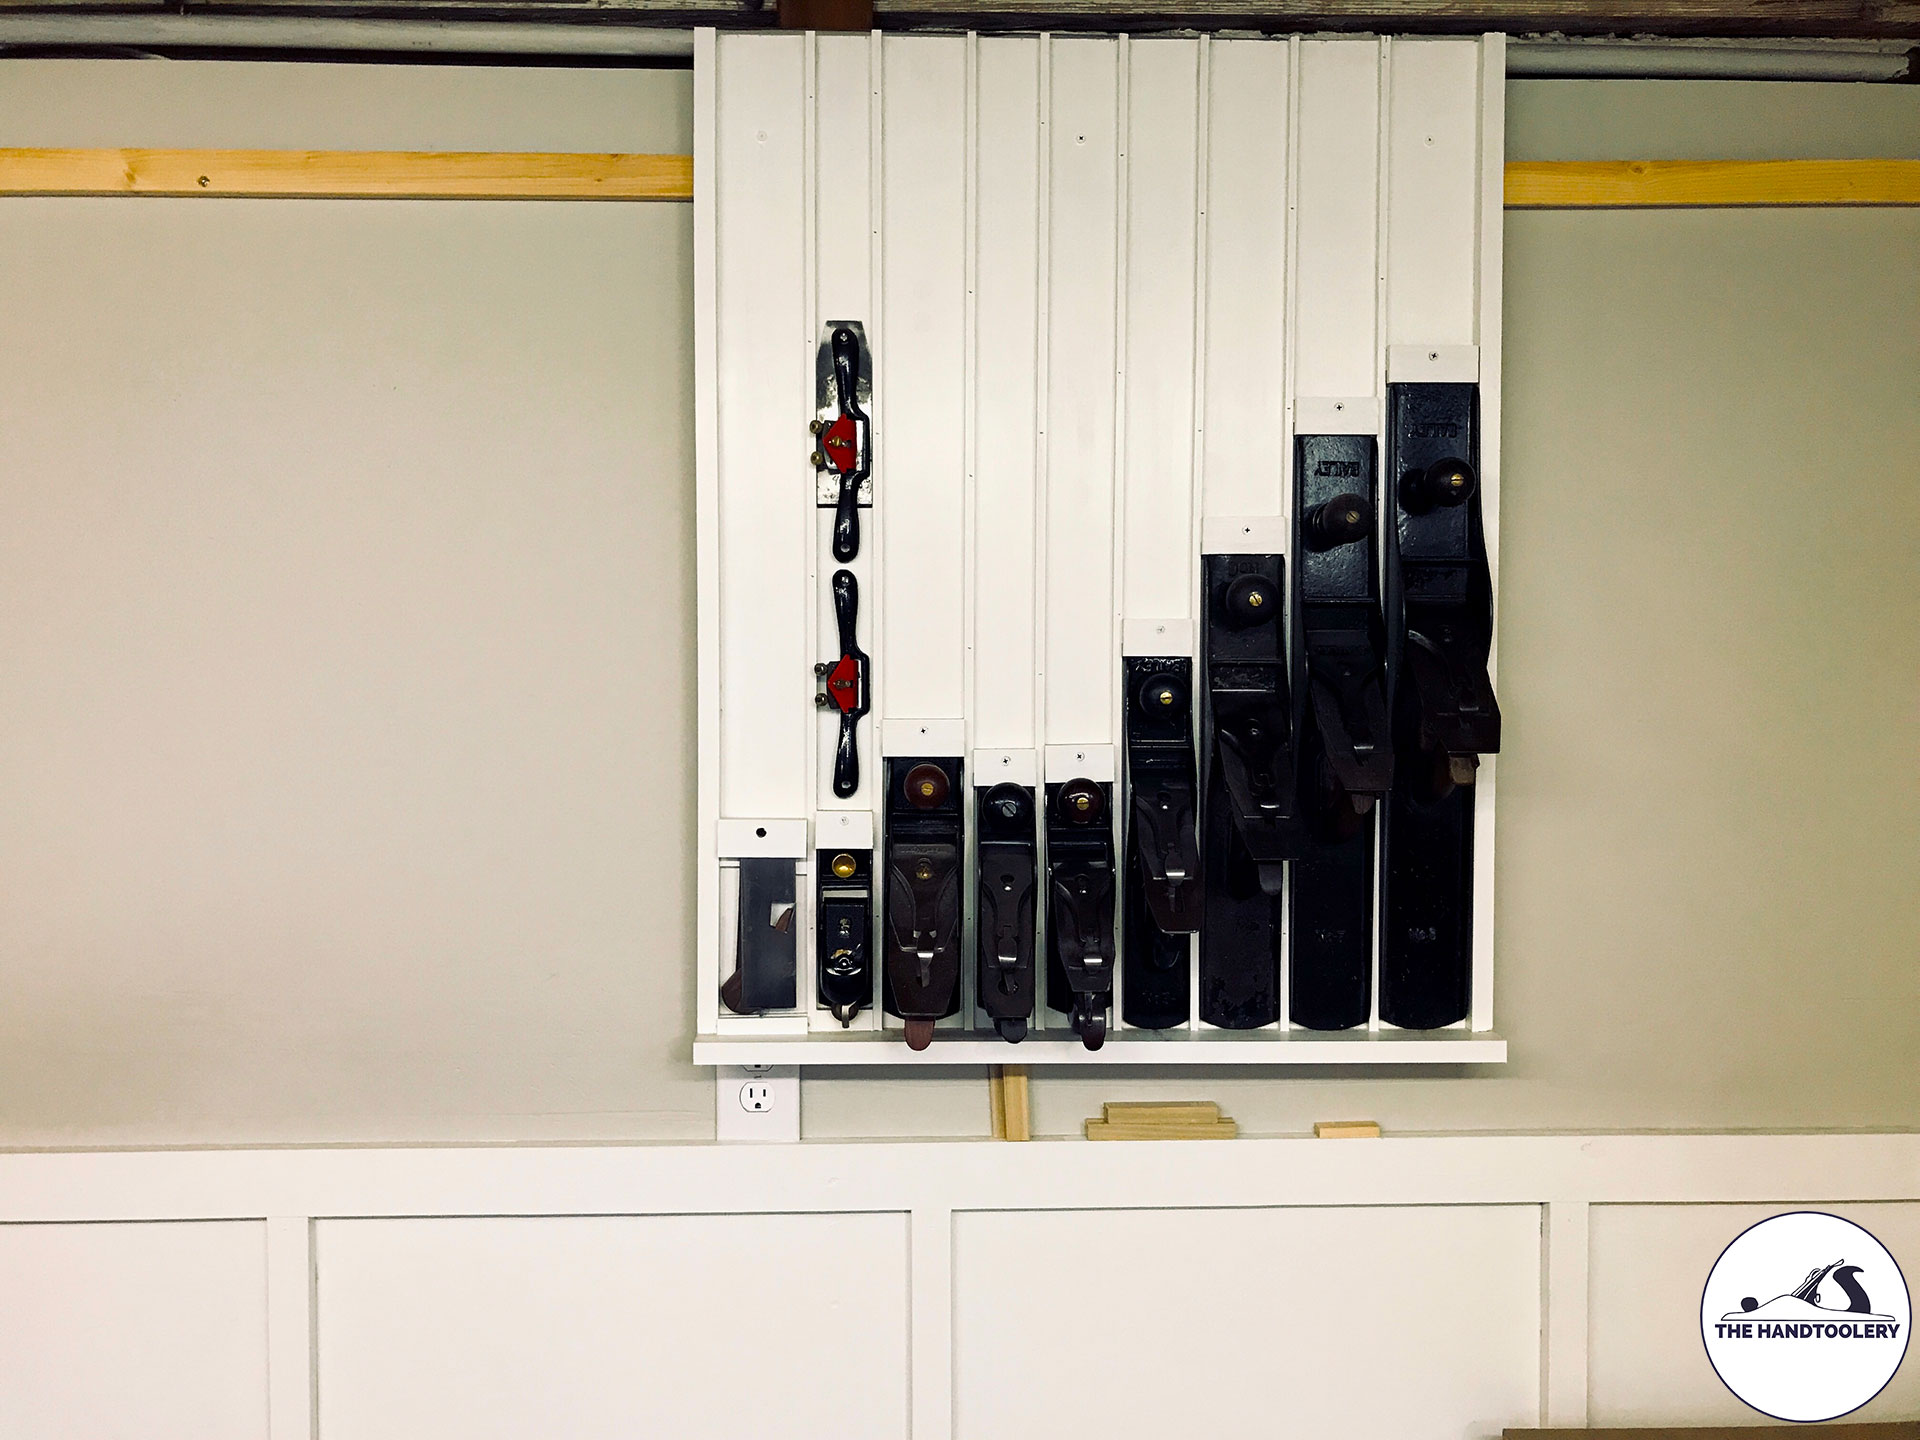
Here is the show-stopper! Just kidding, but yes, I would be pretty upset if that whole thing just fell of the wall. I’ve built the plane till really sturdy, and it hangs on that French cleat you can see at the top. From left to right, I’ve got a shop-made shoulder plane, a Stanley 9 ¼ block plane, two no-name spoke shaves from Ebay above that, a Woodriver 4 ½ (video review here: https://www.youtube.com/watch?v=dtVJuKR9Kj8), a #3c plane (I don’t think it’s a Stanley), and then a Stanley 4c, 5c, 6c, 7c, and 8c. Of the 6, 7, and 8, I go to the 8c the most. I’m absolutely loving the Woodriver 4 ½, and I’d say the Stanley 5c is my most-used plane by far, which is why I’ve upgraded the iron in it. The 4c has become my scrub plane, and you can see me convert its iron to a scrub plane iron in a video here (https://www.youtube.com/watch?v=oHWNXU909wQ). And because you must be wondering, those pieces of wood beneath the plane till are spacers in case I add more planes to the till.
The back-left corner gives you a view of the door that goes to my laundry area! You can also see the work I did when I renovated my shop, putting chair rail and wainscoting up (Shop reno video here: https://www.youtube.com/watch?v=0gW-kYm7t3Y). That little desk is mostly decorative, but it works well for putting my camera tripod on occasion. Also, it’s a good reminder for me, since it was my very first, all hand tools project. Hanging on the wall is my shooting board, and above that are my clamps and my saws. Let’s take a closer look.
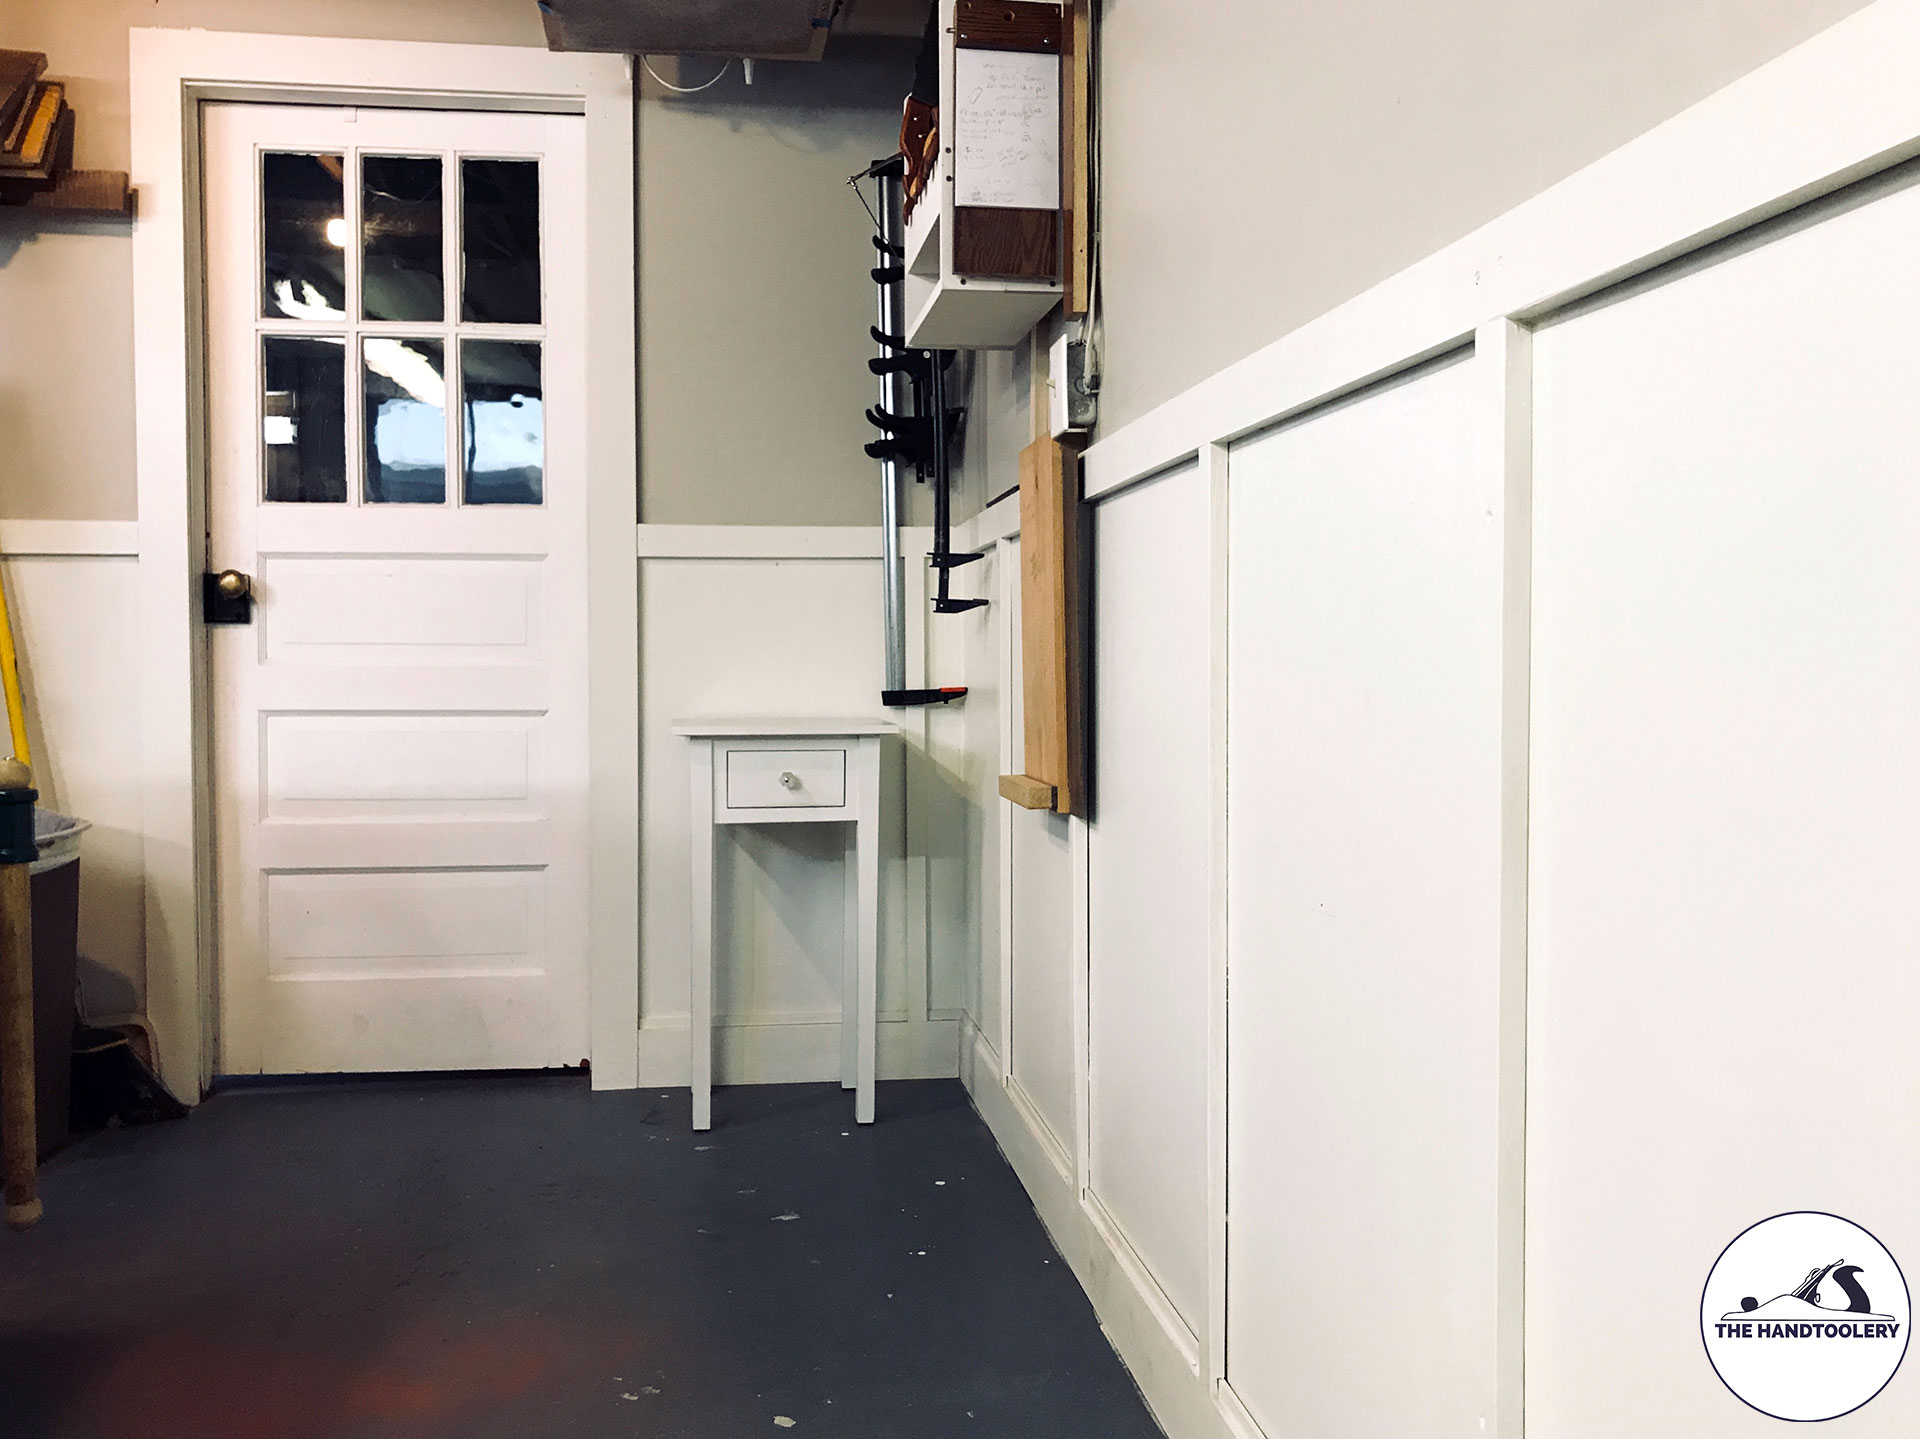
My shooting board is one of the most useful things in my shop. It’s a regular shooting board on one side, and it flips over to be a mitre “box” or fence. I LOVE it. I actually made one last year and gave it away for the Wood by Wright tool build off, and you can see that video here (https://www.youtube.com/watch?v=vCnv_wKh2IY).

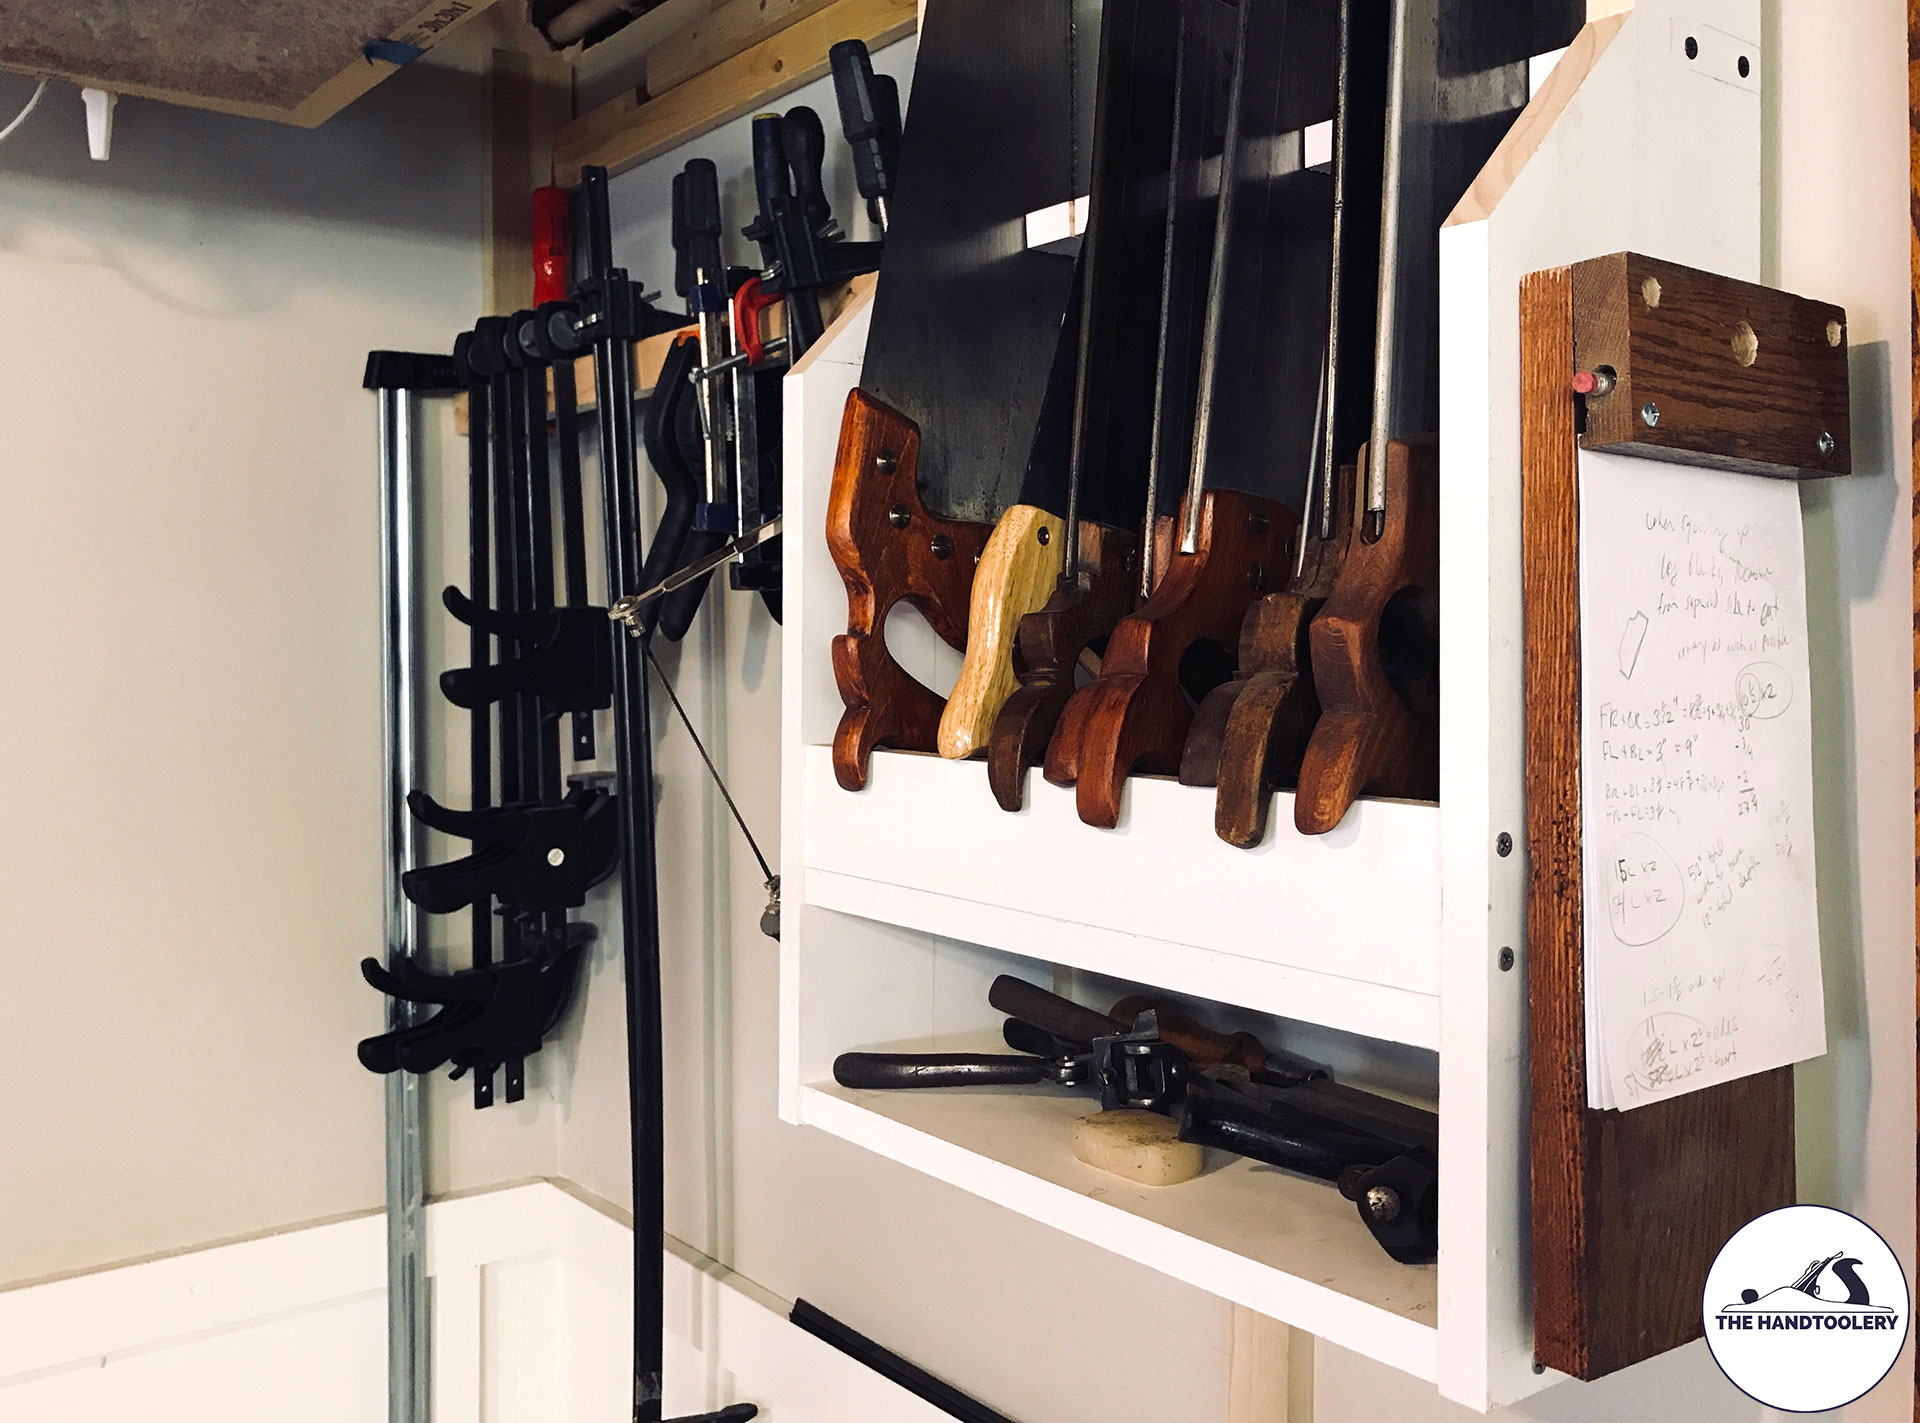
Here you see my no-frills saw till (video here: https://www.youtube.com/watch?v=FiQw9kLnm7U). It’s just made from pre-primed pine with screws and no glue. I needed something ASAP, and this was built-in about 2 hours while my kids were in bed! I’ve got a number of saws for a number of functions, and most of them have been restored by me. I’ve got a course rip saw and a course cross-cut saw. I’ve got a cross-cut tenon and rip tenon saw. I’ve got a cross-cut “carcass” saw and a dovetail saw that I made the handle for, and I’ve got some mitre box saws that I’ve collected along the way. Then, toward the back is where I store my clamps. I hung two side pieces from the French cleat, and connected them with a horizontal board. Then, I hook the clamps over that horizontal board; it works nicely for me.
Here’s my lumber storage area. The top has all my long pieces. The middle is off cuts, organized by species. The bottom is more offcuts and some maple, oak, and cherry I picked up from a cabinet shop that was going out of business. The maple will be the drawer sides for my sideboard.

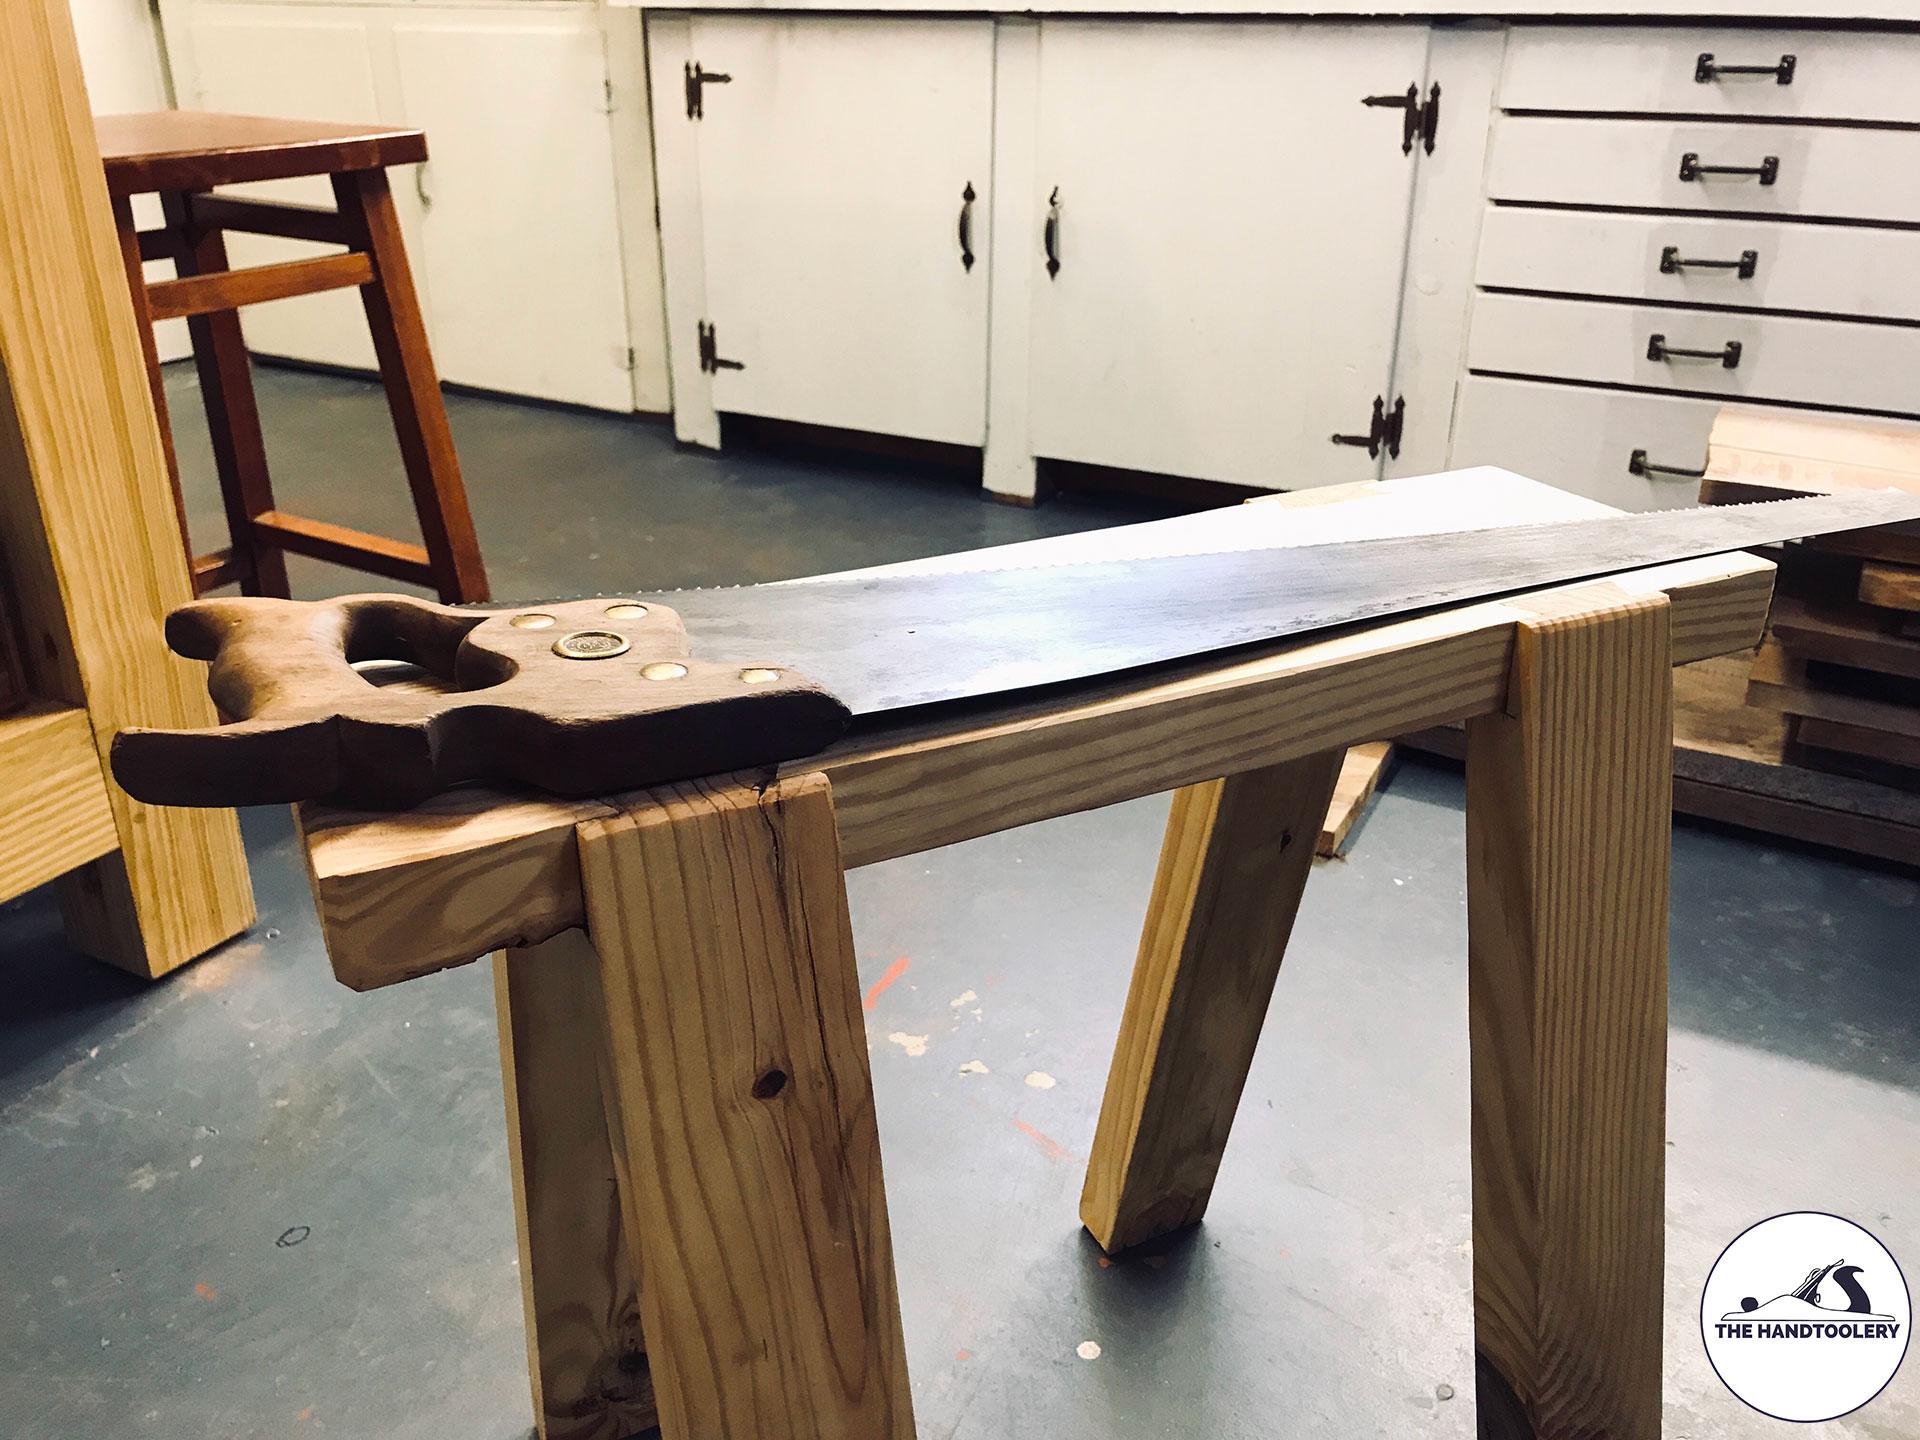
Here’s my scrap wood saw bench with my vintage Disston saw. It has been a game-changer to have a dedicated saw bench. Before I was just being creative when processing stock, but now this bench is getting used all the time.
Here is, without a doubt, my largest-ever project, though it didn’t take me too long to build—maybe 6 weeks working almost entirely by hand. My split-top Roubo bench is a mashup of a number of designs I saw on YouTube and elsewhere on the internet. Making a bench is something you MUST do if you work with hand tools often. I made some 50-page plans for it, for both lefties and right-handed woodworkers, and I’ve sold about 50 of them at my Etsy shop. In total, I spent about $200 on this entire thing, including the hardware, and that’s because I actually made the pinless leg-vise “criss-cross” system myself. I have a tour of that system here (https://www.youtube.com/watch?v=sxmnTWDaOrs) if you’re interested in seeing mine and understanding how these systems work in general, in case you are thinking about building you own!
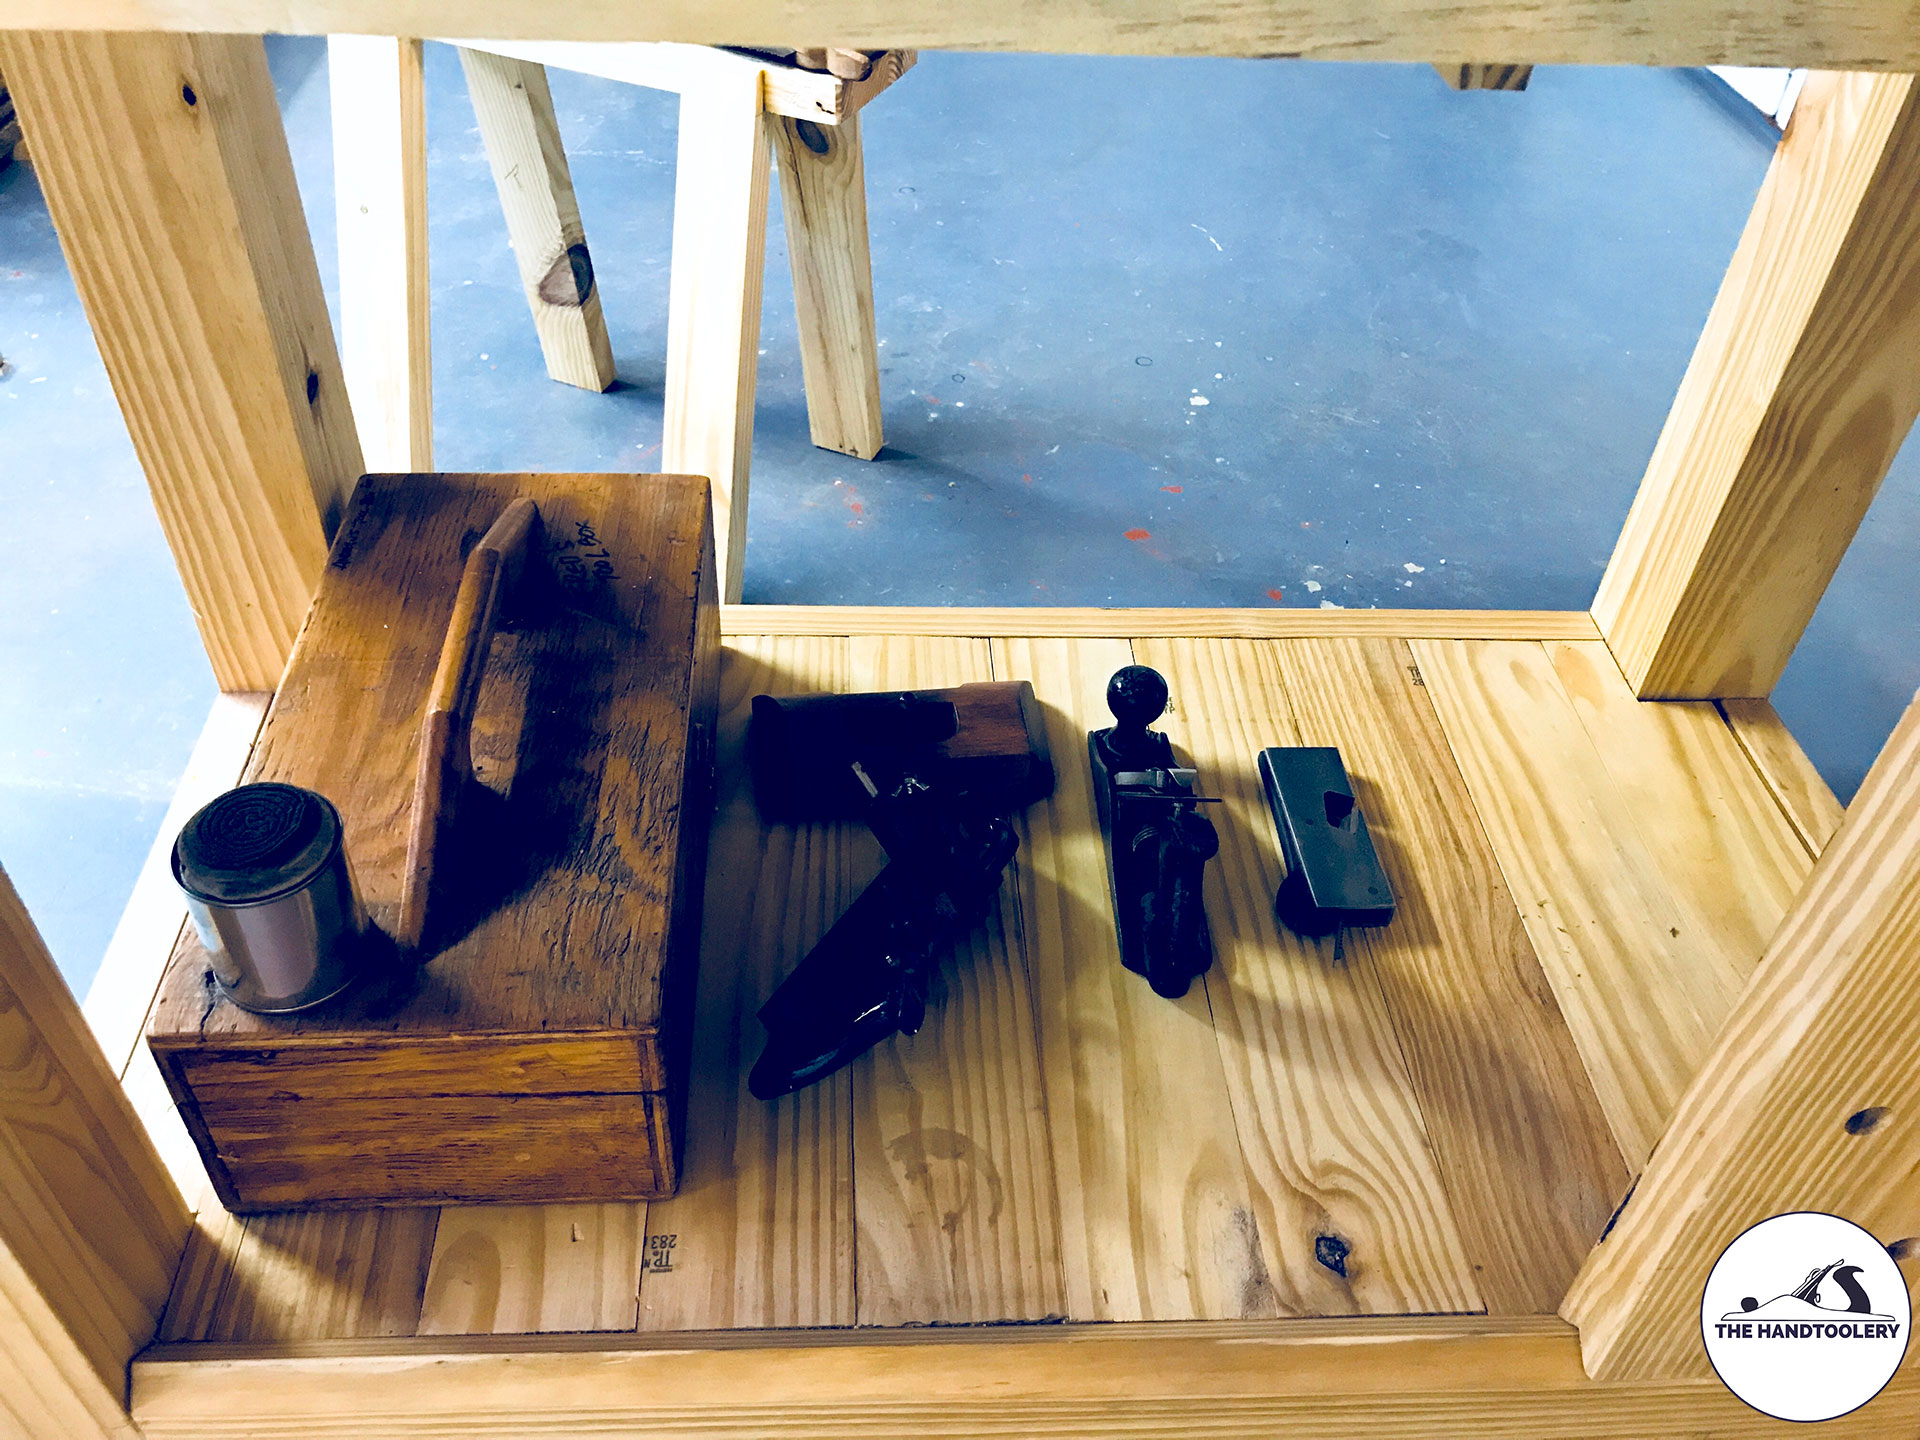
Here is the view underneath my workbench. The box—which was my grandfather’s—has my brace and bits, as well as my egg beater drill. I’ve got my oil rag for lubricating my planes. I’ve also got my shop-made router plane, toward the back, a Stanley 78 rabbet plane, a Stanley 3, and a second shop-made shoulder plane (video here: https://www.youtube.com/watch?v=puV4DG-Wptc).
Here is that Stanley #3 on top of my bench. I wanted to end the tour by saying thanks again to Jay and to all of you who joined me on this tour! Also, I do hope you think about subscribing to my channel, The HandToolery, because I’m putting out regular content and have some great content coming! Soon enough, should be at the 10,000 subs mark, and when I hit 10,000, I will give away this Stanley #3 in a giveaway, so stay tuned!

Thanks again for visiting my shop! Don’t forget to subscribe on YouTube, and follow me on social media. Hope this has been enjoyable, and I’ll see you around!
YouTube: https://www.youtube.com/channel/UC33RmG_ubJcNF7k474XLssg
Etsy: https://www.etsy.com/shop/TheHandToolery
Instagram: @thehandtoolery (https://www.instagram.com/thehandtoolery/)
Facebook: https://www.facebook.com/TheHandToolery

")

Outstanding! Your shop is not only practical but it is simply laid out. Thanks for the grand tour. I would like to see your
‘HANDS’ used for all this ‘Hand-Toolery’.
Jay, Thanks for the tour, great shop.
I used to use a lot of hand tools, but 10 years ago I had a stroke and lost my left side. As I was left handed, I was screwed. It took a few years after learning how to walk again the stroke to attempt to work with my tools. Today, I only make small projects, and I use very few hand tools. I still love to go out to the back and tinker, but large projects are out.
I love to watch you guys ( yourself and Wanndell, and even Izzy, doing your thing. Keep it up.
Thank you for the tour – well structured shop for the way you work. Have not had a chance to click through some of the links provided but will this week. Looking forward to viewing some of the projects discussed. Thank you.
Cool shop! Enjoyed seeing how you had it all set up!