Having a workbench is half the battle. Having a way to hold material to a workbench is the other half. In my last article and video I made a workbench out of hickory. I chose hickory because I got a bunch of it really cheap last year. By a bunch I mean over a thousand board feet of it and by really cheap I mean $350 for the entire bundle. There was more than a thousand board feet but just to make things easy lets just say the hickory cost 35 cents per board foot. That’s less than half the price for me to go to my local home center and buy construction grade southern yellow pine. Pretty crazy, right?
The hickory workbench was based upon my southern yellow pine workbench that I built a couple of years ago (I still love it. It’s not going anywhere). Same design, very similar dimensions. And in this article and video I’ll show another way to make the same leg vise design. A leg vise is simple; a large screw pulling a large block of wood (chop) closer to the workbench and therefore pinching something between the large block of wood (chop) and the workbench. But there is one more necessary feature to a leg vise. Something needs to stop the lower part of the workbench from racking inward when an object is being clamped near the top of the vise. The most simple solution is to put something of the same width that is being clamped on top between the bottom of the chop and the bottom of the workbench. A tiny step above that is a simple wedge that you can kick back and forth. Nothing complicated…just a wedge.
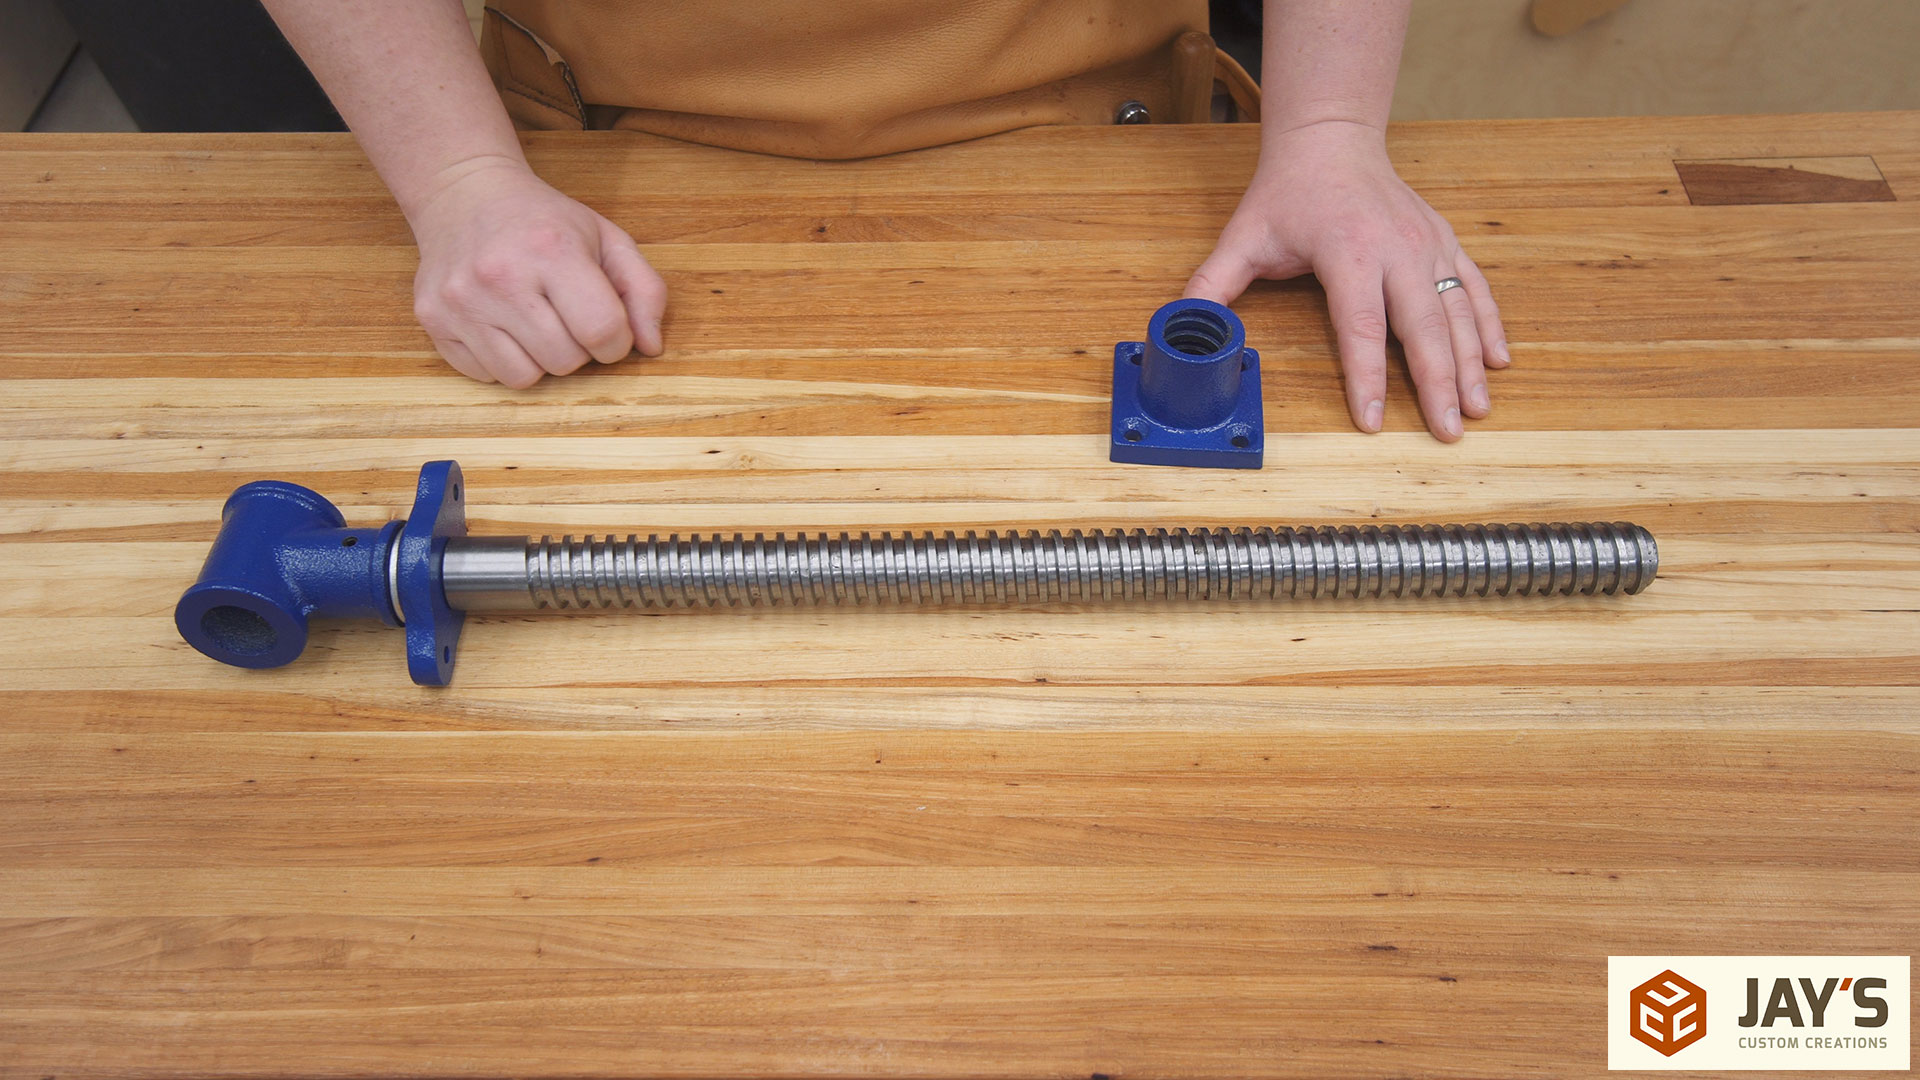
The difference between the leg vise on my pine workbench and my more recent hickory workbench is the hardware. The hardware on the pine workbench is a completely DIY approach. The screw is a scaffold leveling leg, a large washer is split in half to be used as a garter, and the wooden hub and handle were both turned on a lathe. It’s an inexpensive but simple setup that does require a bit of work before you can even install it. It works great. No complaints. But a lot of people have asked for a method to make a leg vise without the use of a lathe. Sure, no problem. Simply buy a screw made for a vise. That’s the route I went with the hickory leg vise.
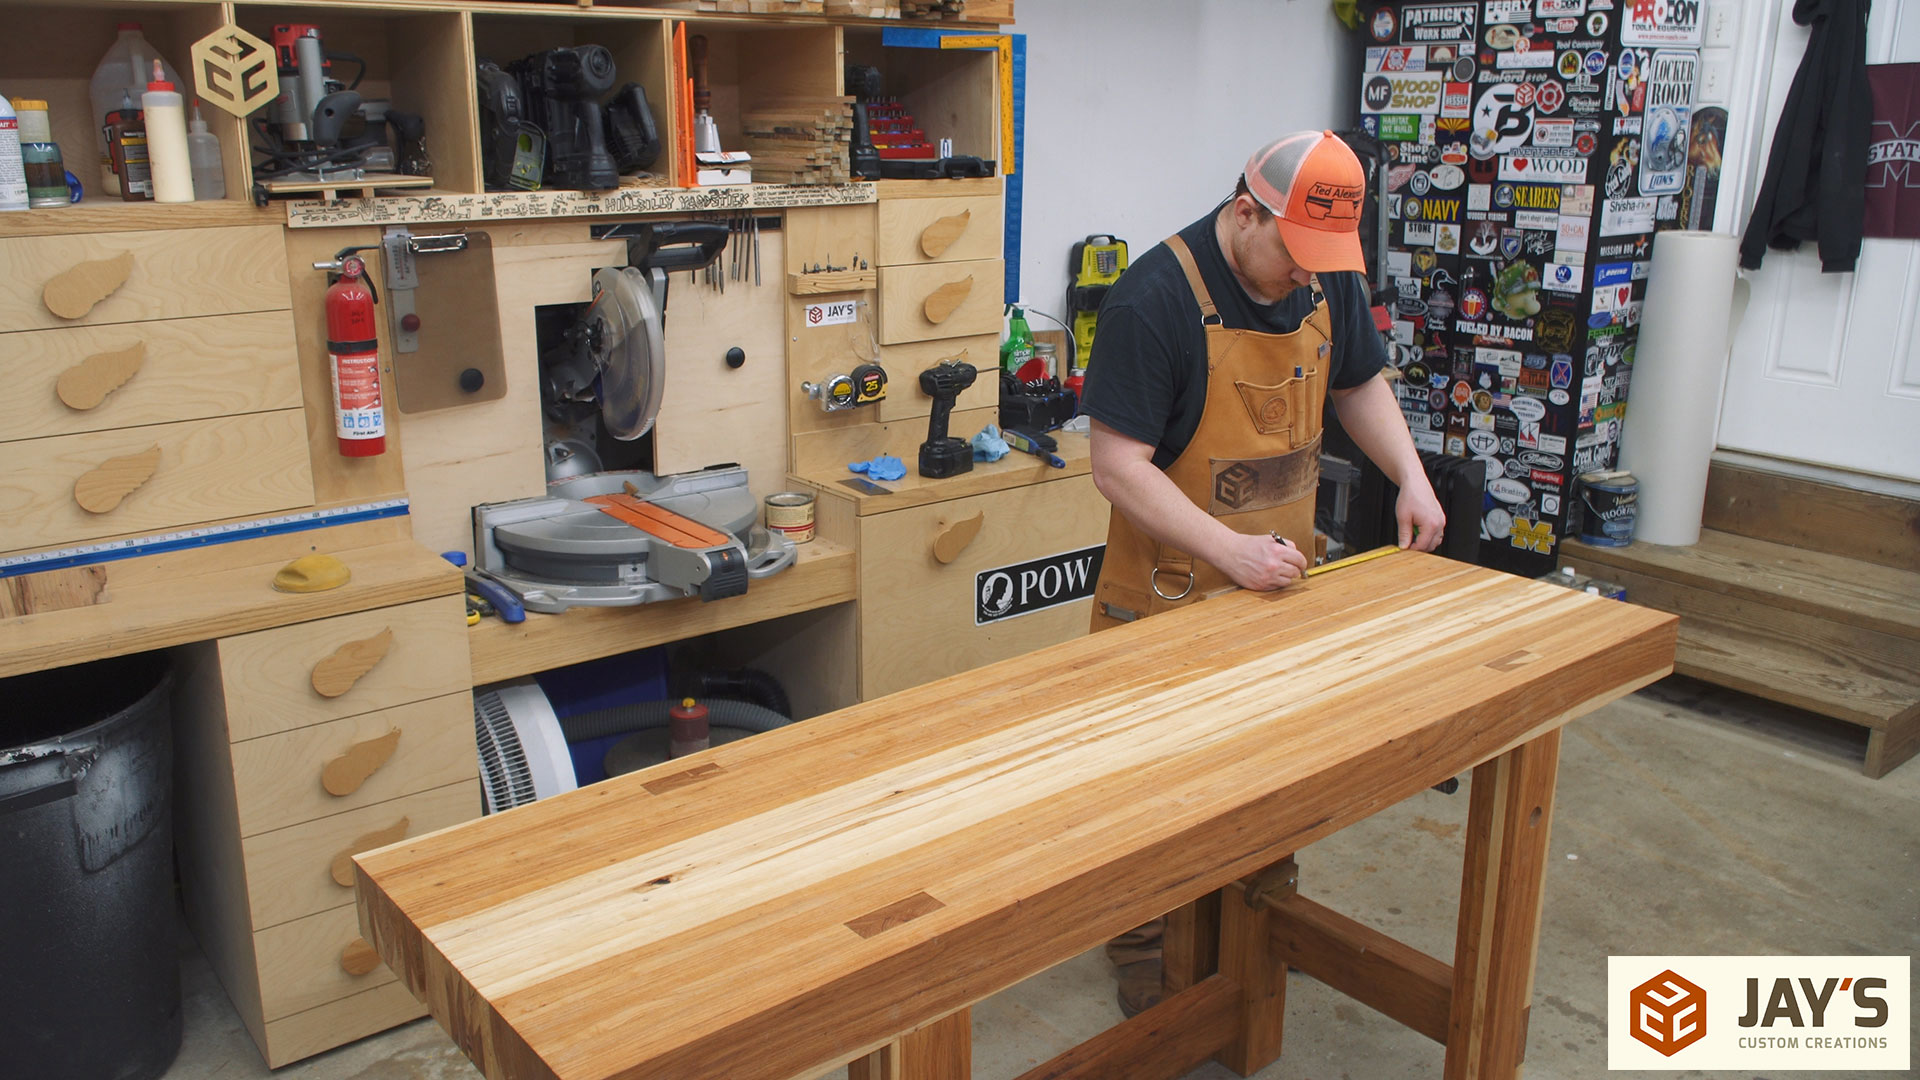
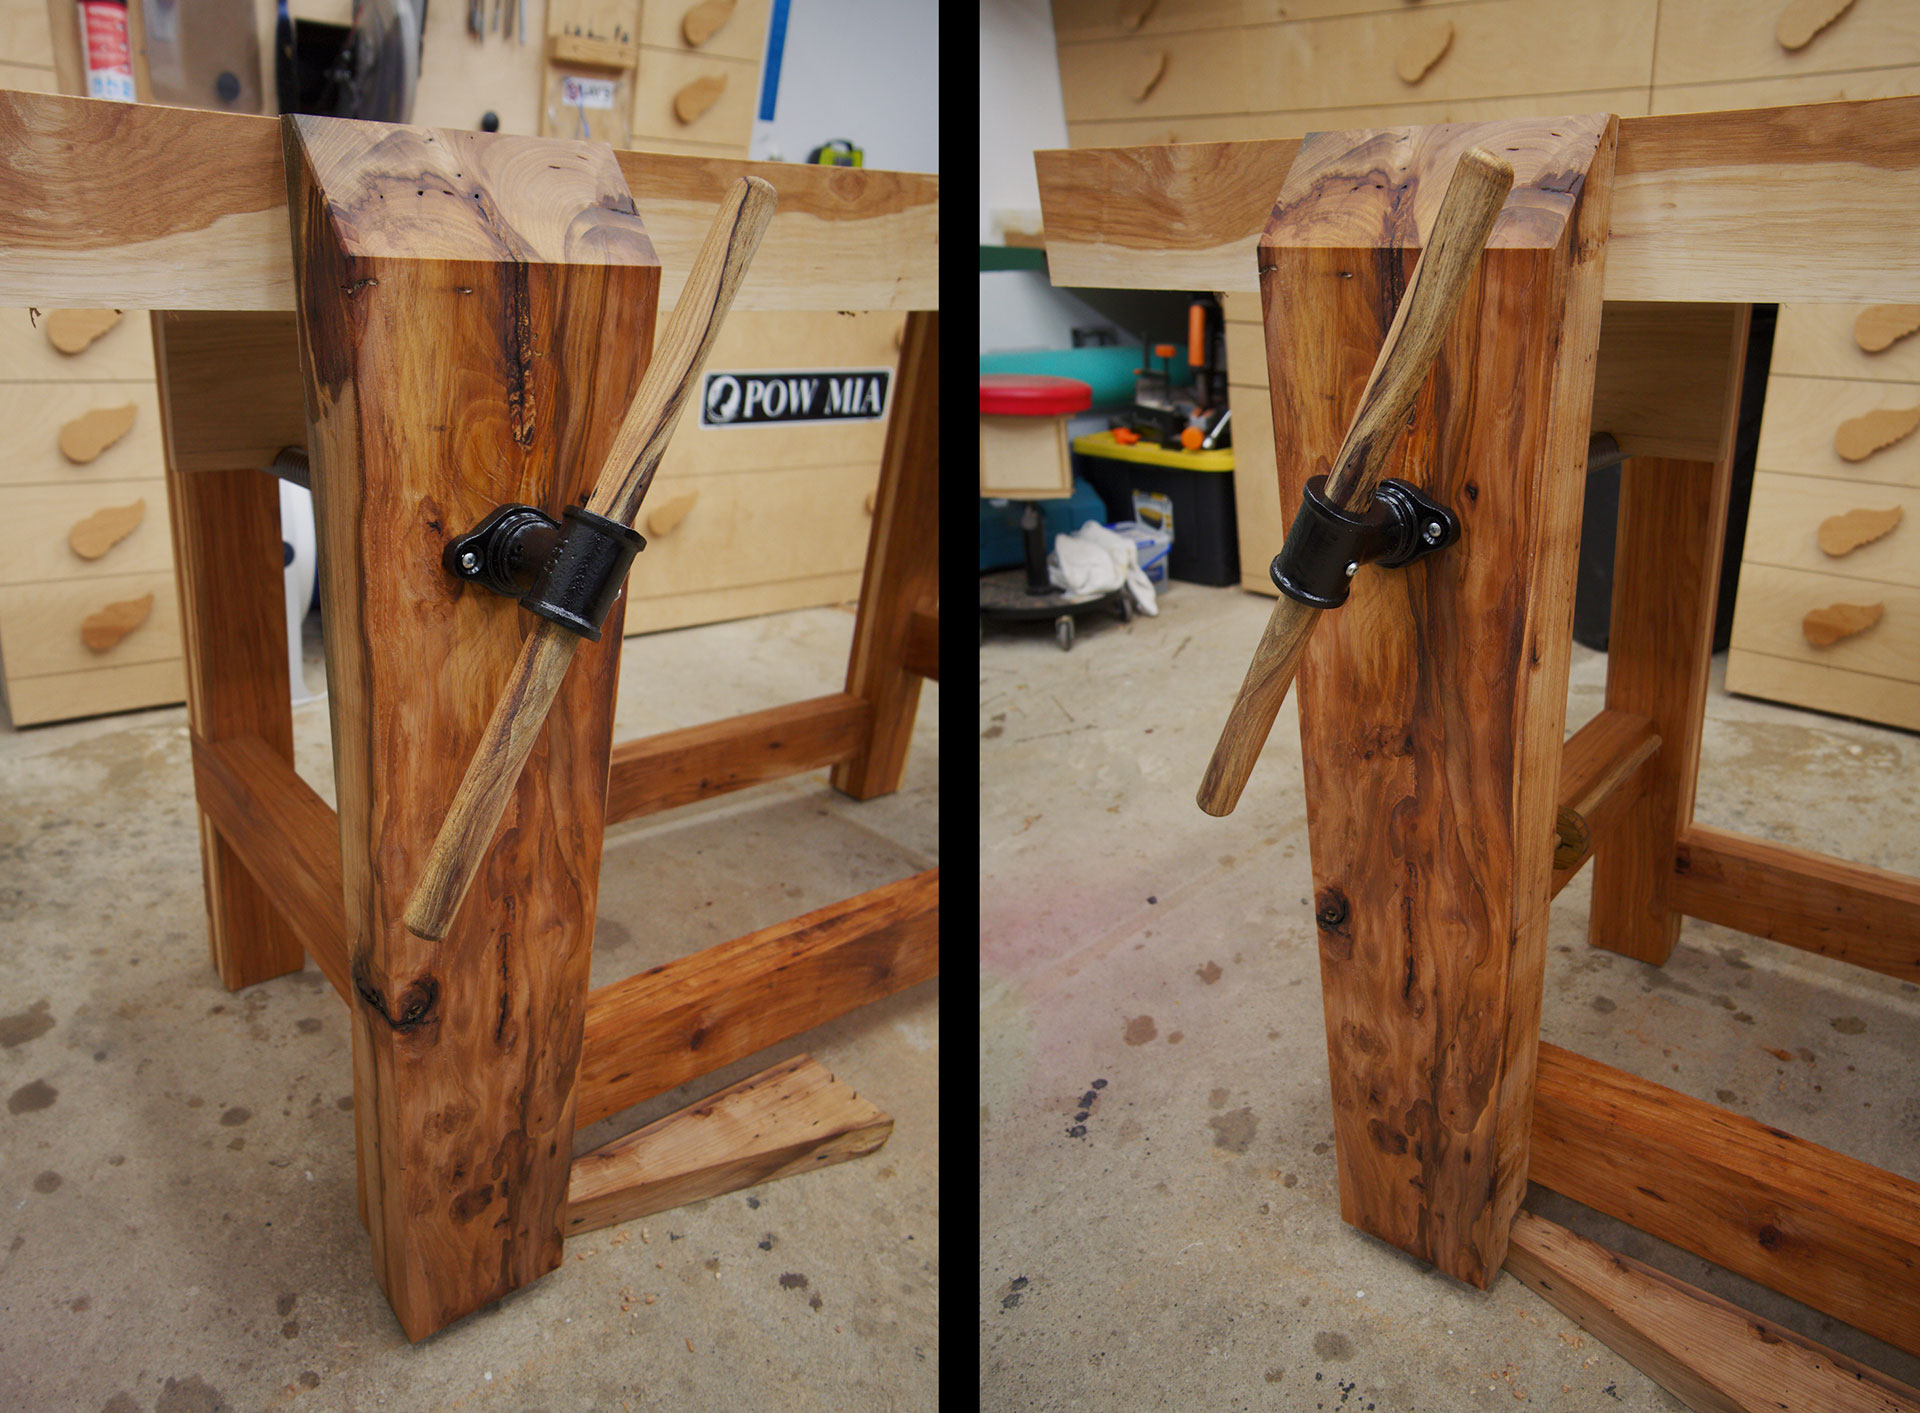
Here’s a shot of the operator side of my pine workbench. The vise handle is pinned in the middle, which I prefer, and the wedge on the floor is still in use. It’s simple and guaranteed to never fail. Right above the wedge you can see a horizontal piece of oak that goes under the front rail and references against the side of the leg. That prevents the chop from rotating clockwise when tightening. It works great but it needs to be relocated because it gets in the way when I’m trying to pull the wedge back.

This is the inexpensive screw I picked up. It costs about twice as much as the materials cost for the DIY scaffold leg vise option from the first bench but there is no time invested in making it. Buy it, wait patiently by the door for the mail man, unbox, install. It’s the easy button.
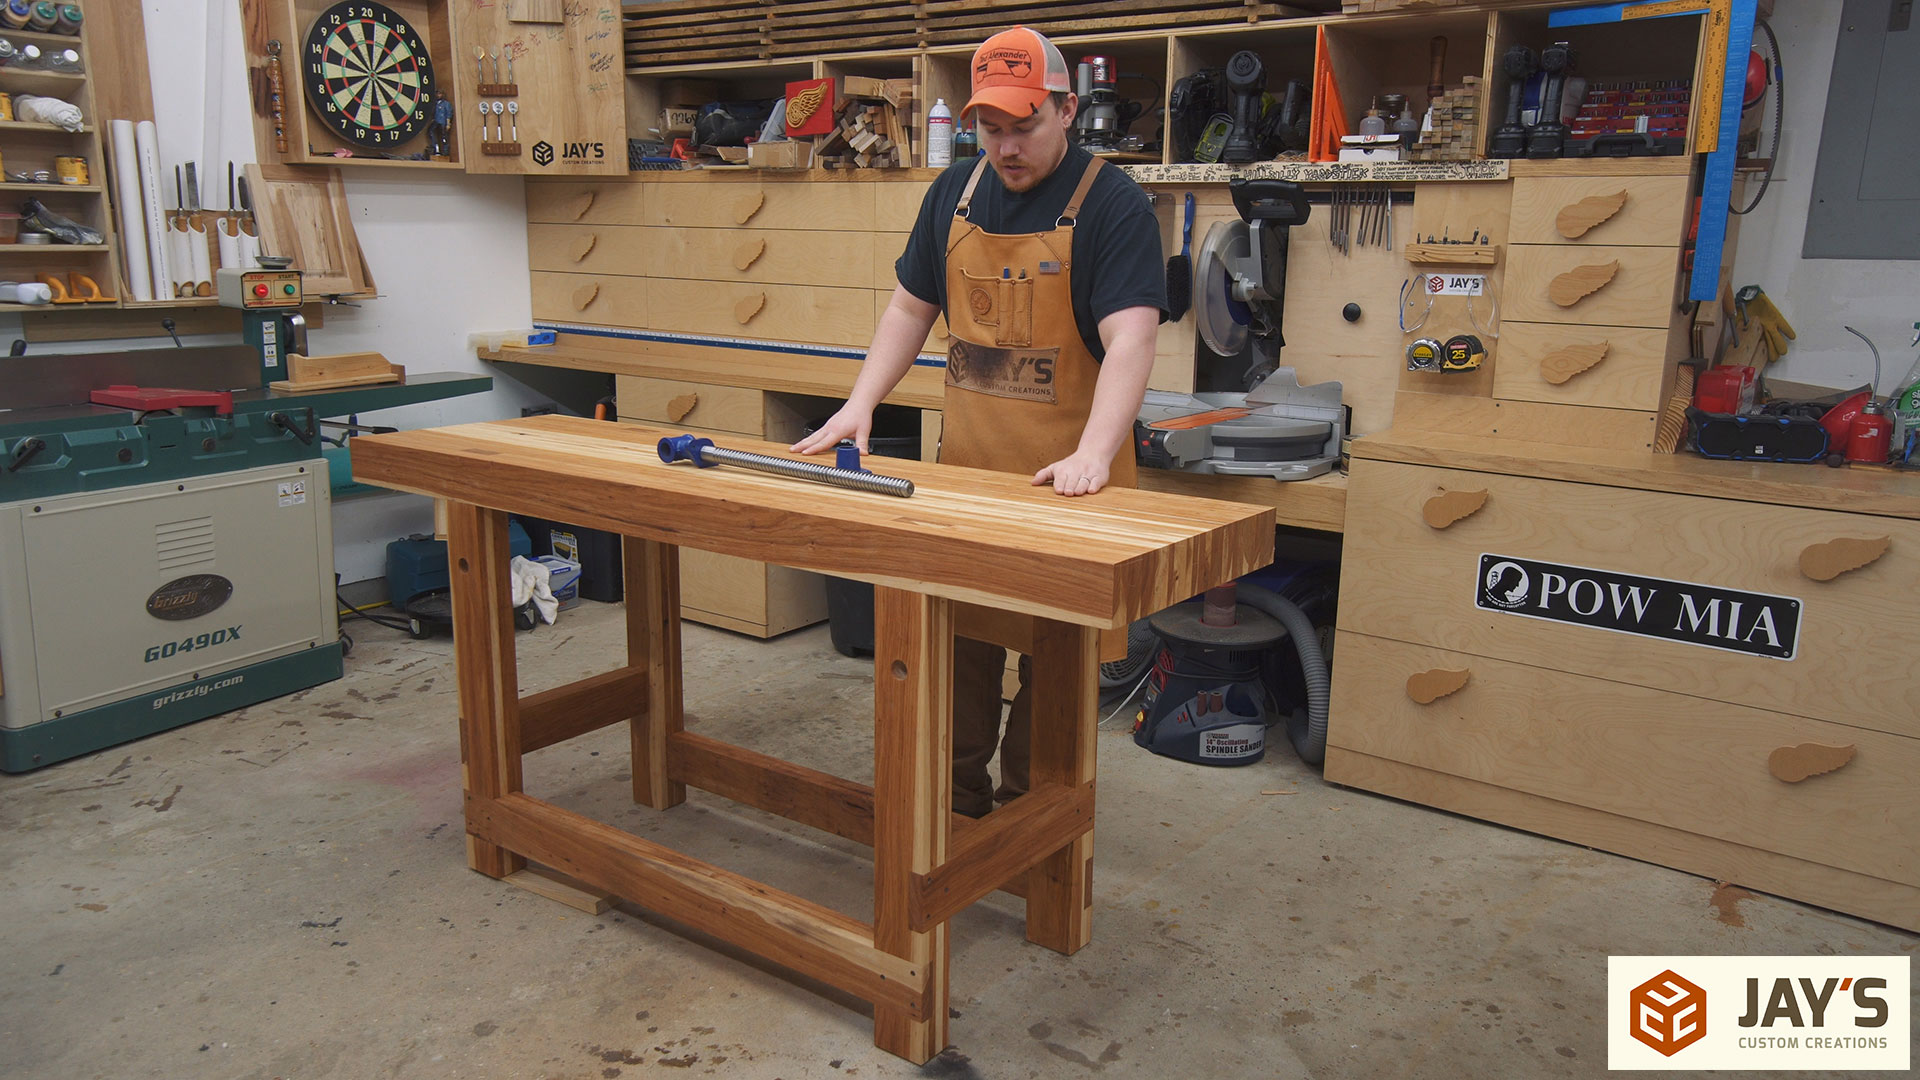
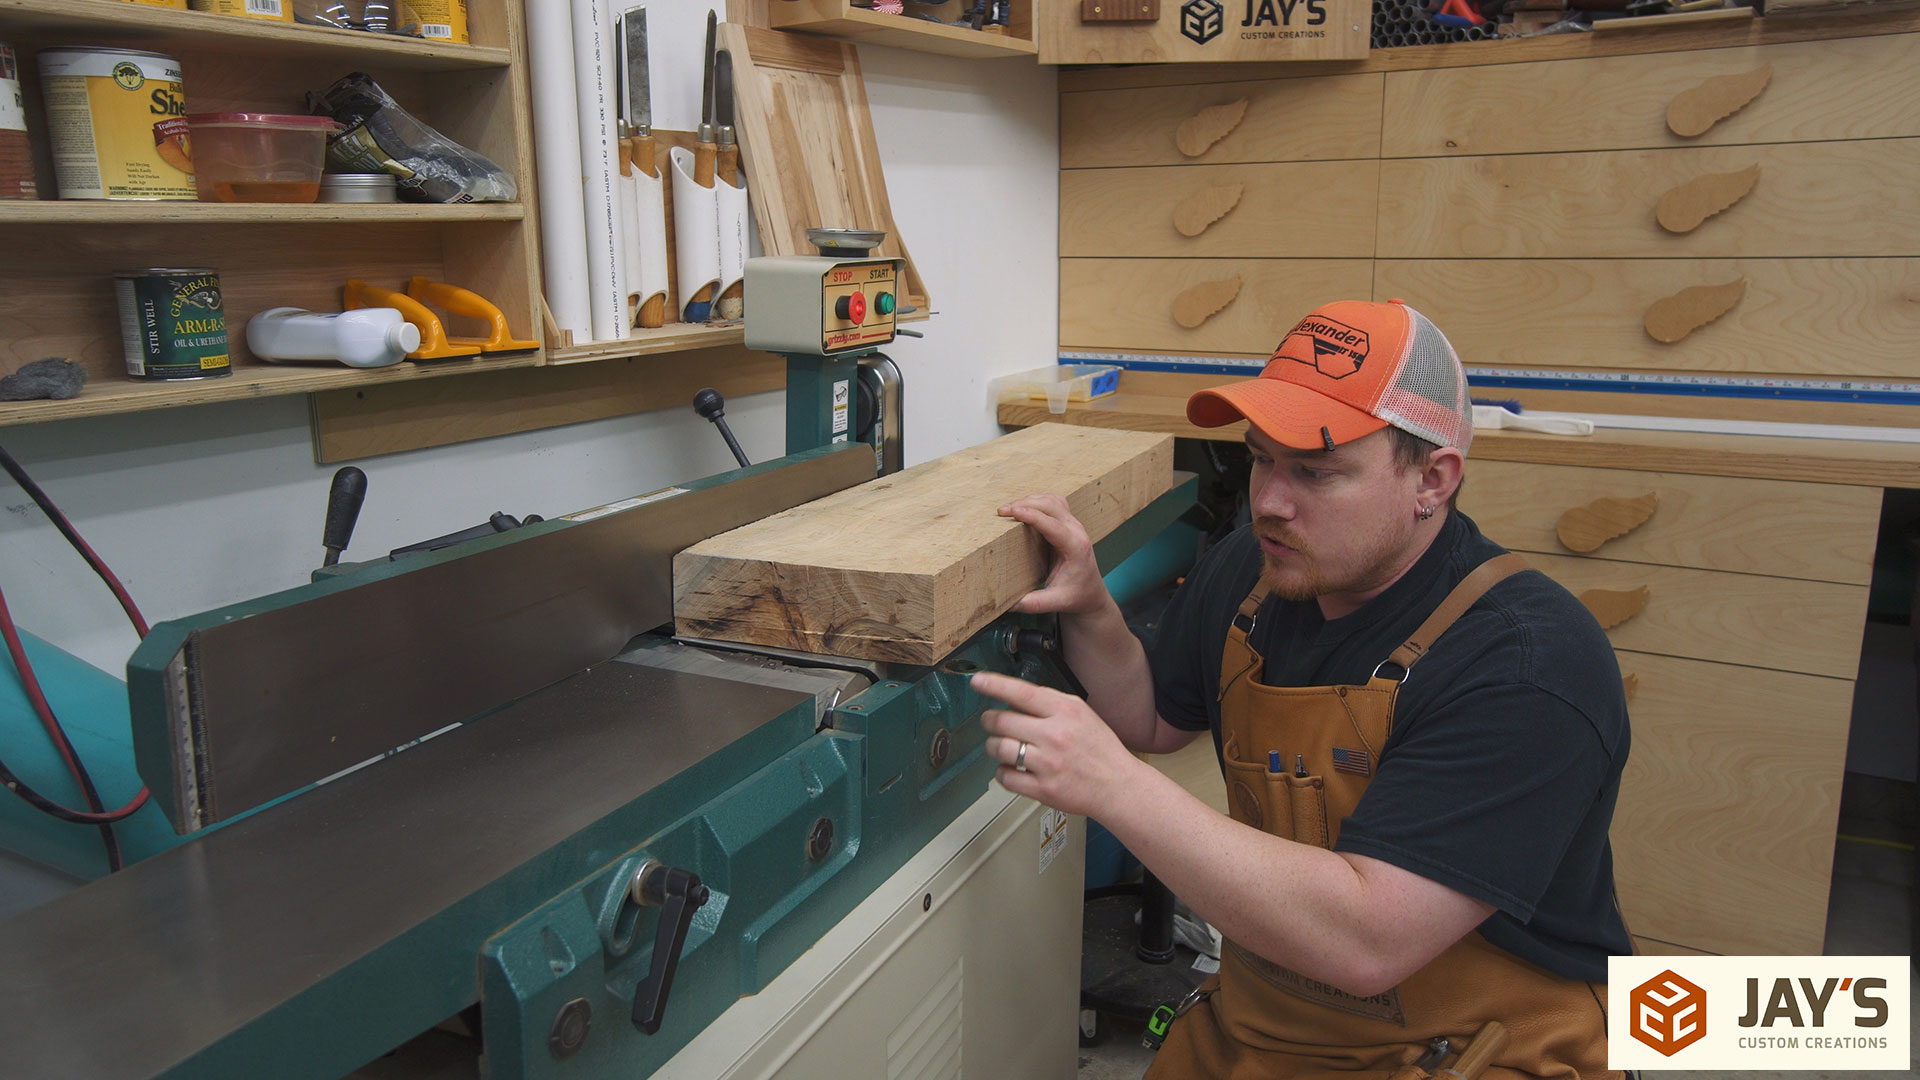
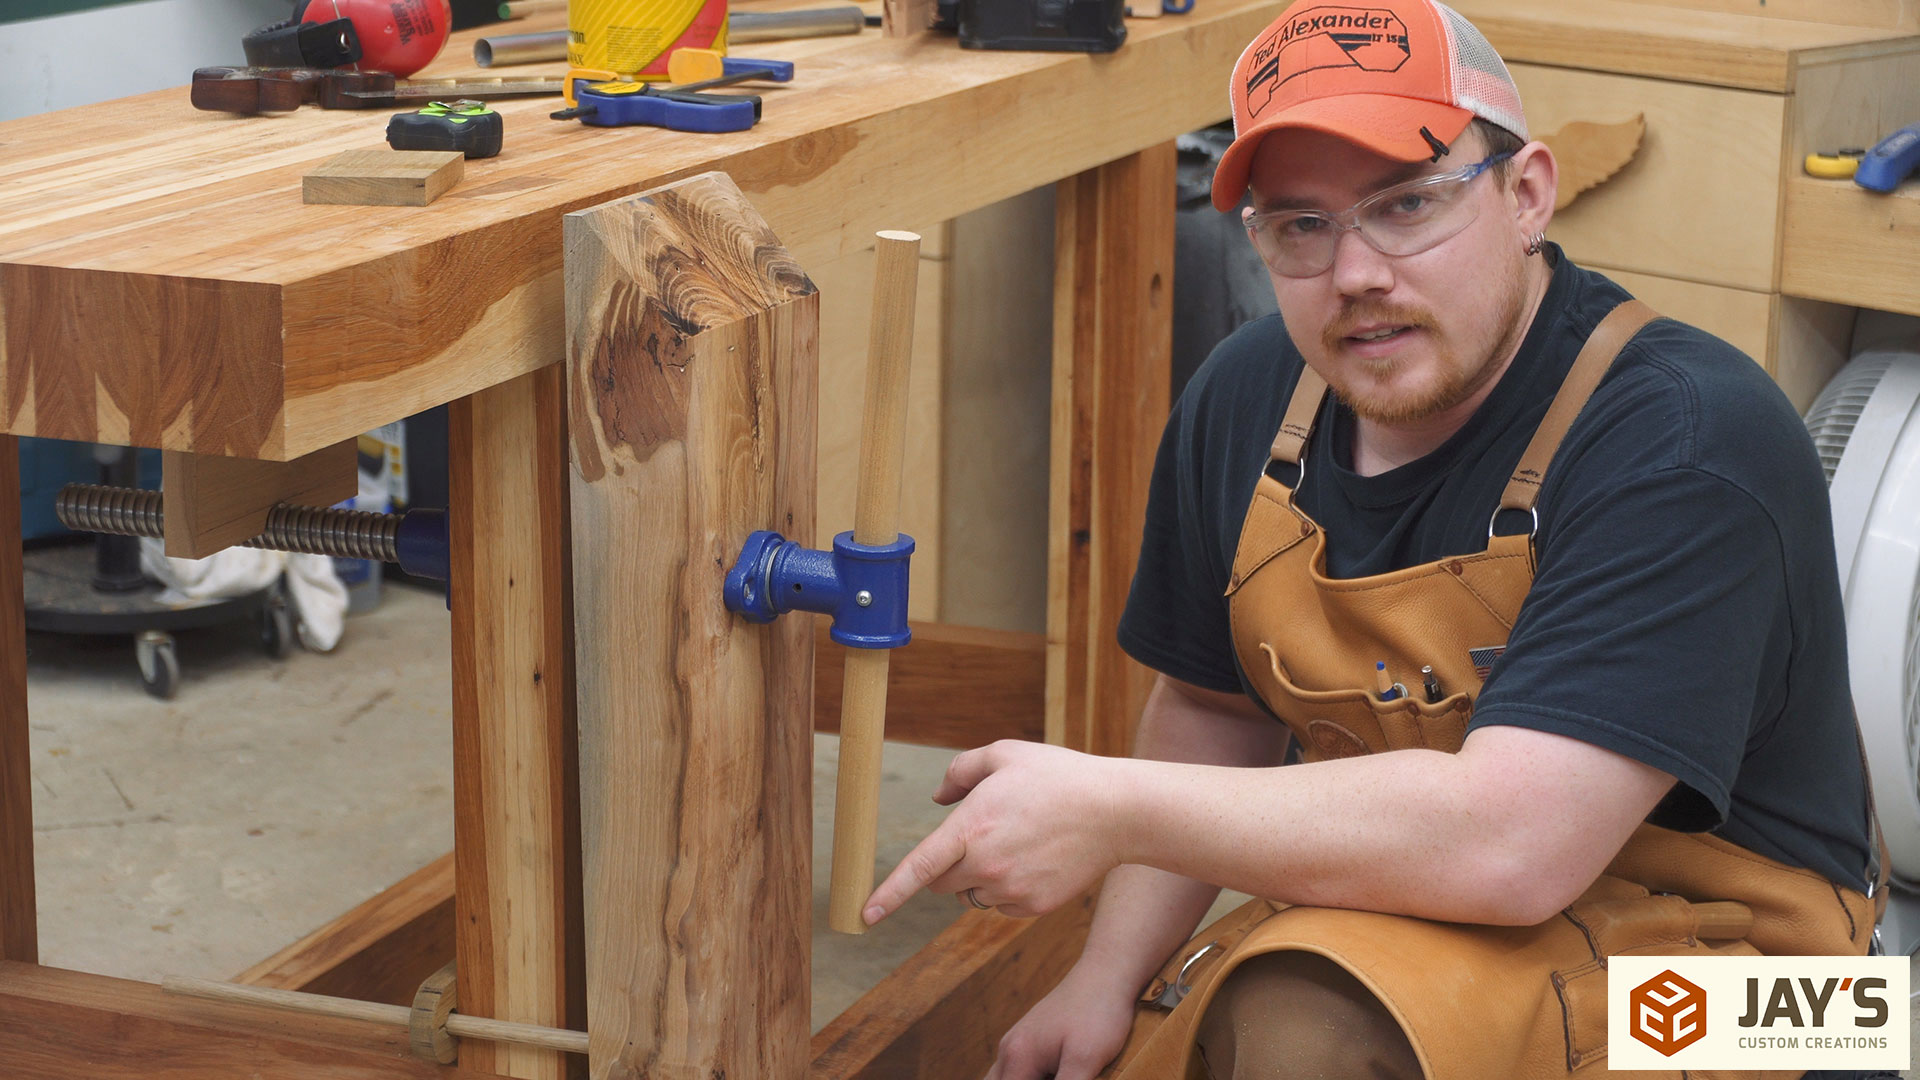
And here is the workbench I’ll be installing it on. When making the bench I drilled a leg vise hole in each one of the legs to allow future flexibility for whoever may get this bench after me (if I sell it). In this case I’ll be installing it on the leg where my left hand is. The side of the bench that the camera can see is the more visually interesting side anyway.
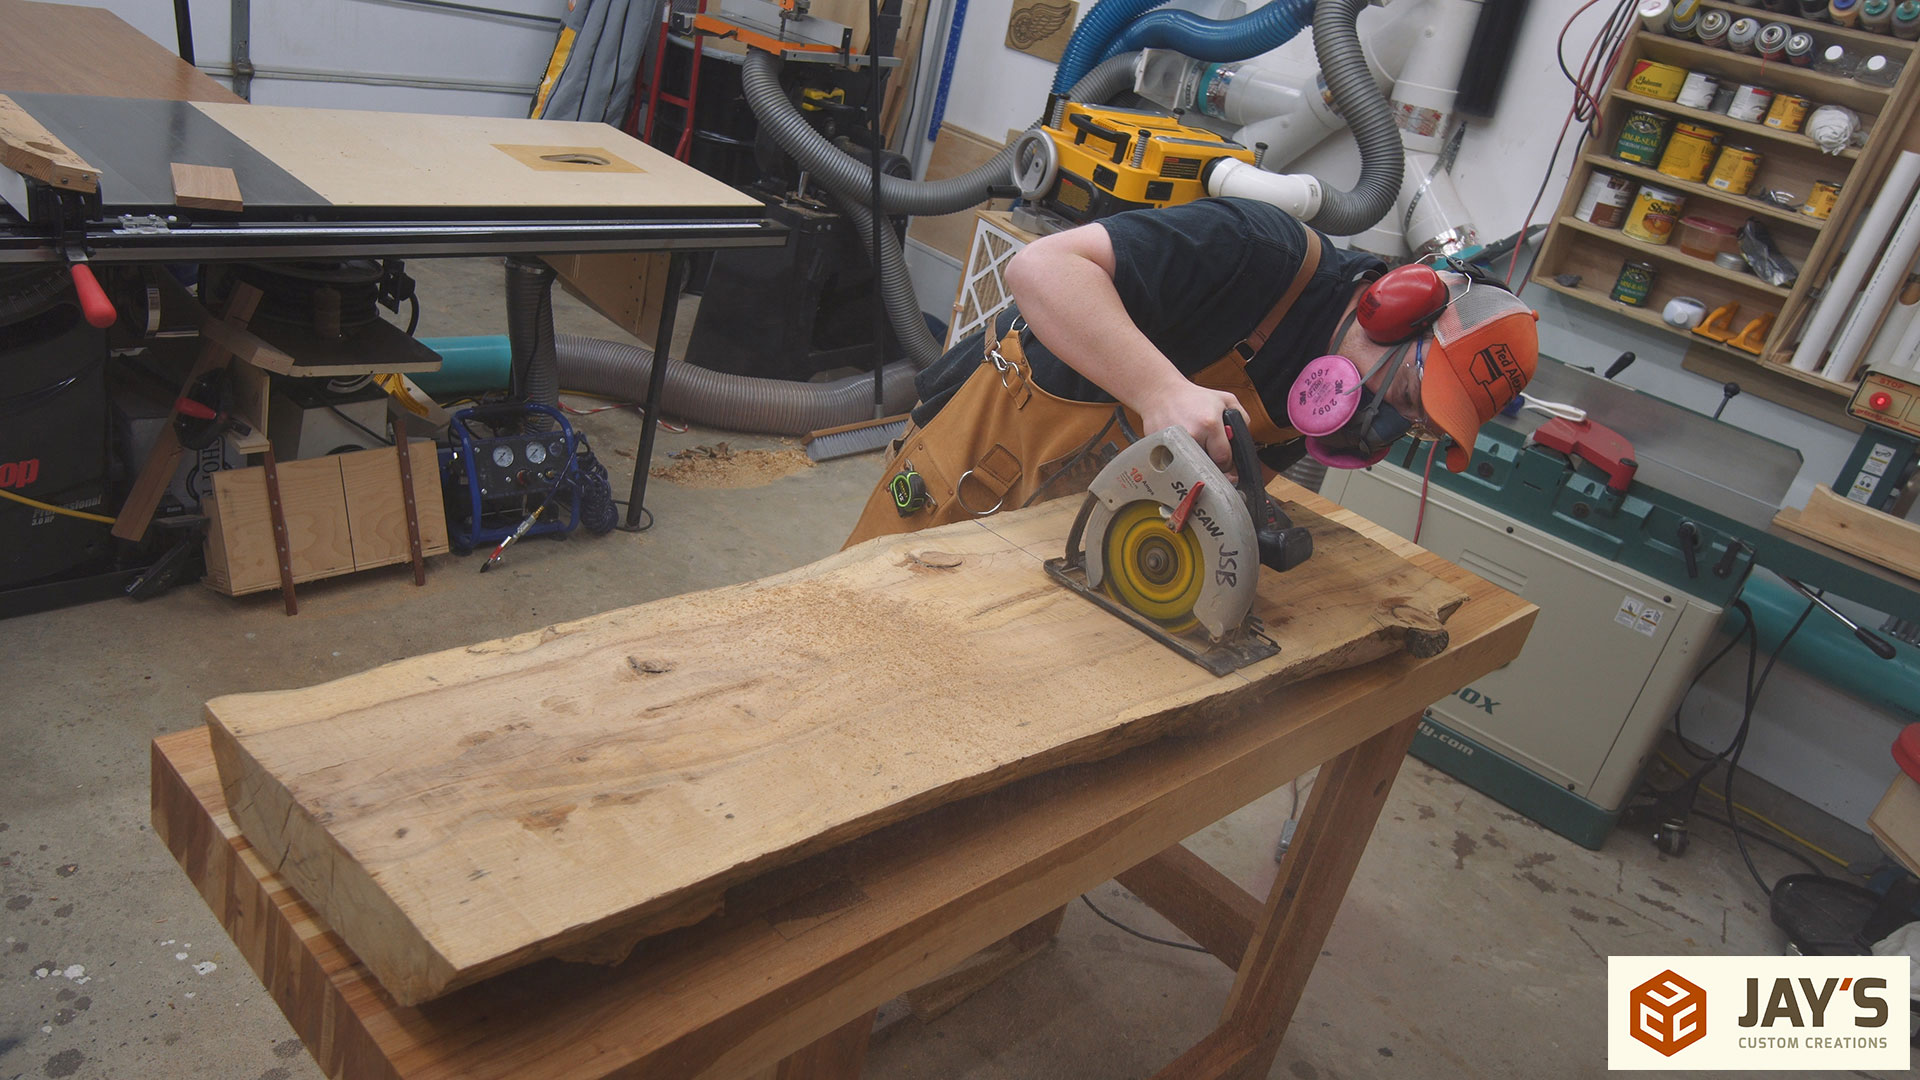
A year or two ago I had the idea to make a set of living room tables out of hickory. That ship has sailed though. My wife got different living room furniture and there simply isn’t any room for end tables. Just enough room for a small coffee table. But when I had those previous plans my friend Shawn gave me a slab of hickory for the legs of the tables. I actually forgot all about it and was about to glue up a three-piece blank when Shawn reminded me I had it tucked away in the corner of my shop. I always start milling with a crosscut and this one was a bit too long for my miter saw. So I used my circular saw to get a slightly oversized length.
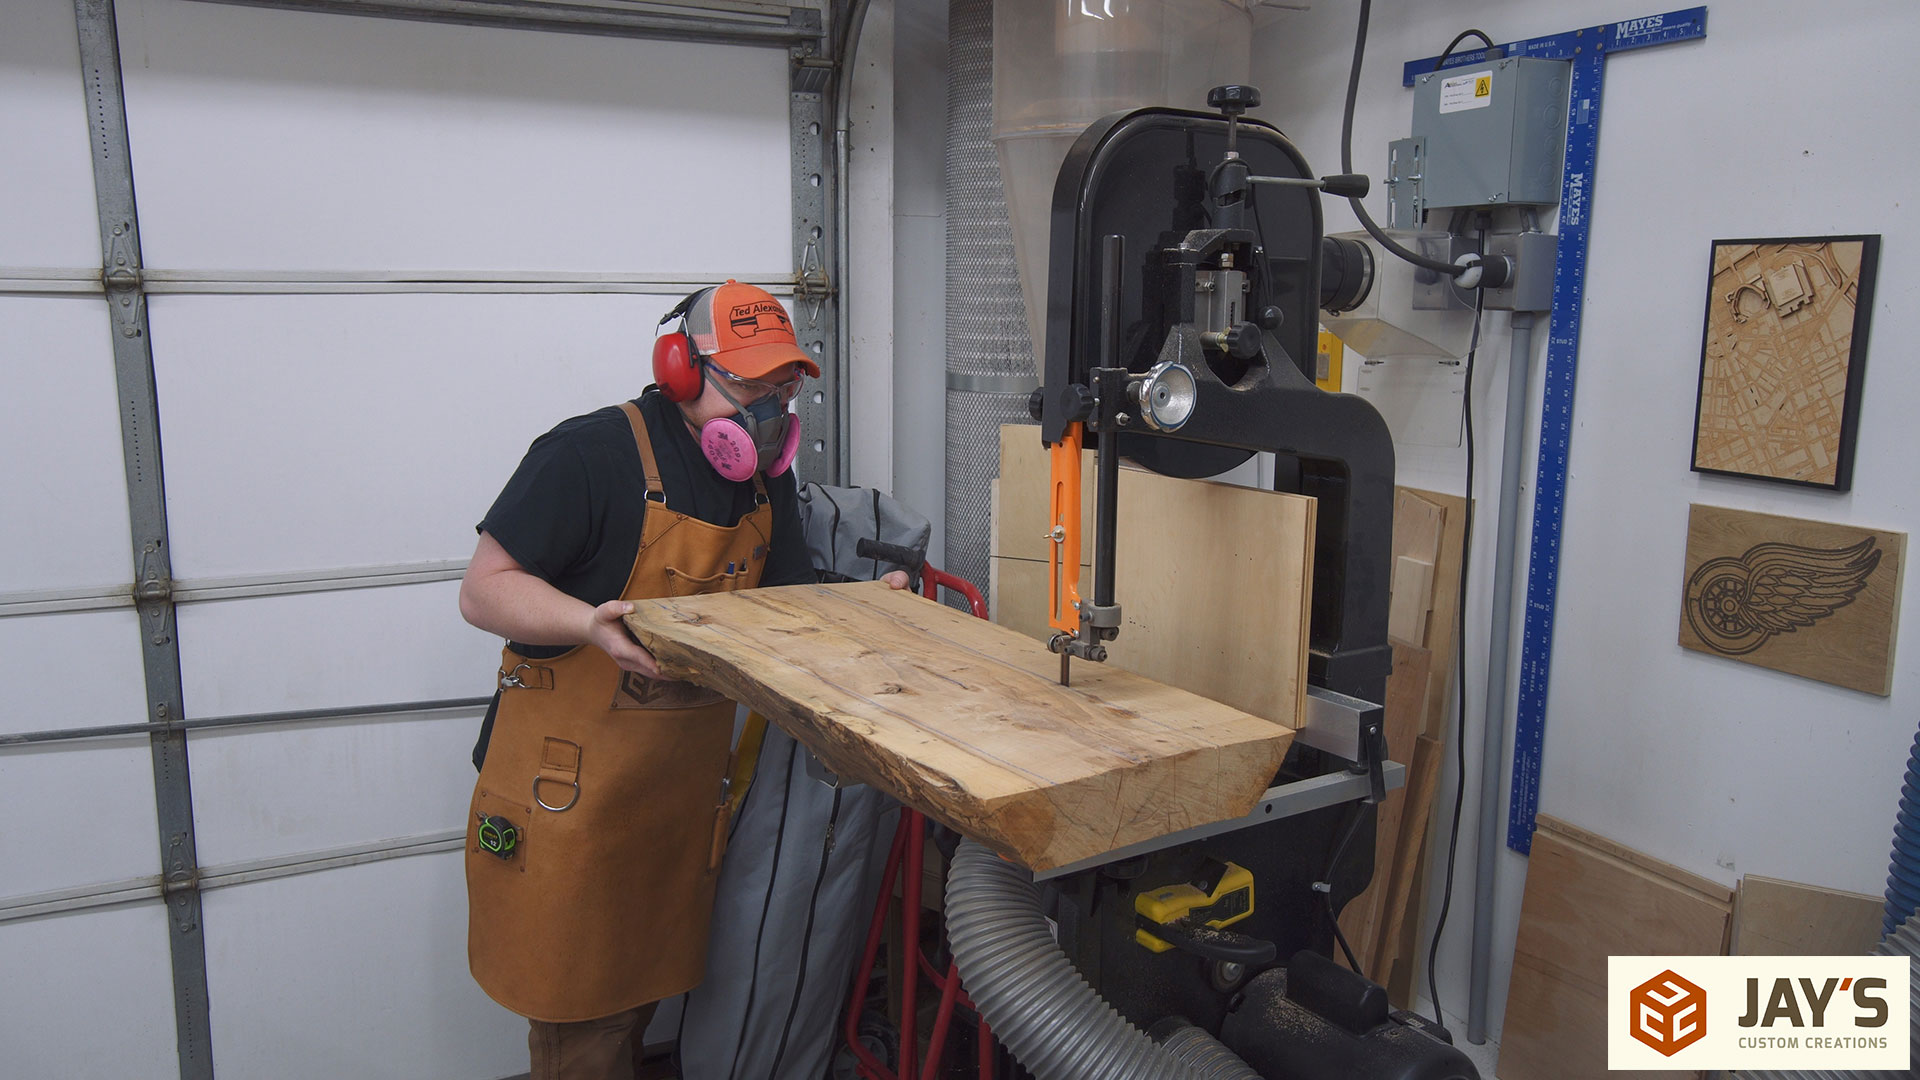
The visual centerline that was offset from the physical centerline of the slab by a few inches. So to center the material I measured out from the visual centerline and cut the live edge off of each side at the bandsaw.
The blank I was left with ended up being a little wider than my jointer. I don’t recommend or like to remove guards from tools but in this case removing the jointer guard allows the jointer to still establish a flat plane that is 8” wide.
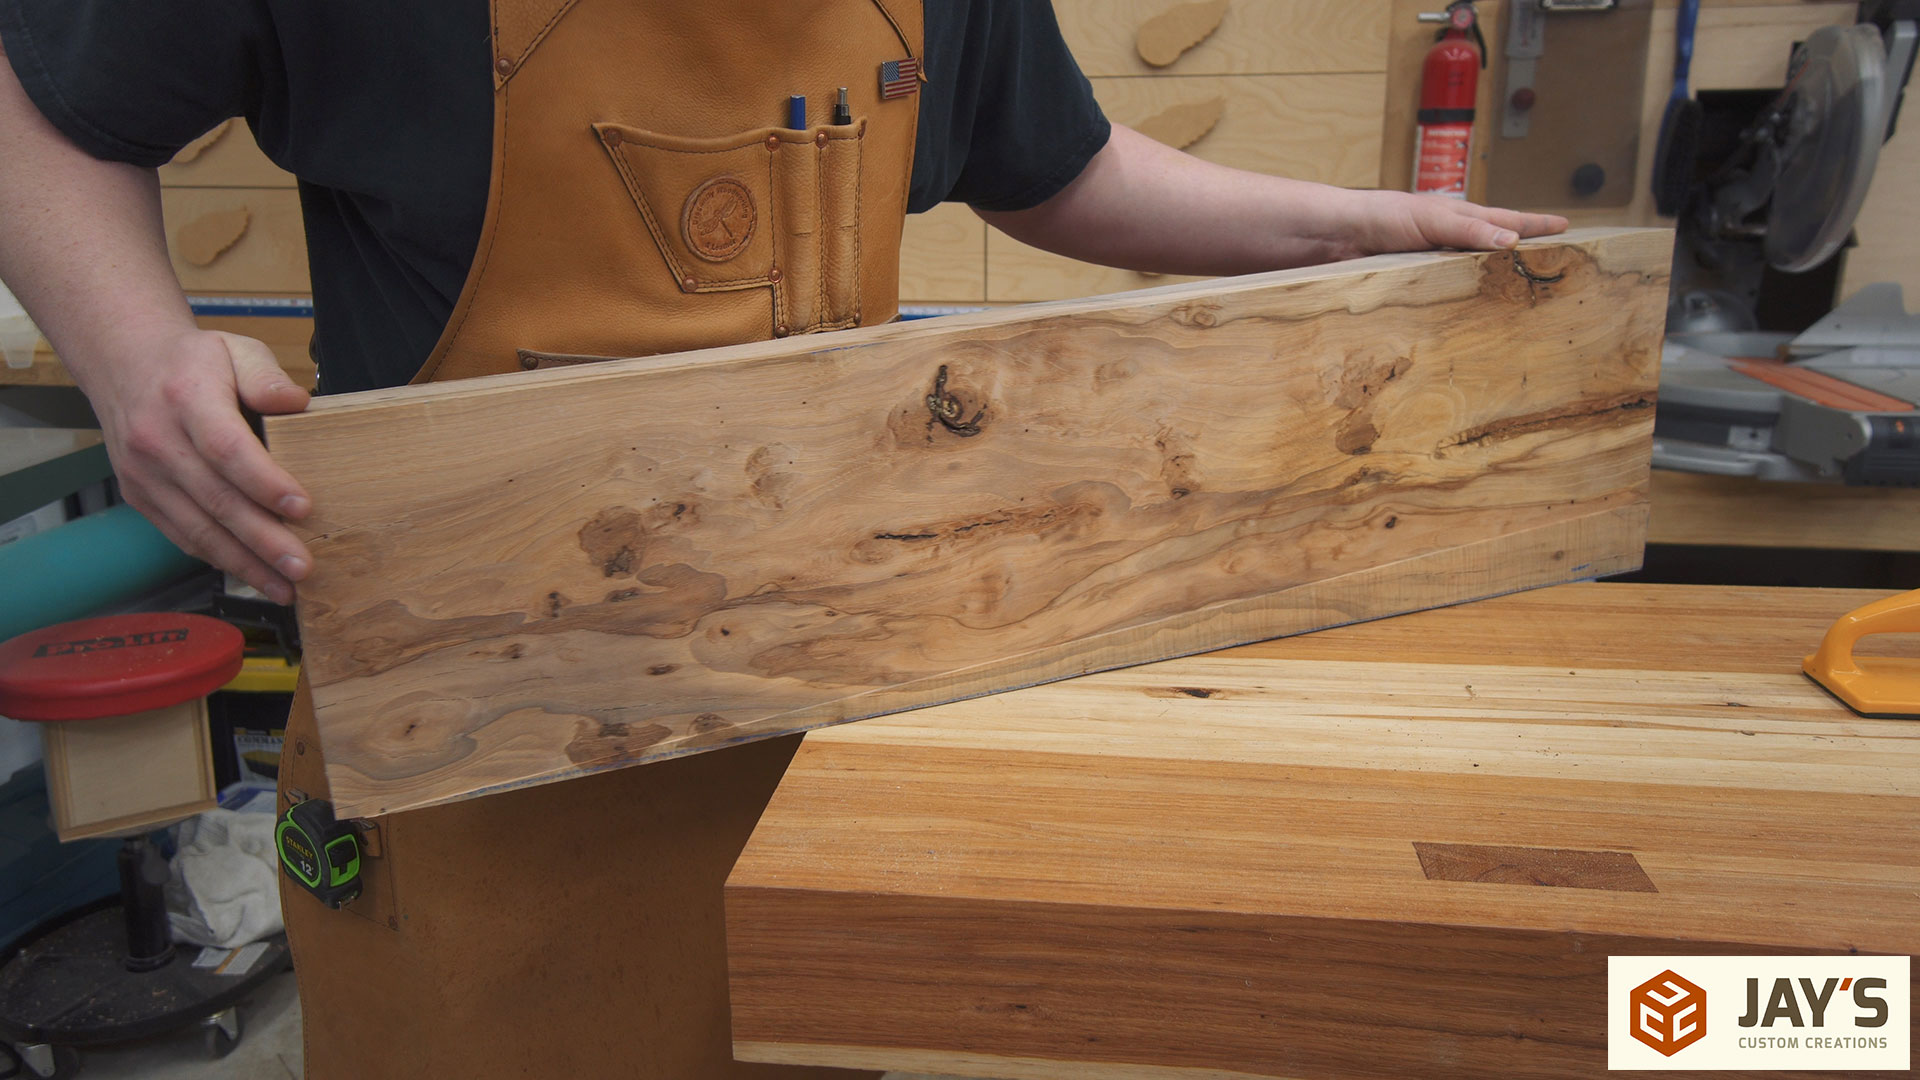
Here you can see the 8” wide flat face and the lip near the bottom that didn’t get jointed. This wood has some crazy figure to it that I just love.
My jointer is 8” wide so I made a 8” wide platform to go on the bed of my planer. On the infeed side there is a cleat attached to the bottom of the plywood to prevent the plywood from being pushed through with the material. The jointed face of the wood can then slide across the platform with the non jointed material hanging off to get the opposite face flat and parallel to the jointed face.
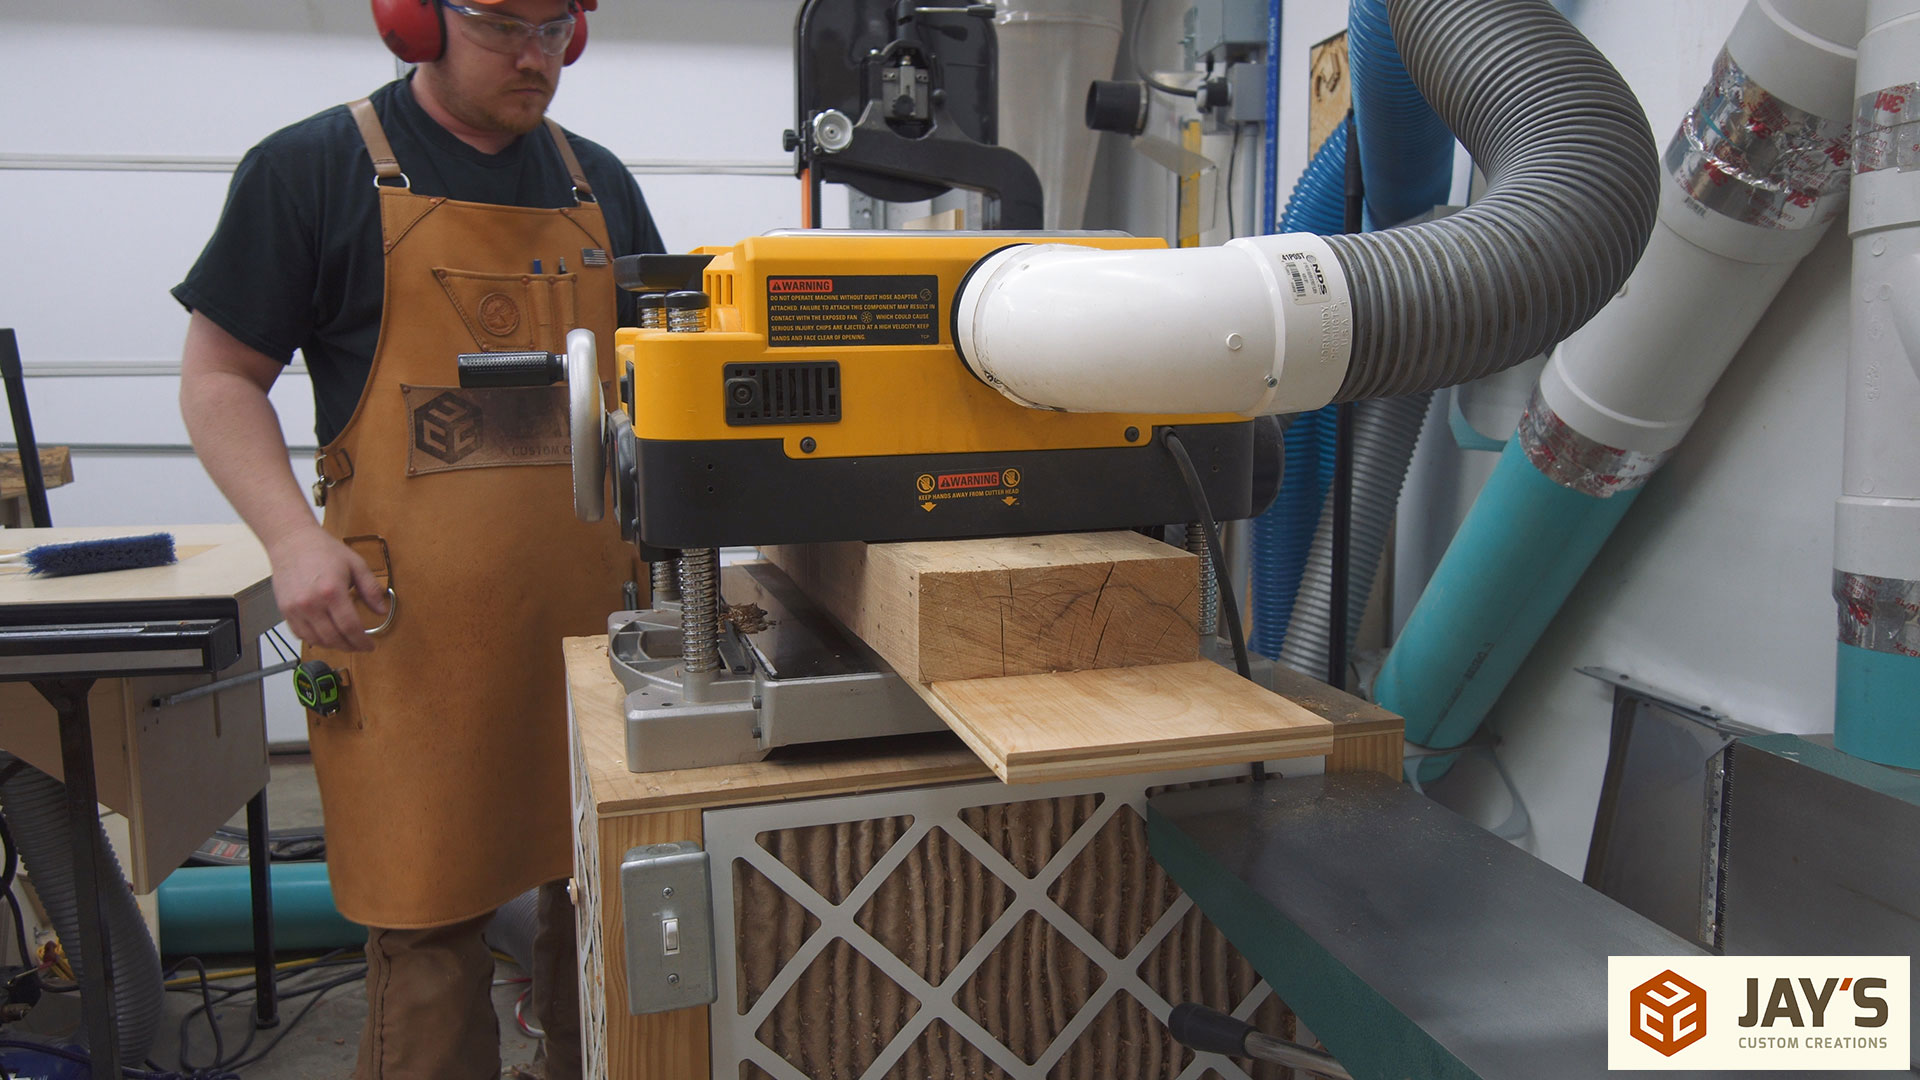
Then the newly jointed, and flattened, face can be placed down on top of the planer bed without the platform and the planer can finish flattening the overhang that was never cut by the jointer. This process adds an extra step to milling lumber but it allows you to quickly and easily flatten boards wider than your jointer.

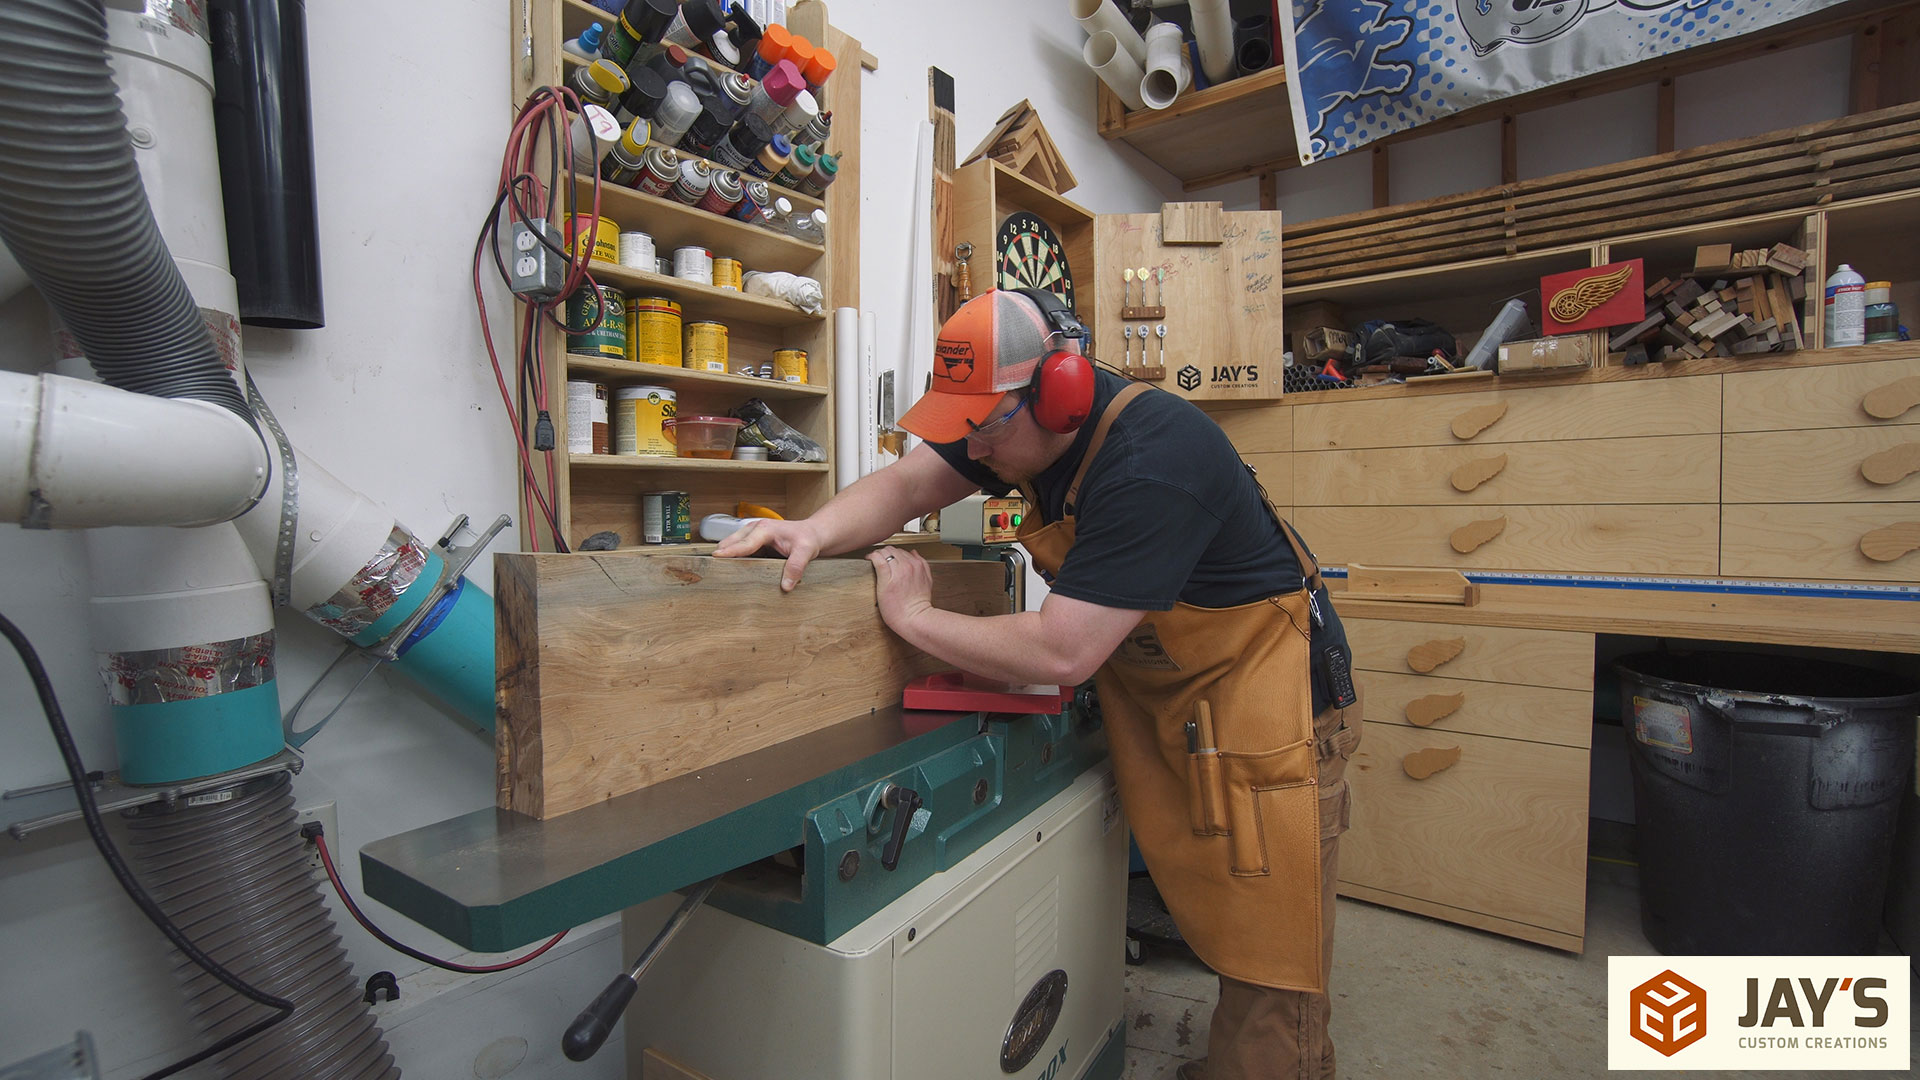
Back to the jointer we go to quickly flatten the tapered side faces. It was really difficult to determine the downhill grain direction for all of this milling because the grain was going in so many different directions.
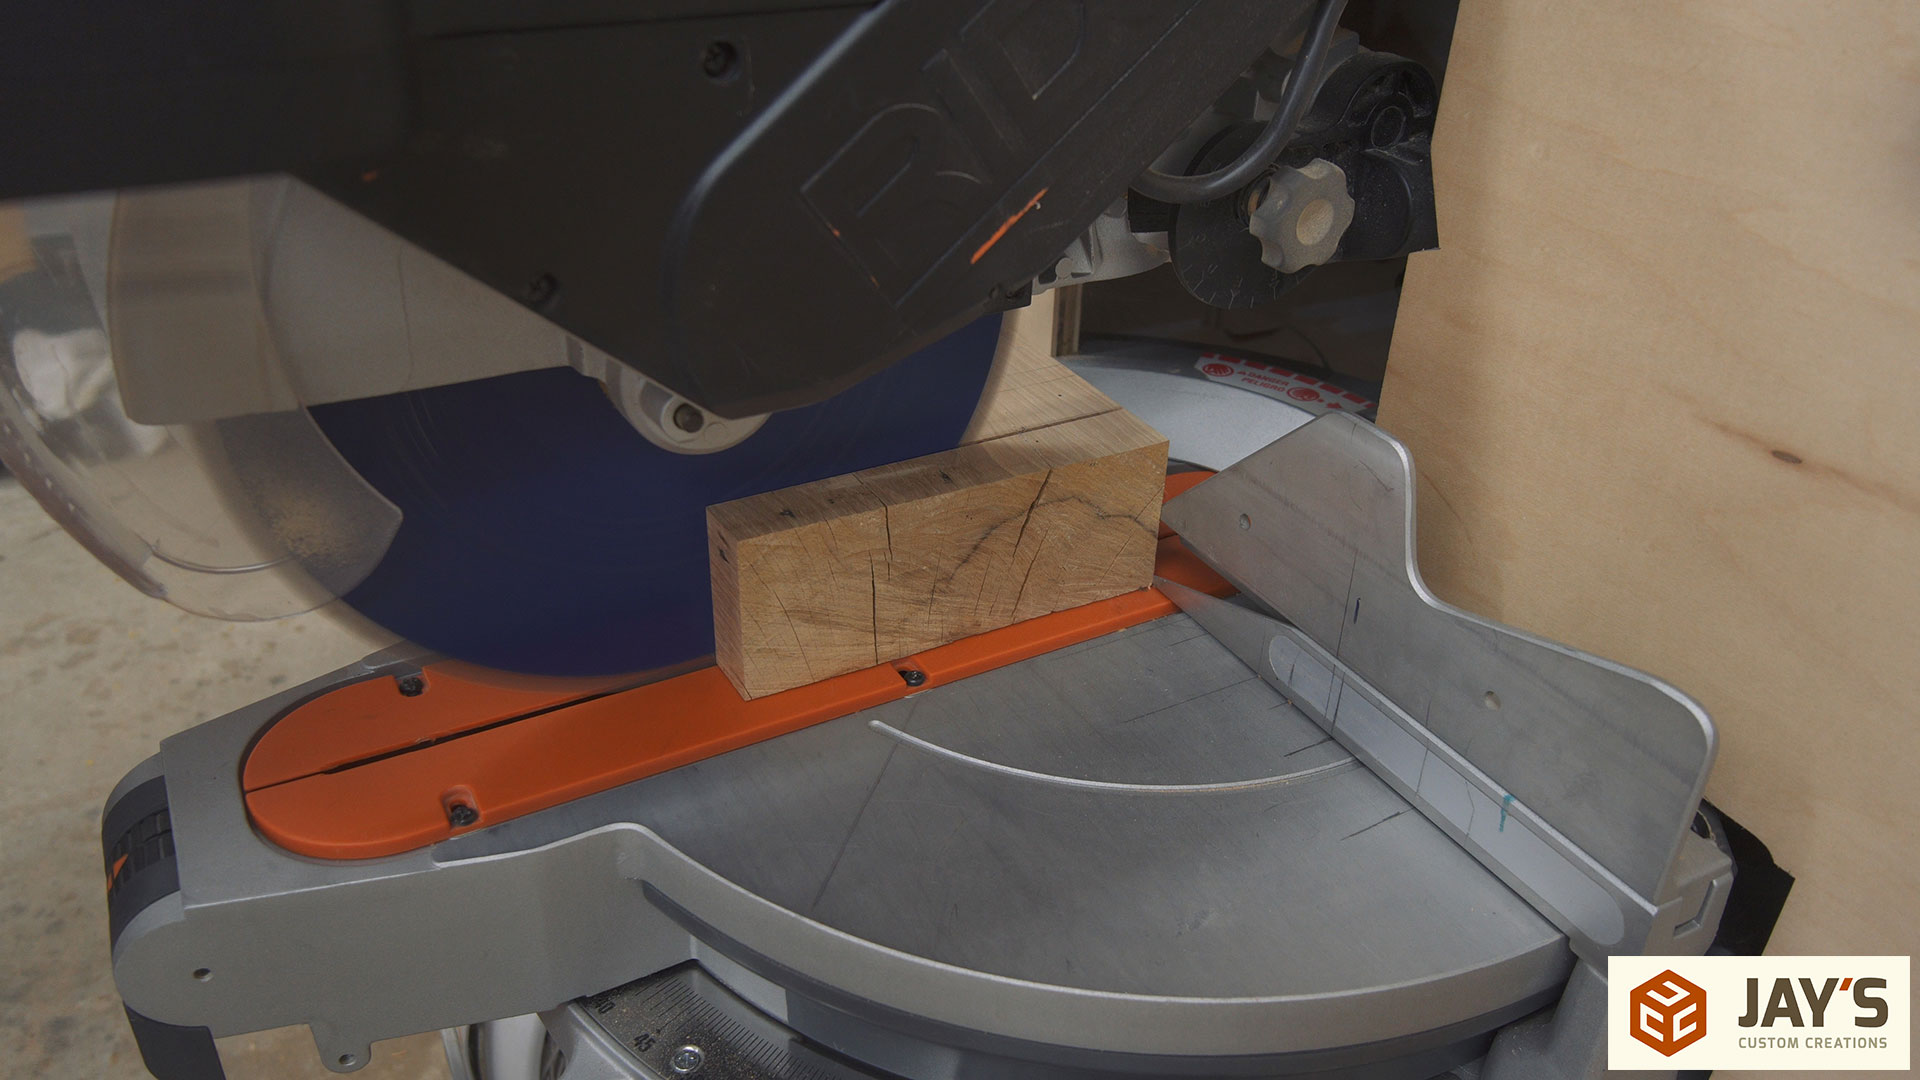
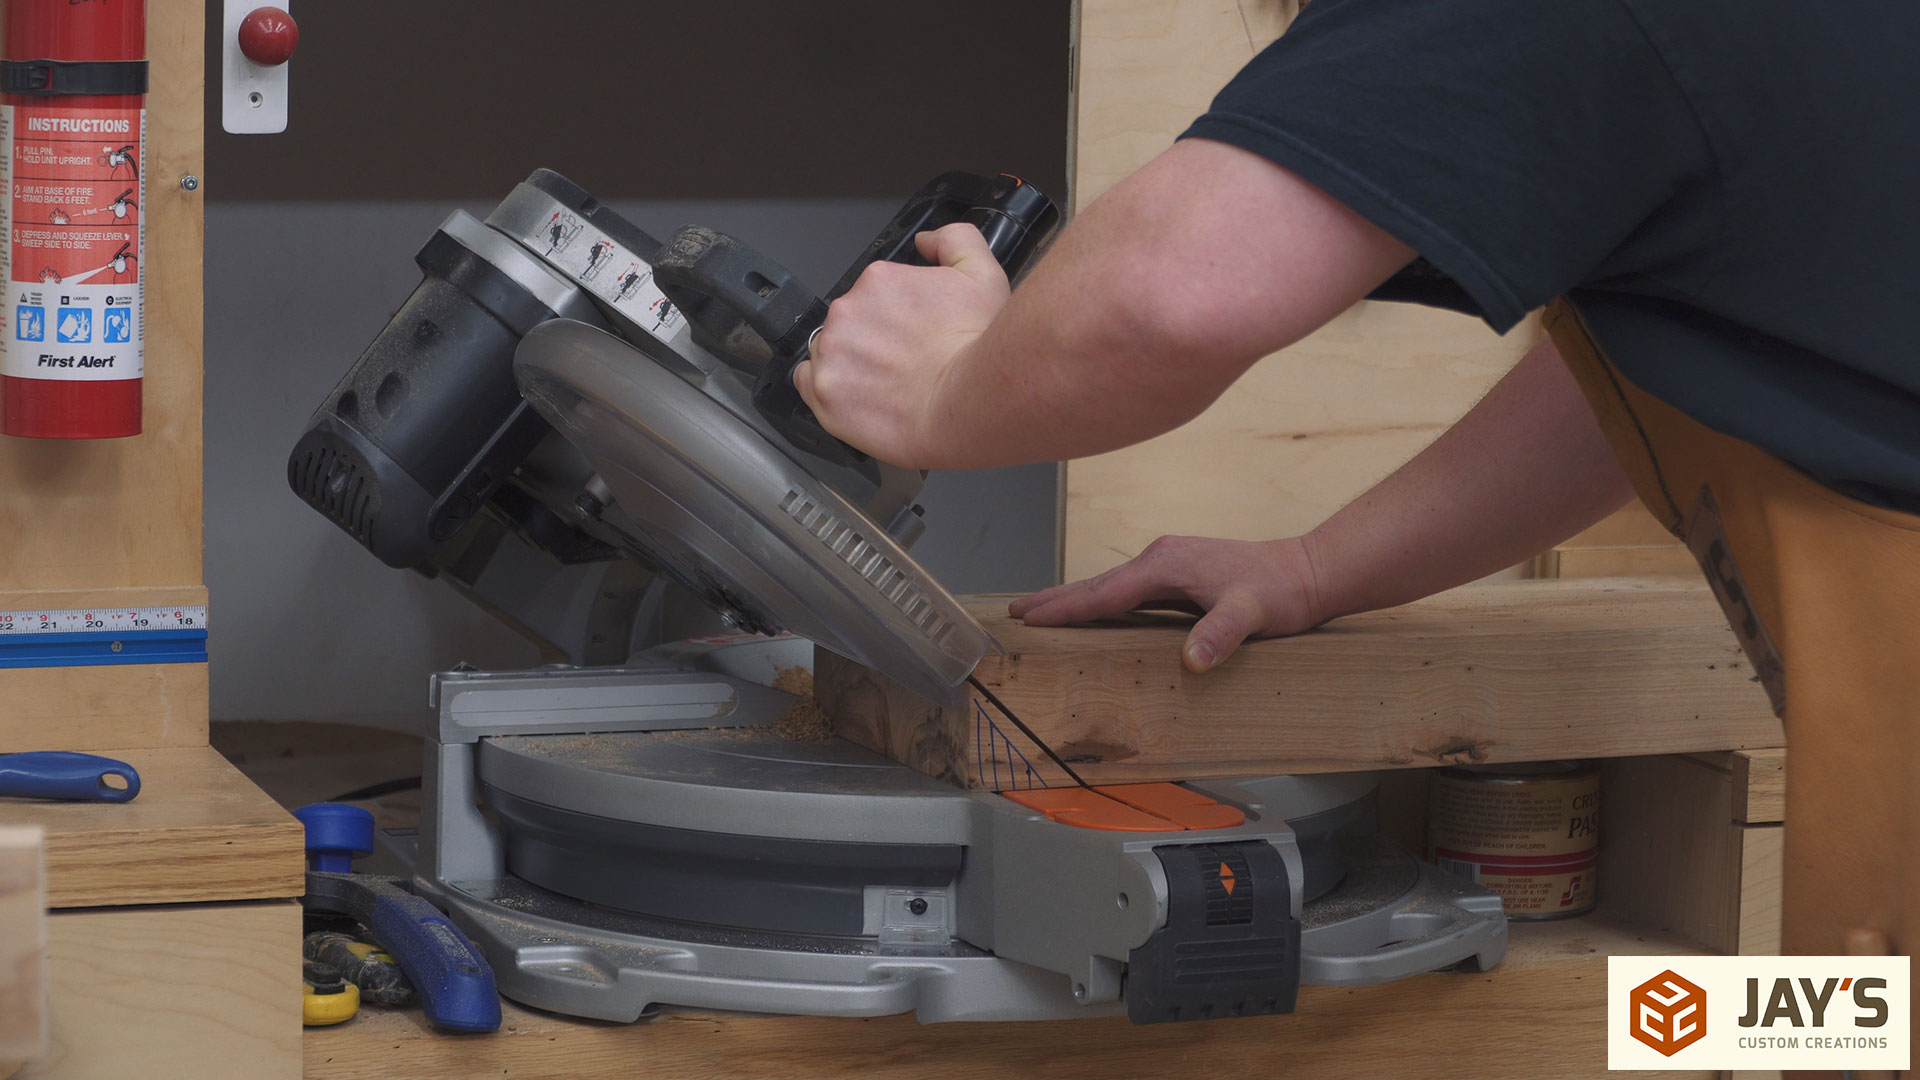
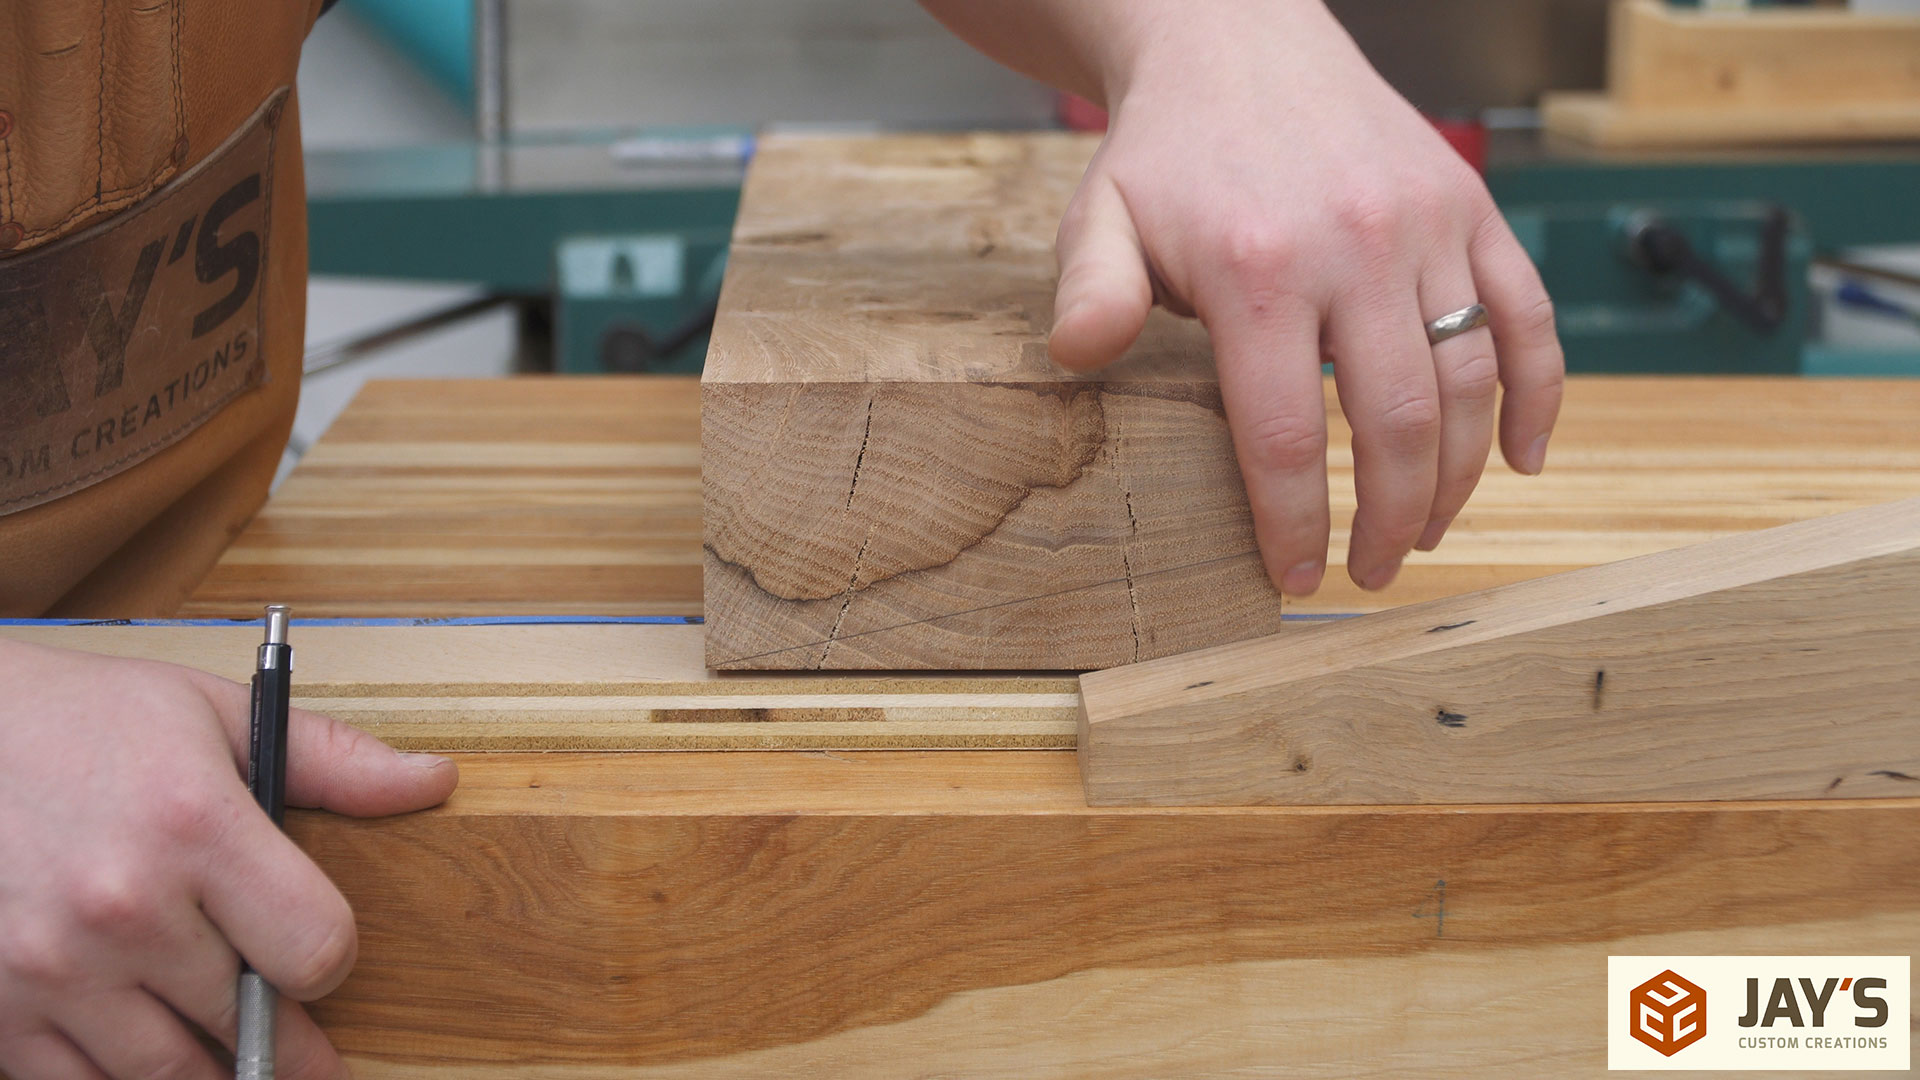
When I made the pine leg vise I cut the tapers last. That means the sides were parallel and crosscutting the chop to the final length was easy to do. In this case I cut the tapers first so that I left as much material as possible on the offcuts of the slab because I wanted to save as much as I could. The problem with cutting the tapers first is that it makes cutting the chop to length a little more difficult as it’s not a 90 degree cut. To determine what angle to set my miter saw I used a protractor to draw lines from each side at the same angle until I found an angle that produced parallel lines. This was about 1.5 or 2 degrees. It doesn’t sound like much but when you double it for each side and then extend it the length of the wood it makes sense visually.
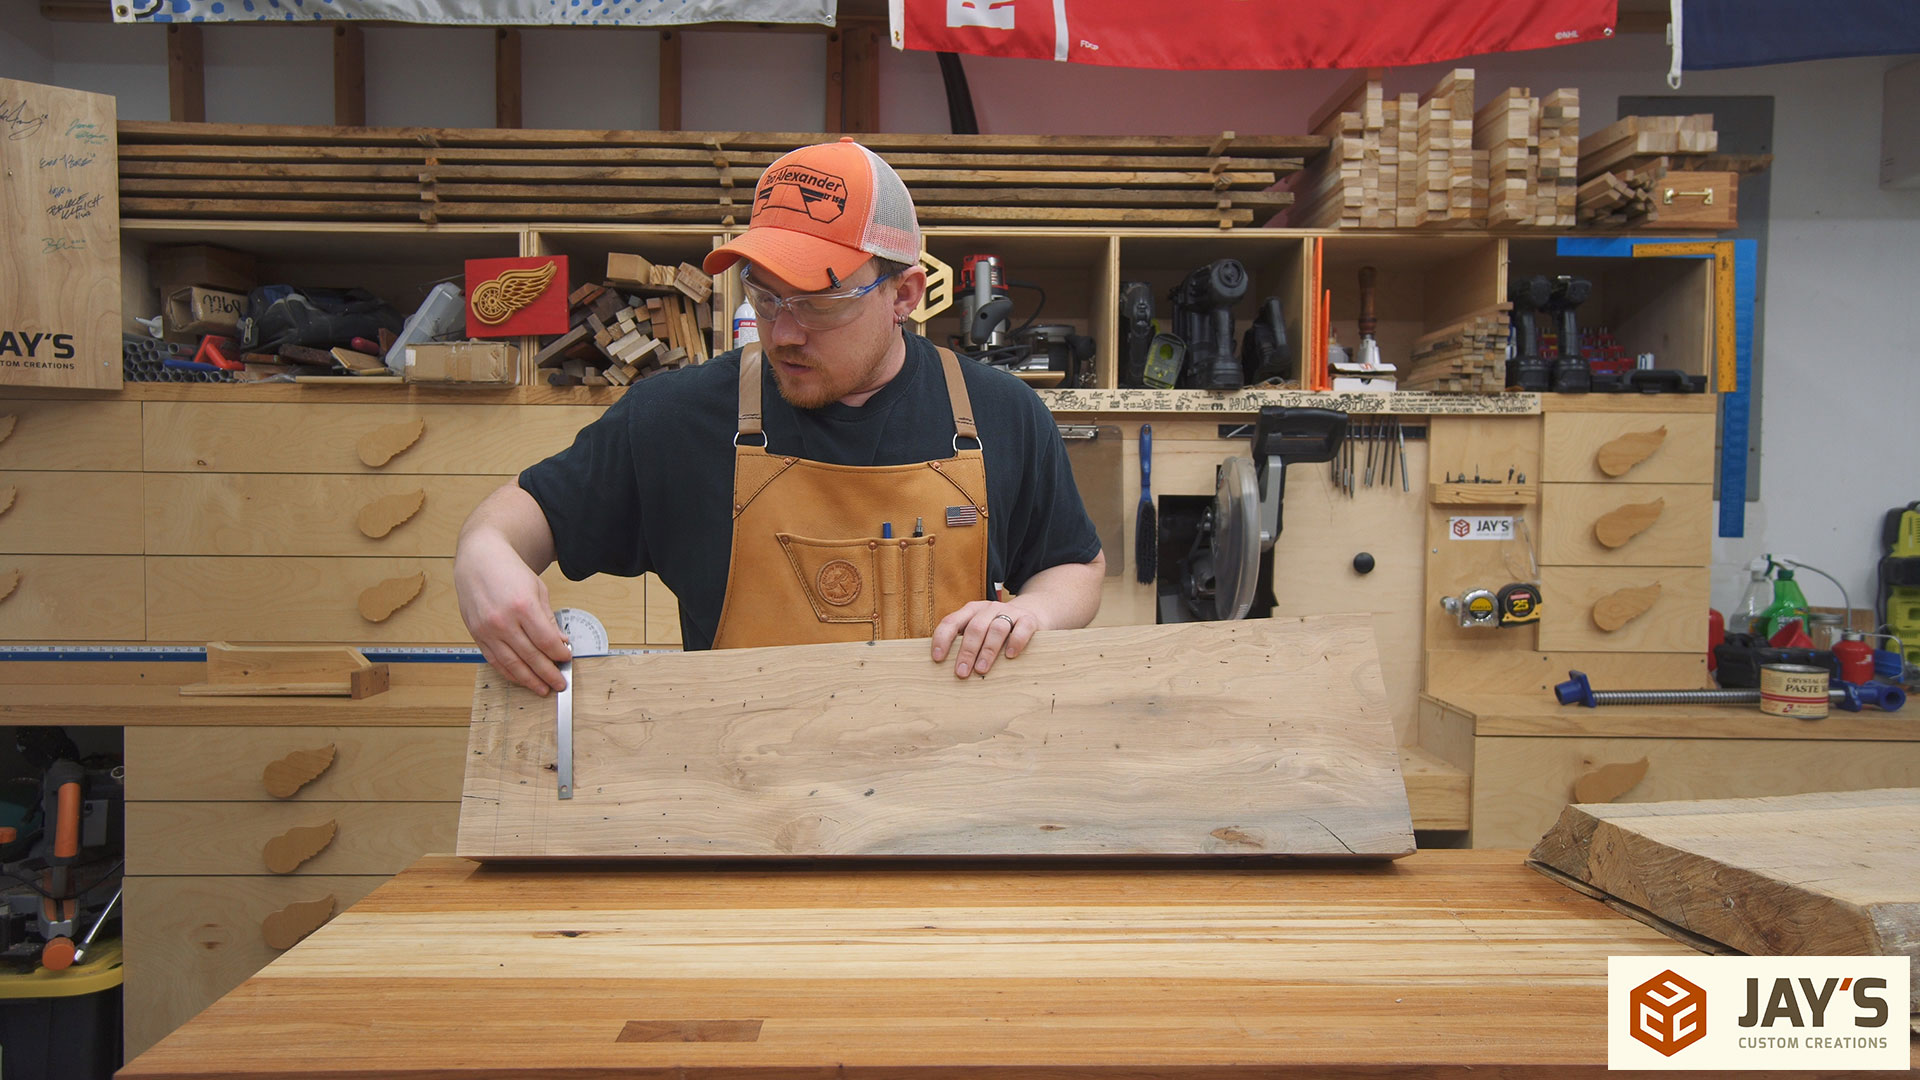
With the saw set to that angle the resulting cut should be 90 degrees to the centerline of the chop. I cut the bottom first, placed the chop against the workbench on a piece of 3/4” plywood to elevate it slightly, marked the top of the workbench on the inside face of the chop, and made another cut with the miter saw about 1/4” longer than that mark. Elevating the chop with a piece of plywood is to ensure that the chop does not drag on the floor when pulled out. And cutting it a little long gives me material to plane off later to get the top of the chop flush with the top of the bench.
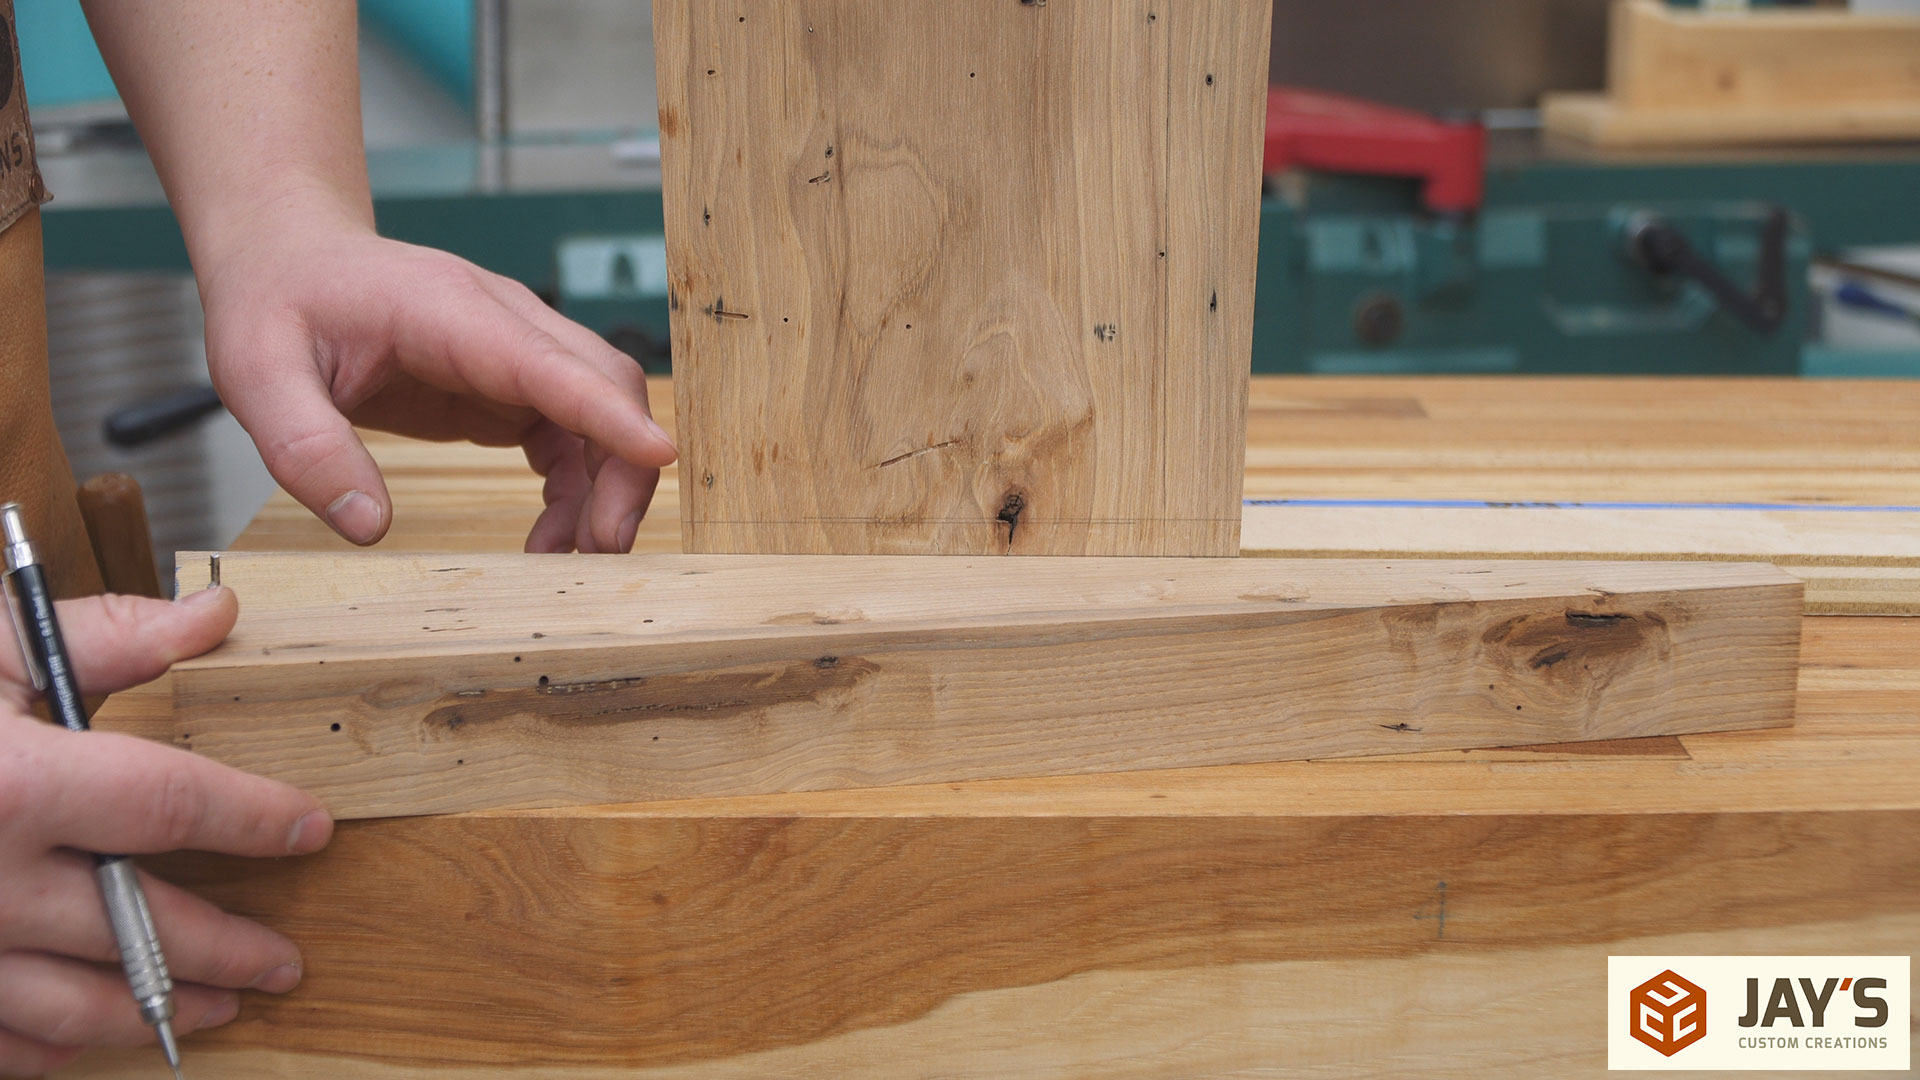
Next I placed the chop back against the workbench and traced the sides of the leg and also the screw hole I previously drilled in the leg.
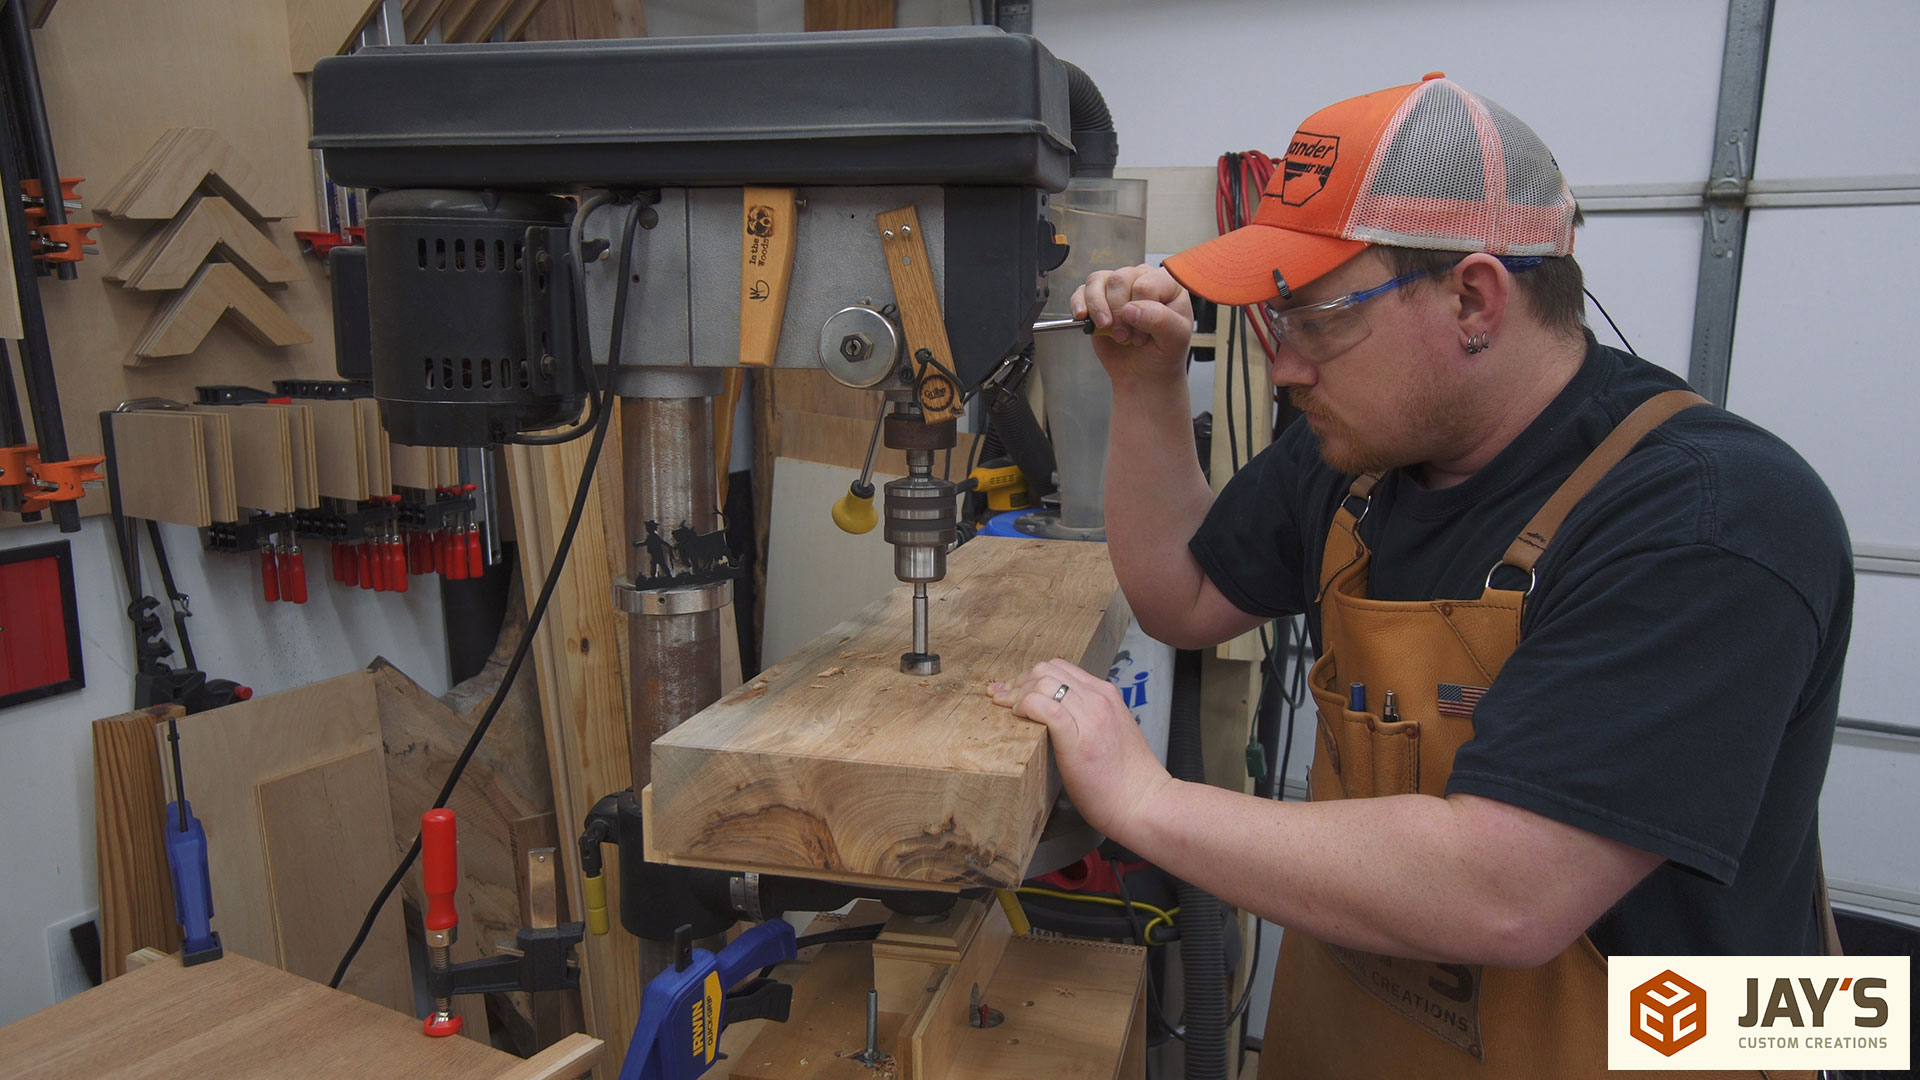
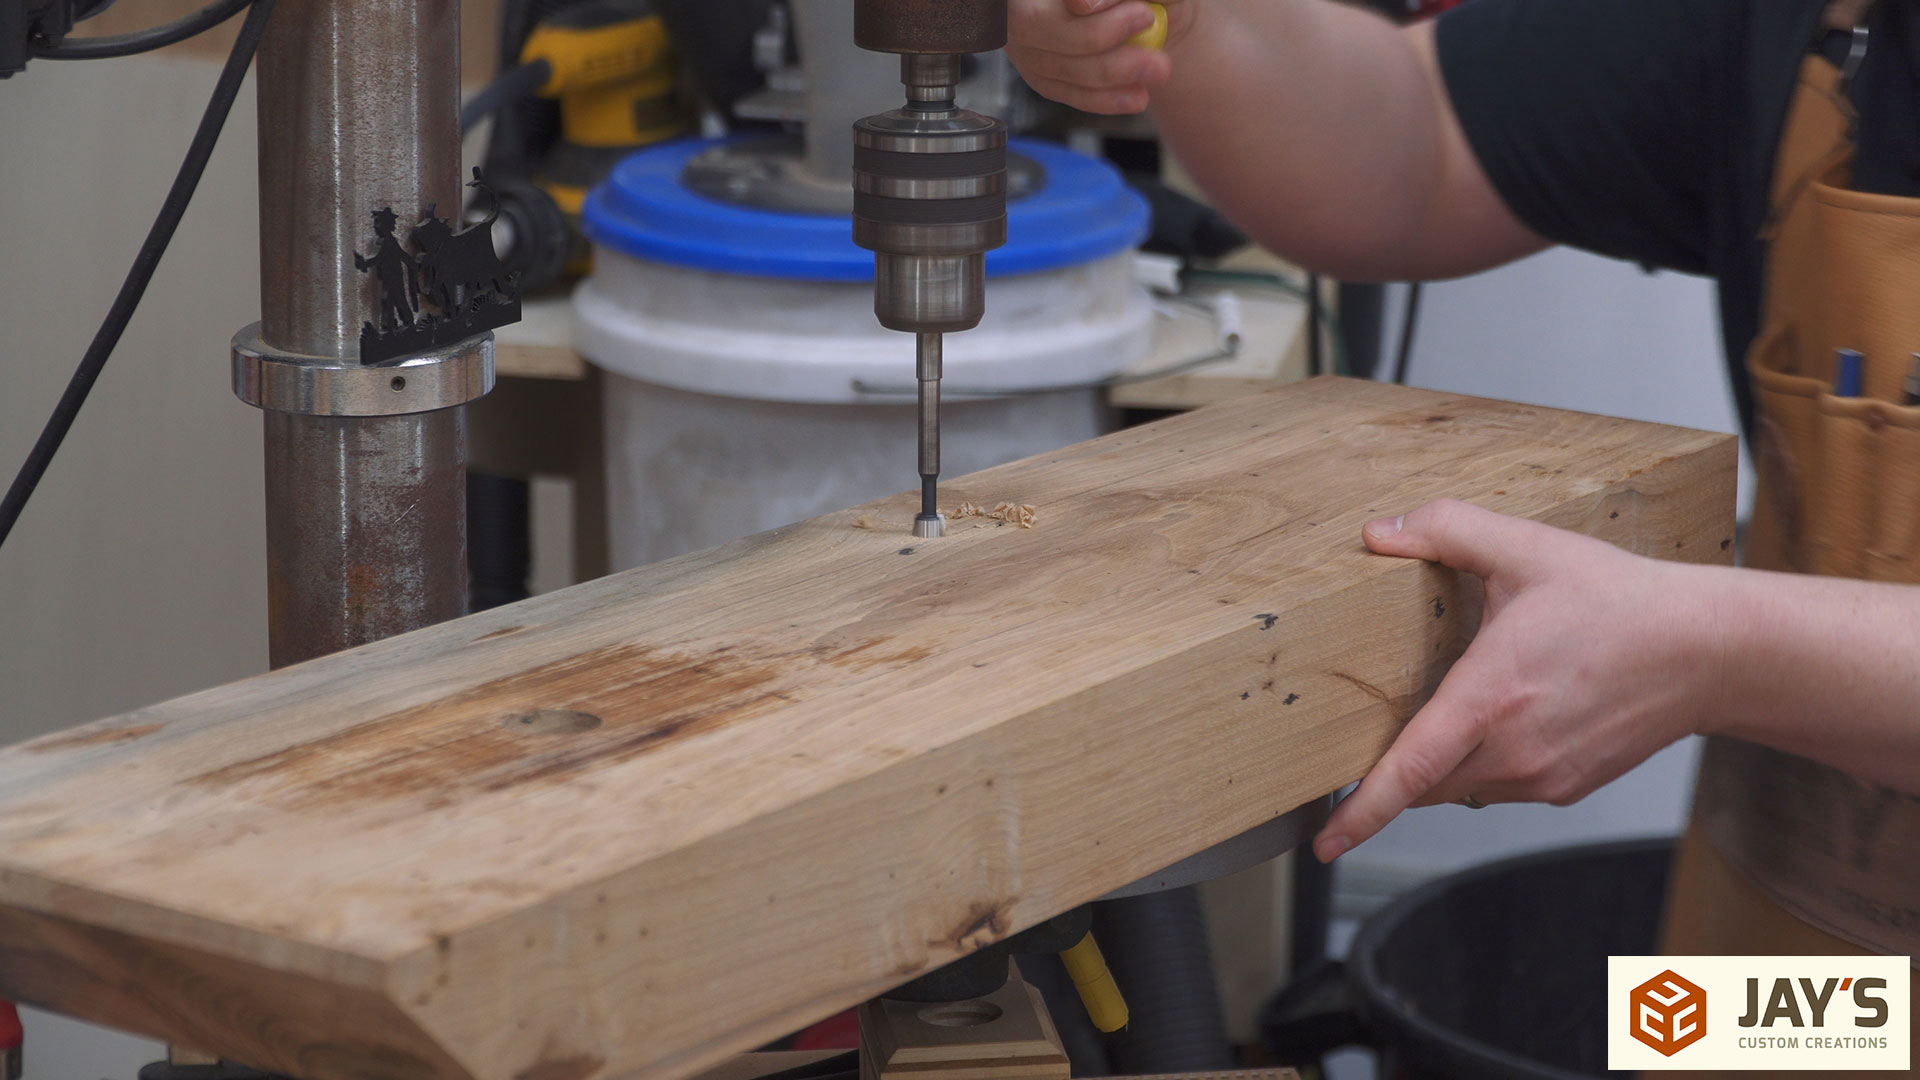
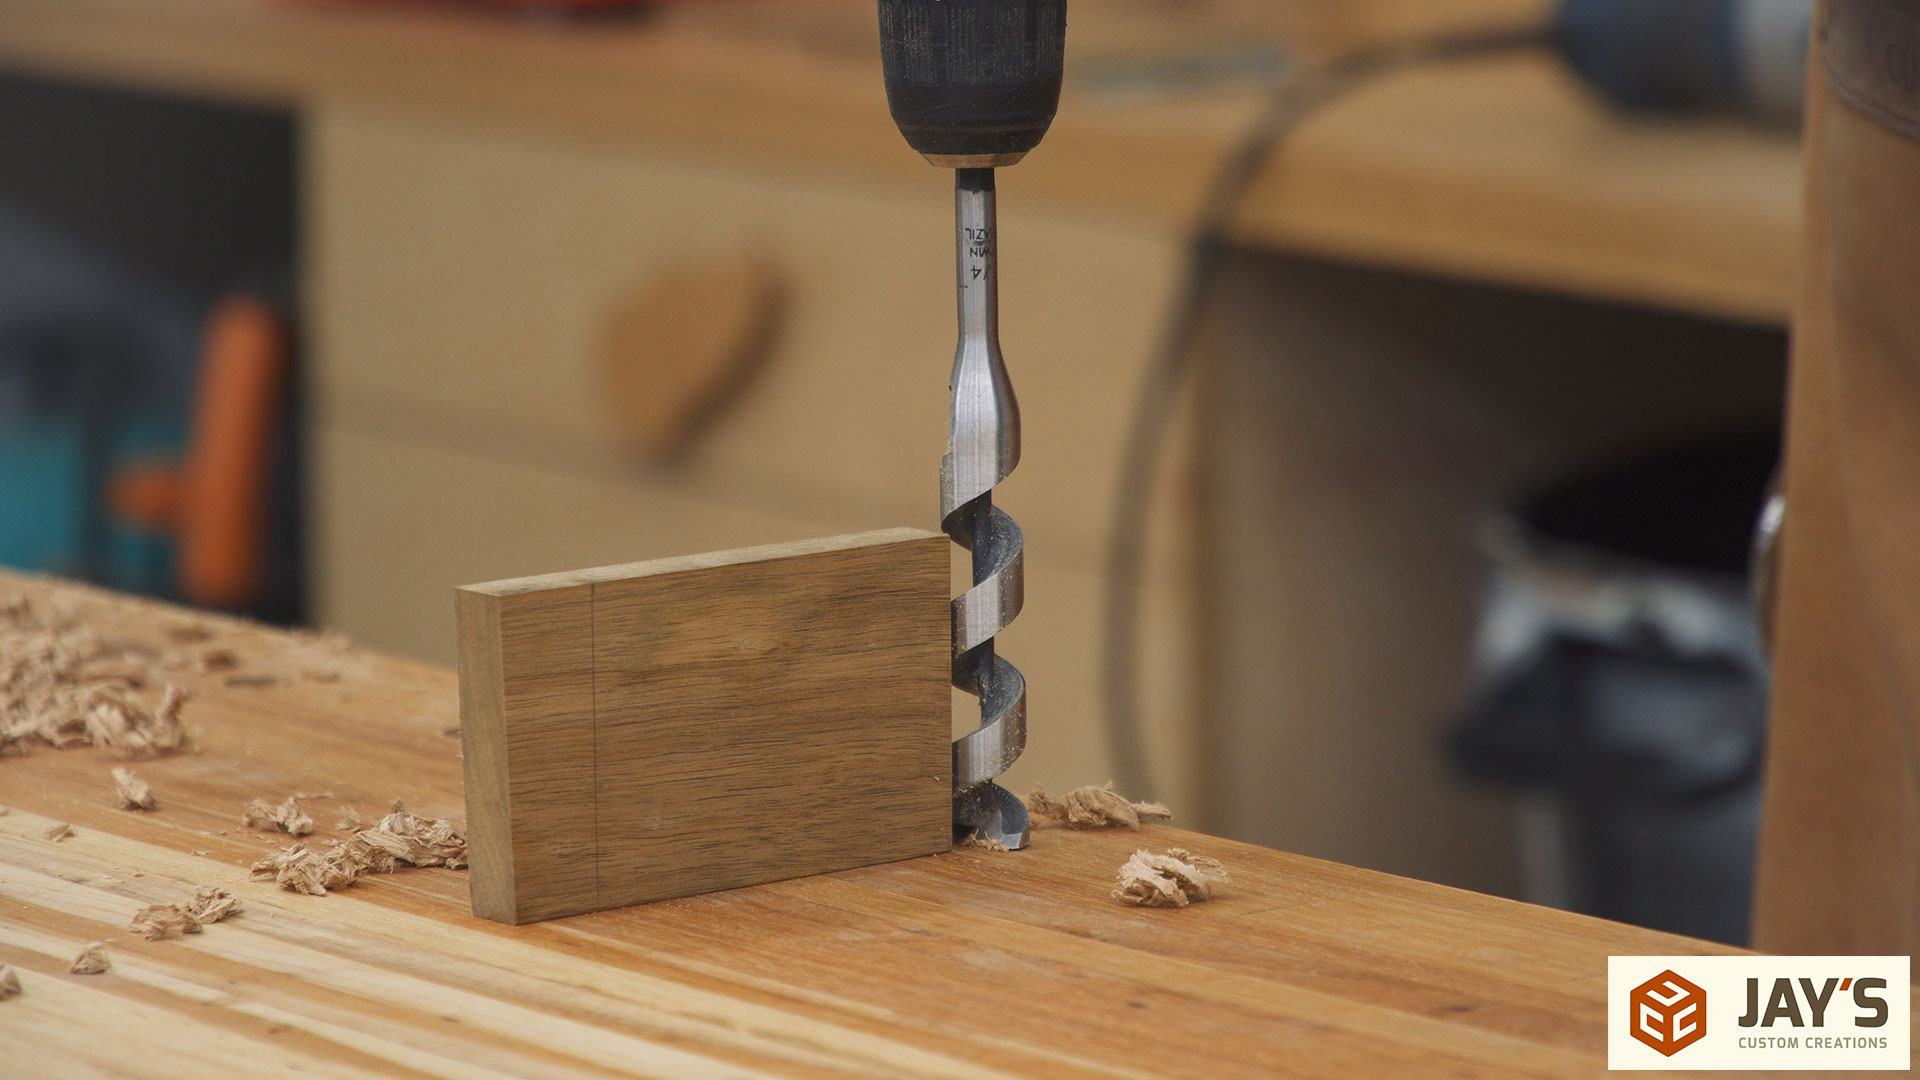
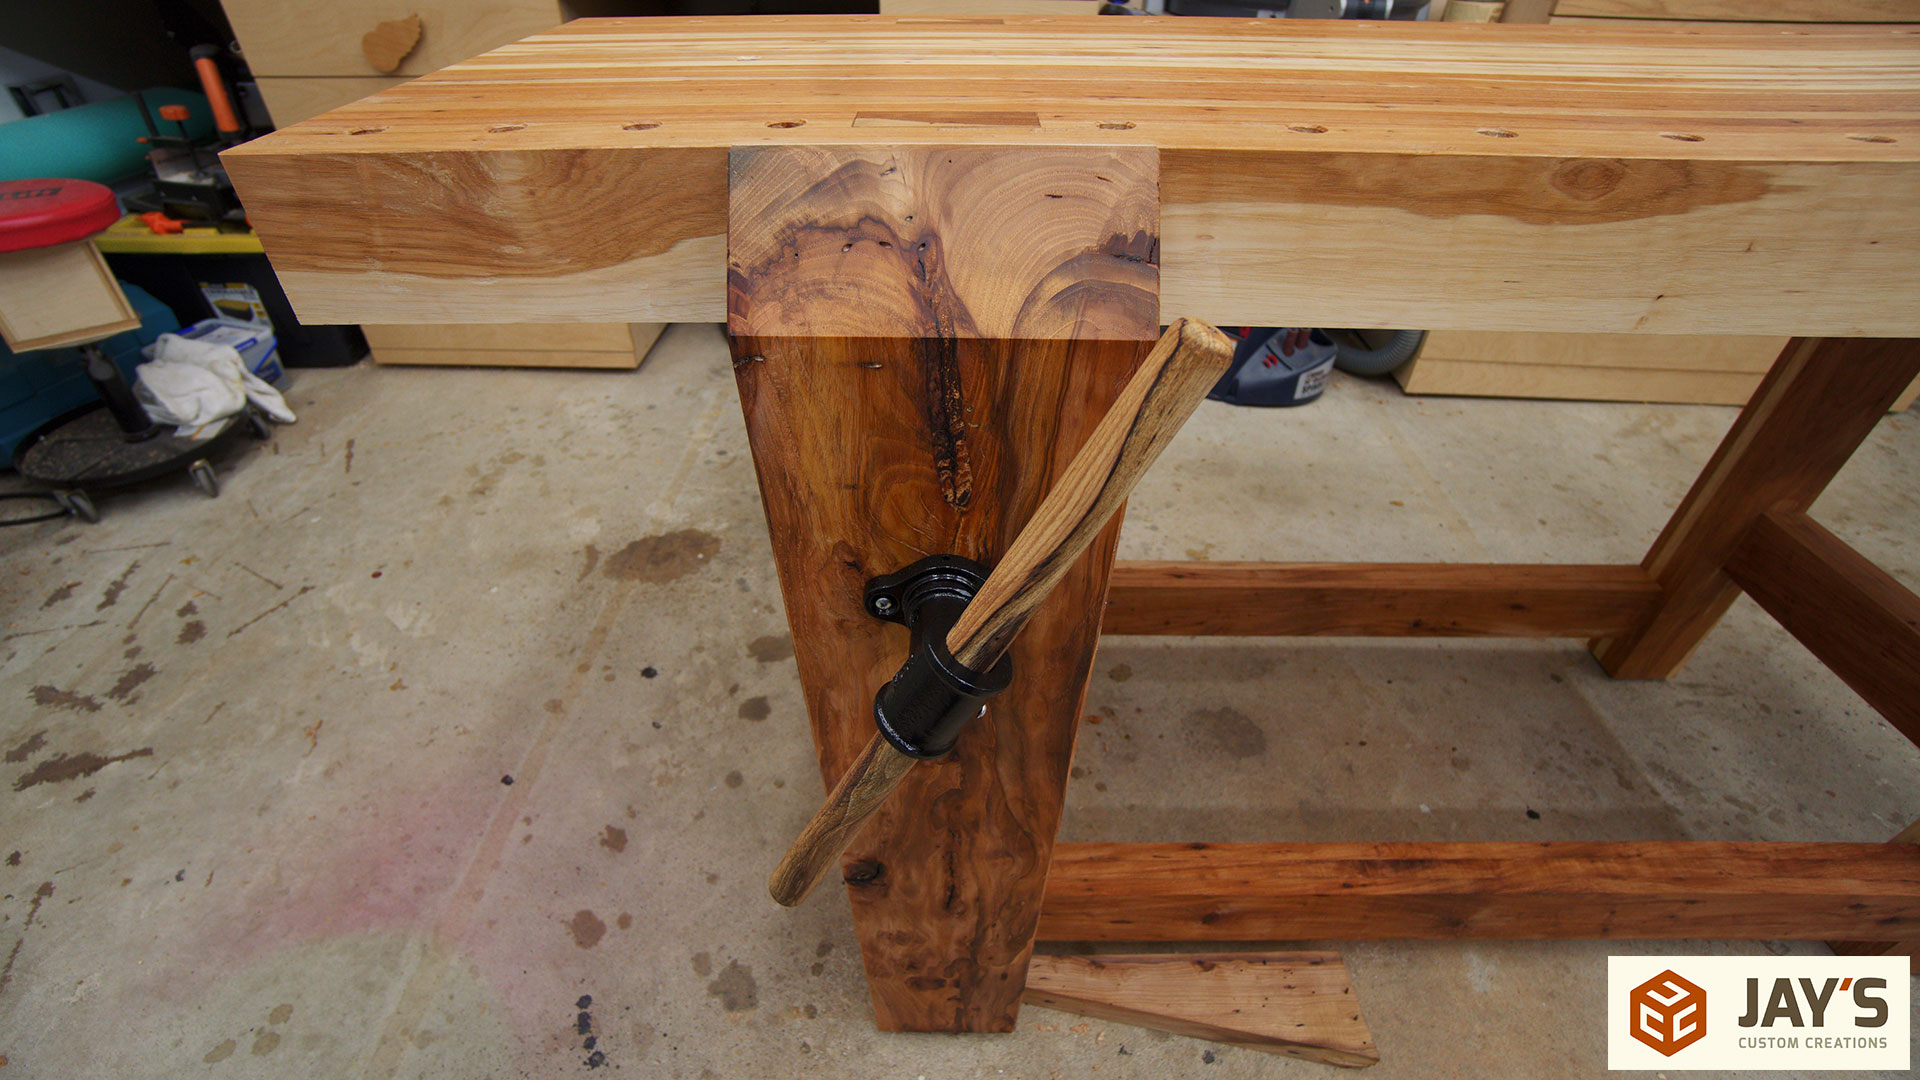
Then the through hole in the chop can be drilled. Mounting this screw is slightly easier than mounting the DIY option. A single through hole is all that is needed for this screw where a precise depth counterbore is needed for the DIY scaffold leveling leg option.
Instead of positing a garter ring this vise screw has a garter ring incorporated in it. Just screw it to the chop. Predrill, of course.
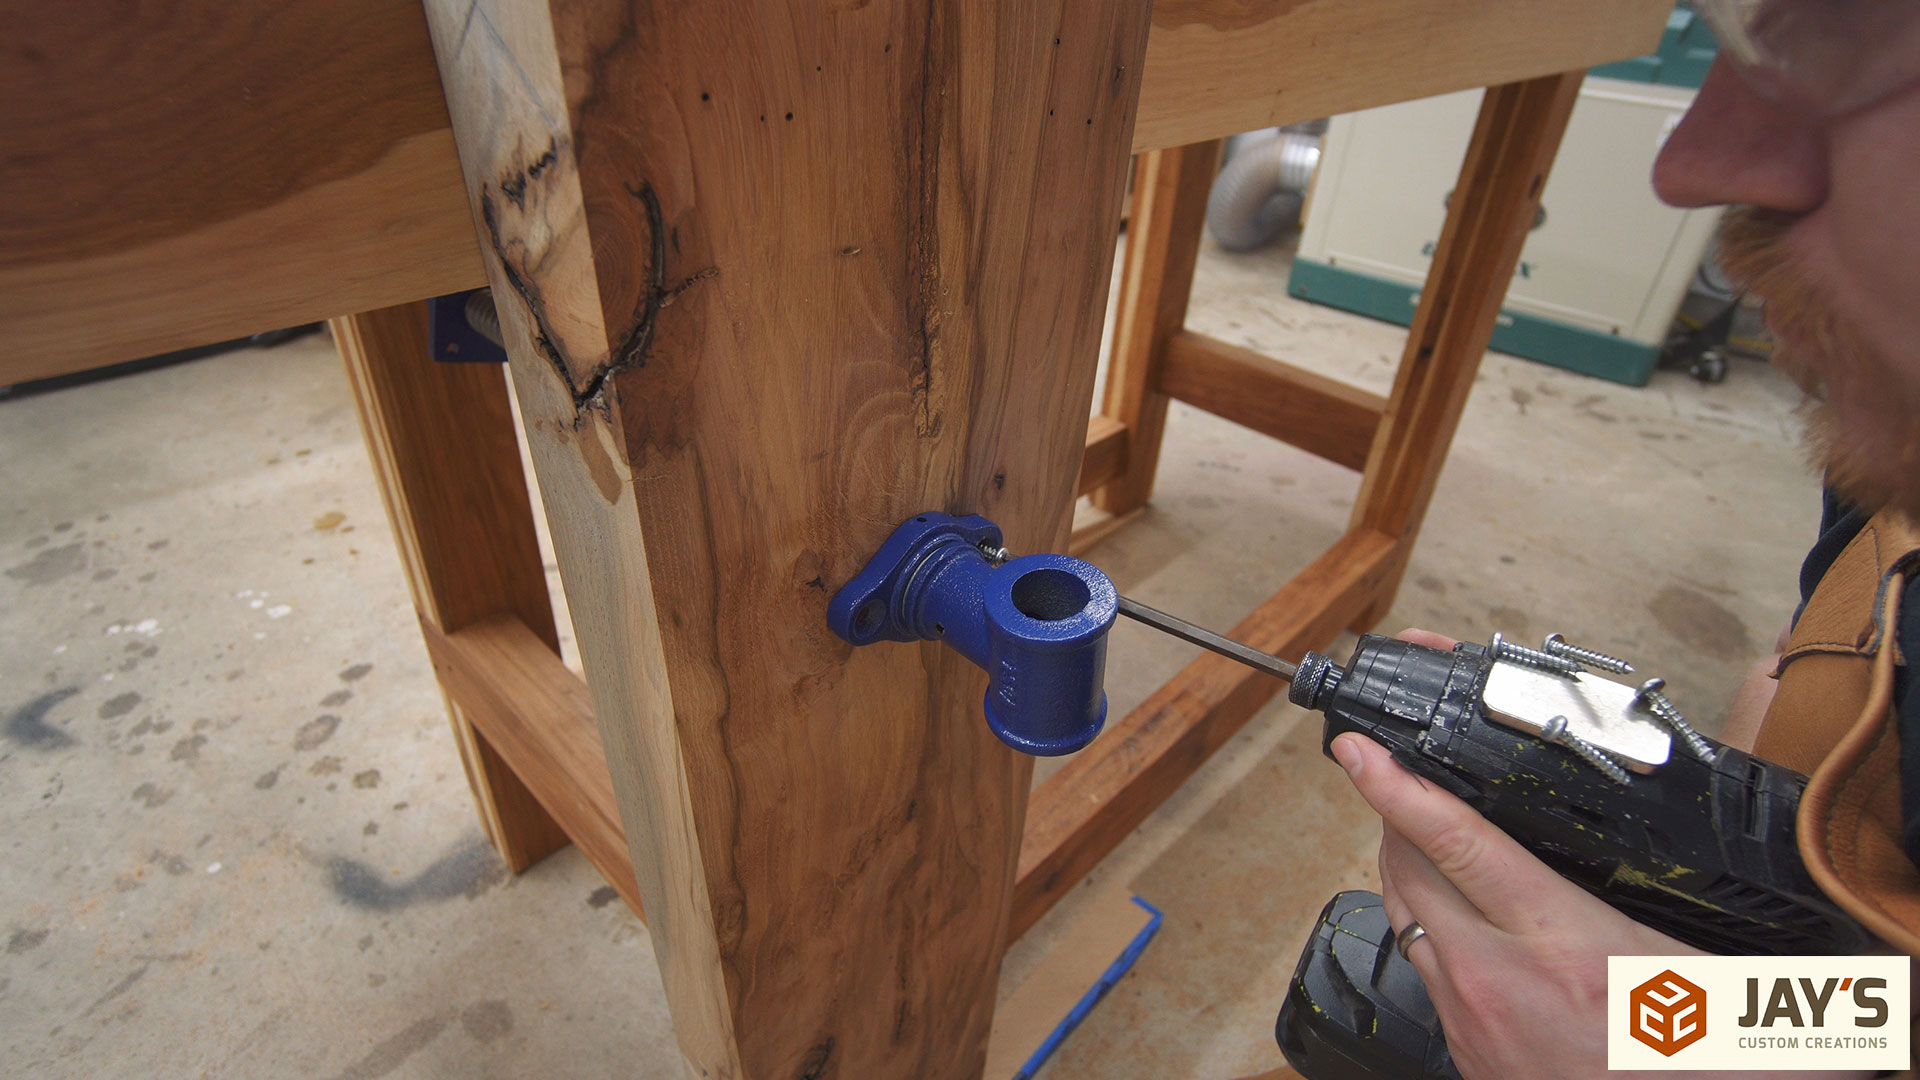
And the included nut is screwed to the inside of the workbench leg.

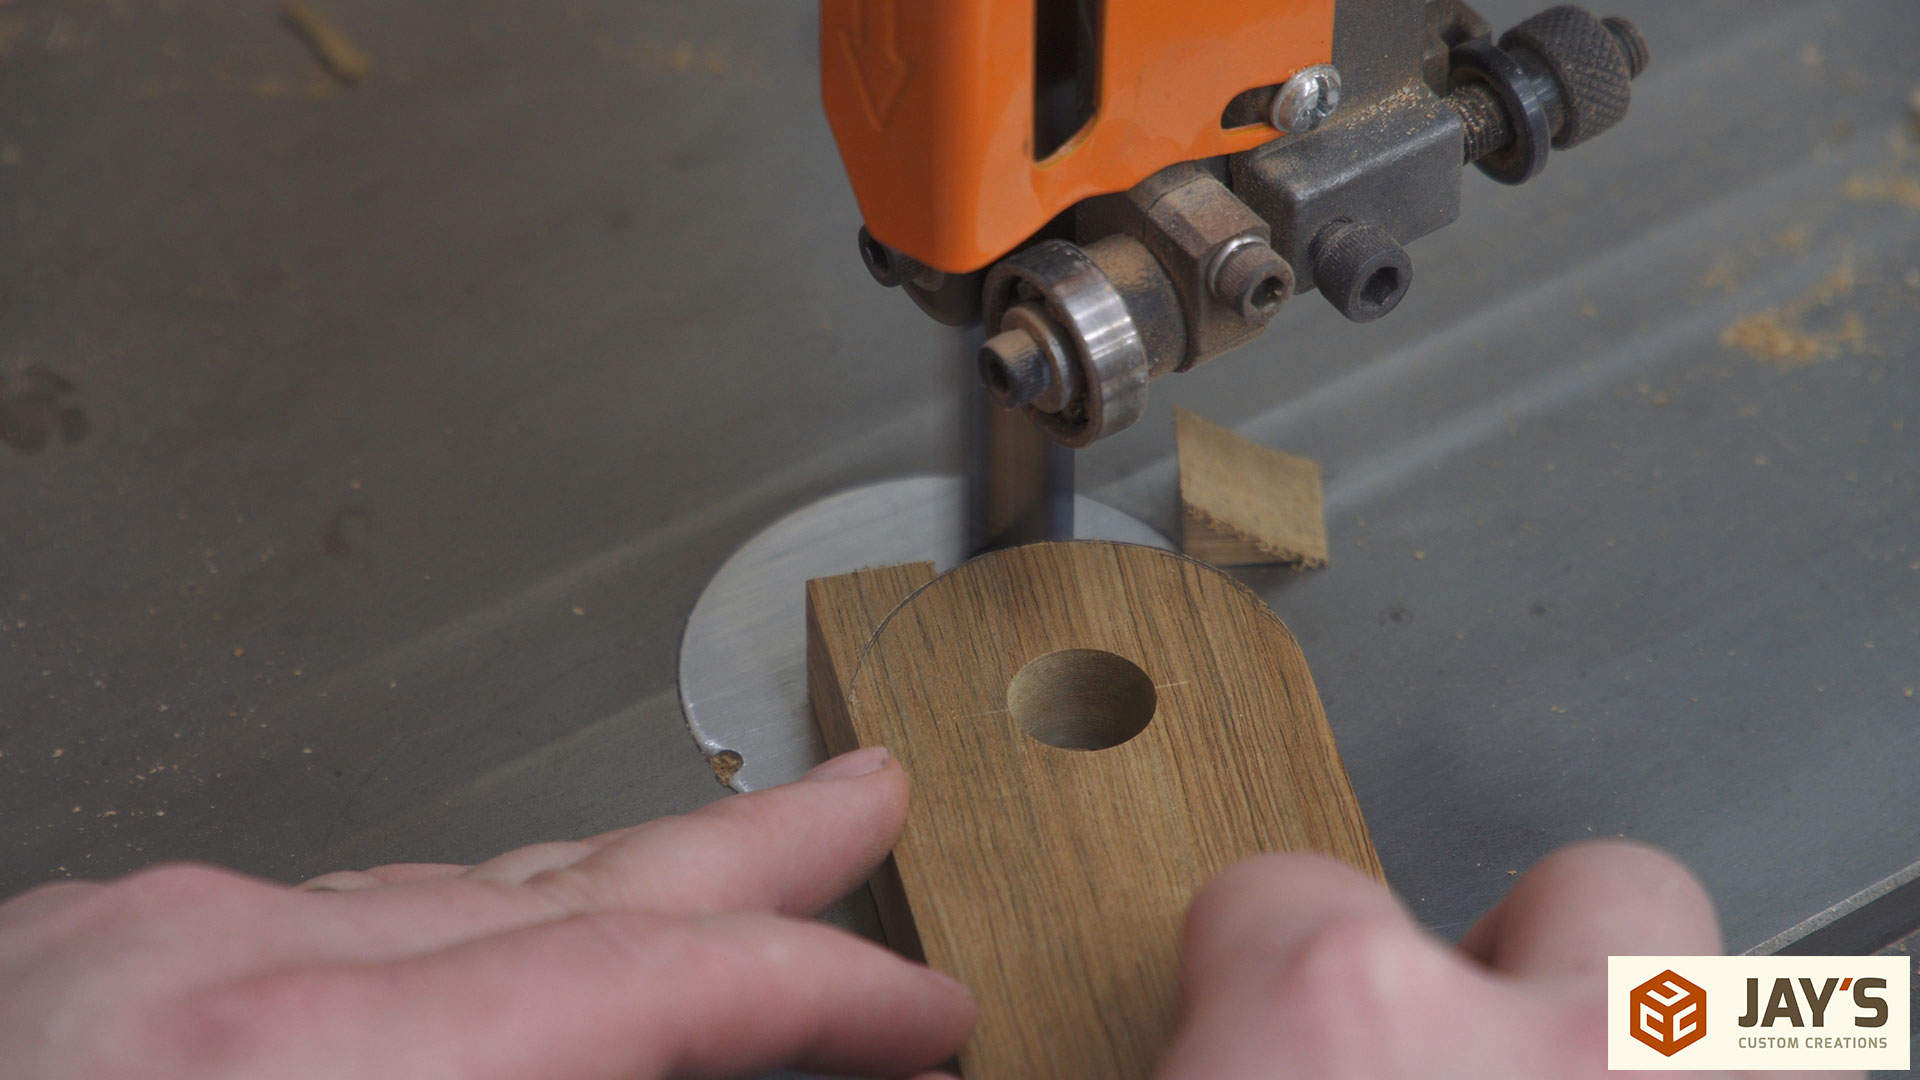
A couple of accessories for the leg vise need to be made. First, a spacer block is needed for the inside of the leg. This is just a scrap piece of hickory with a hole drilled through one edge of the block.
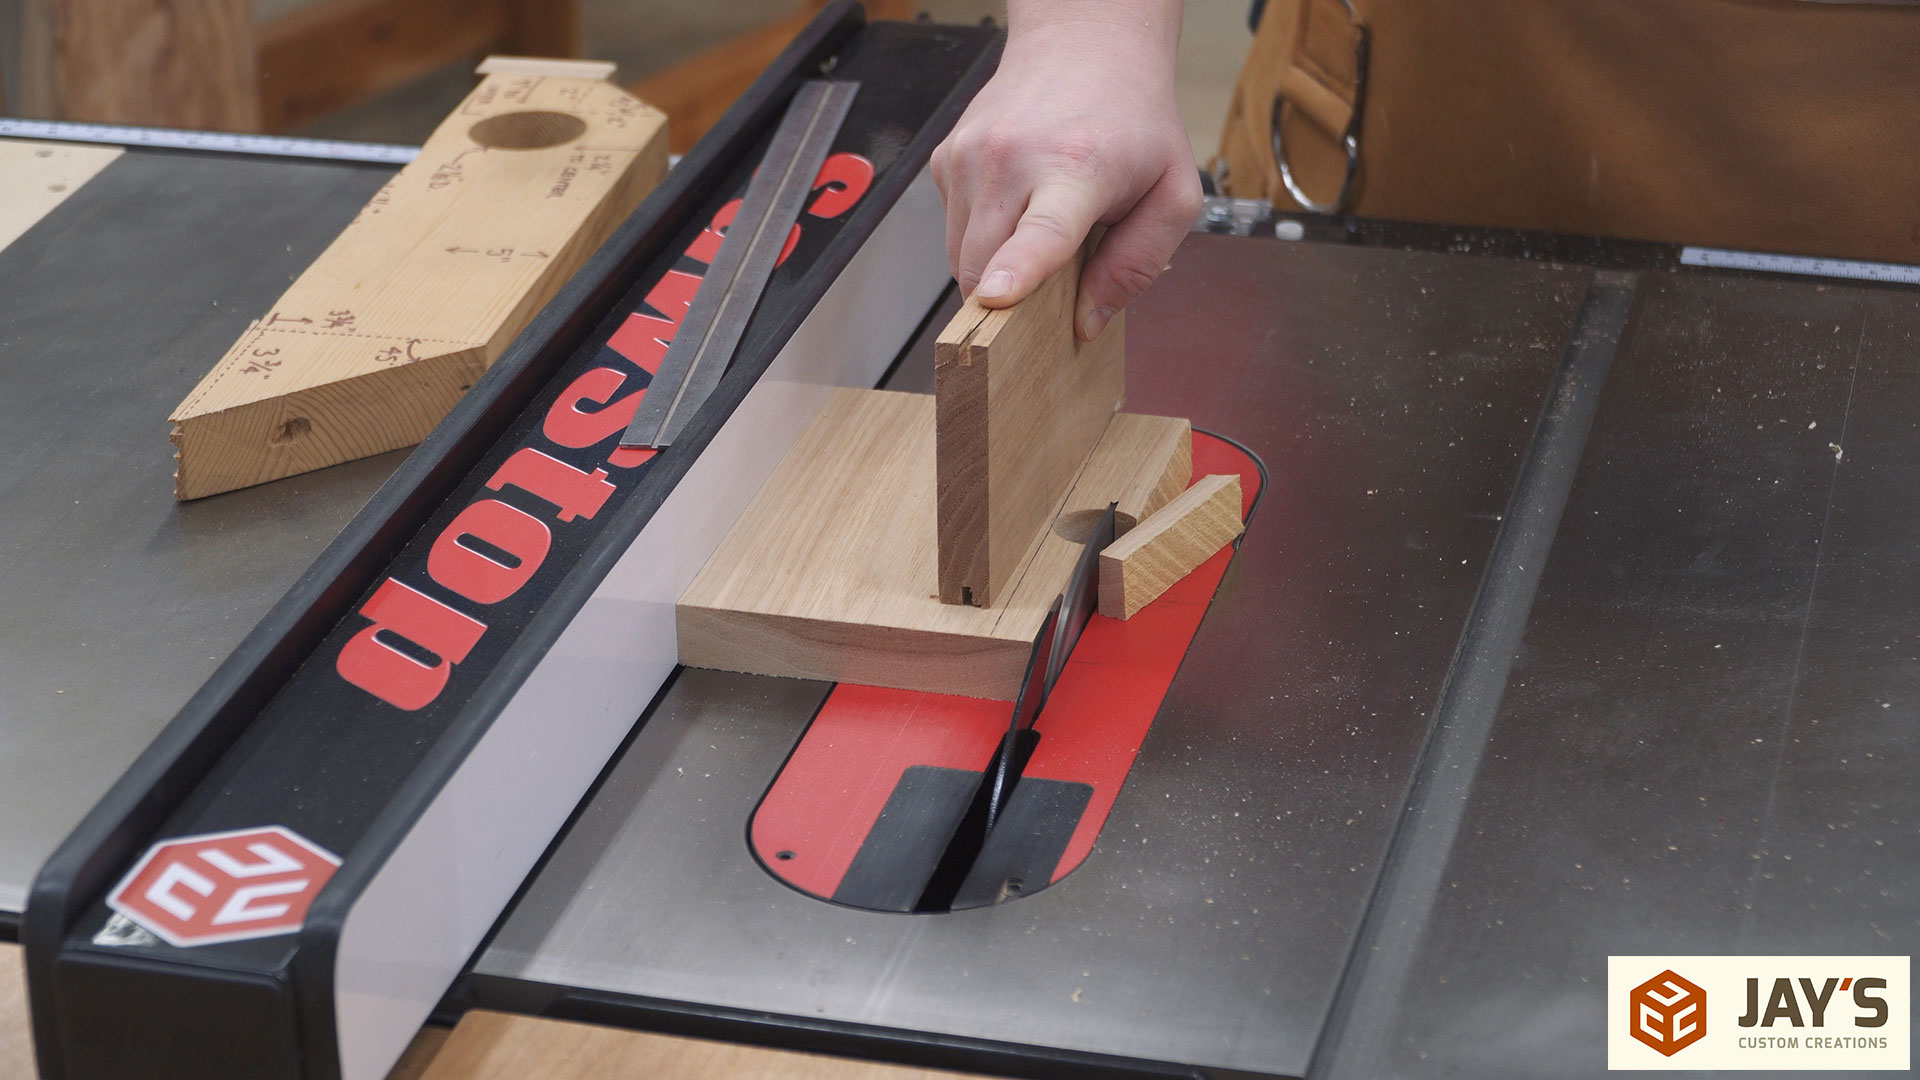
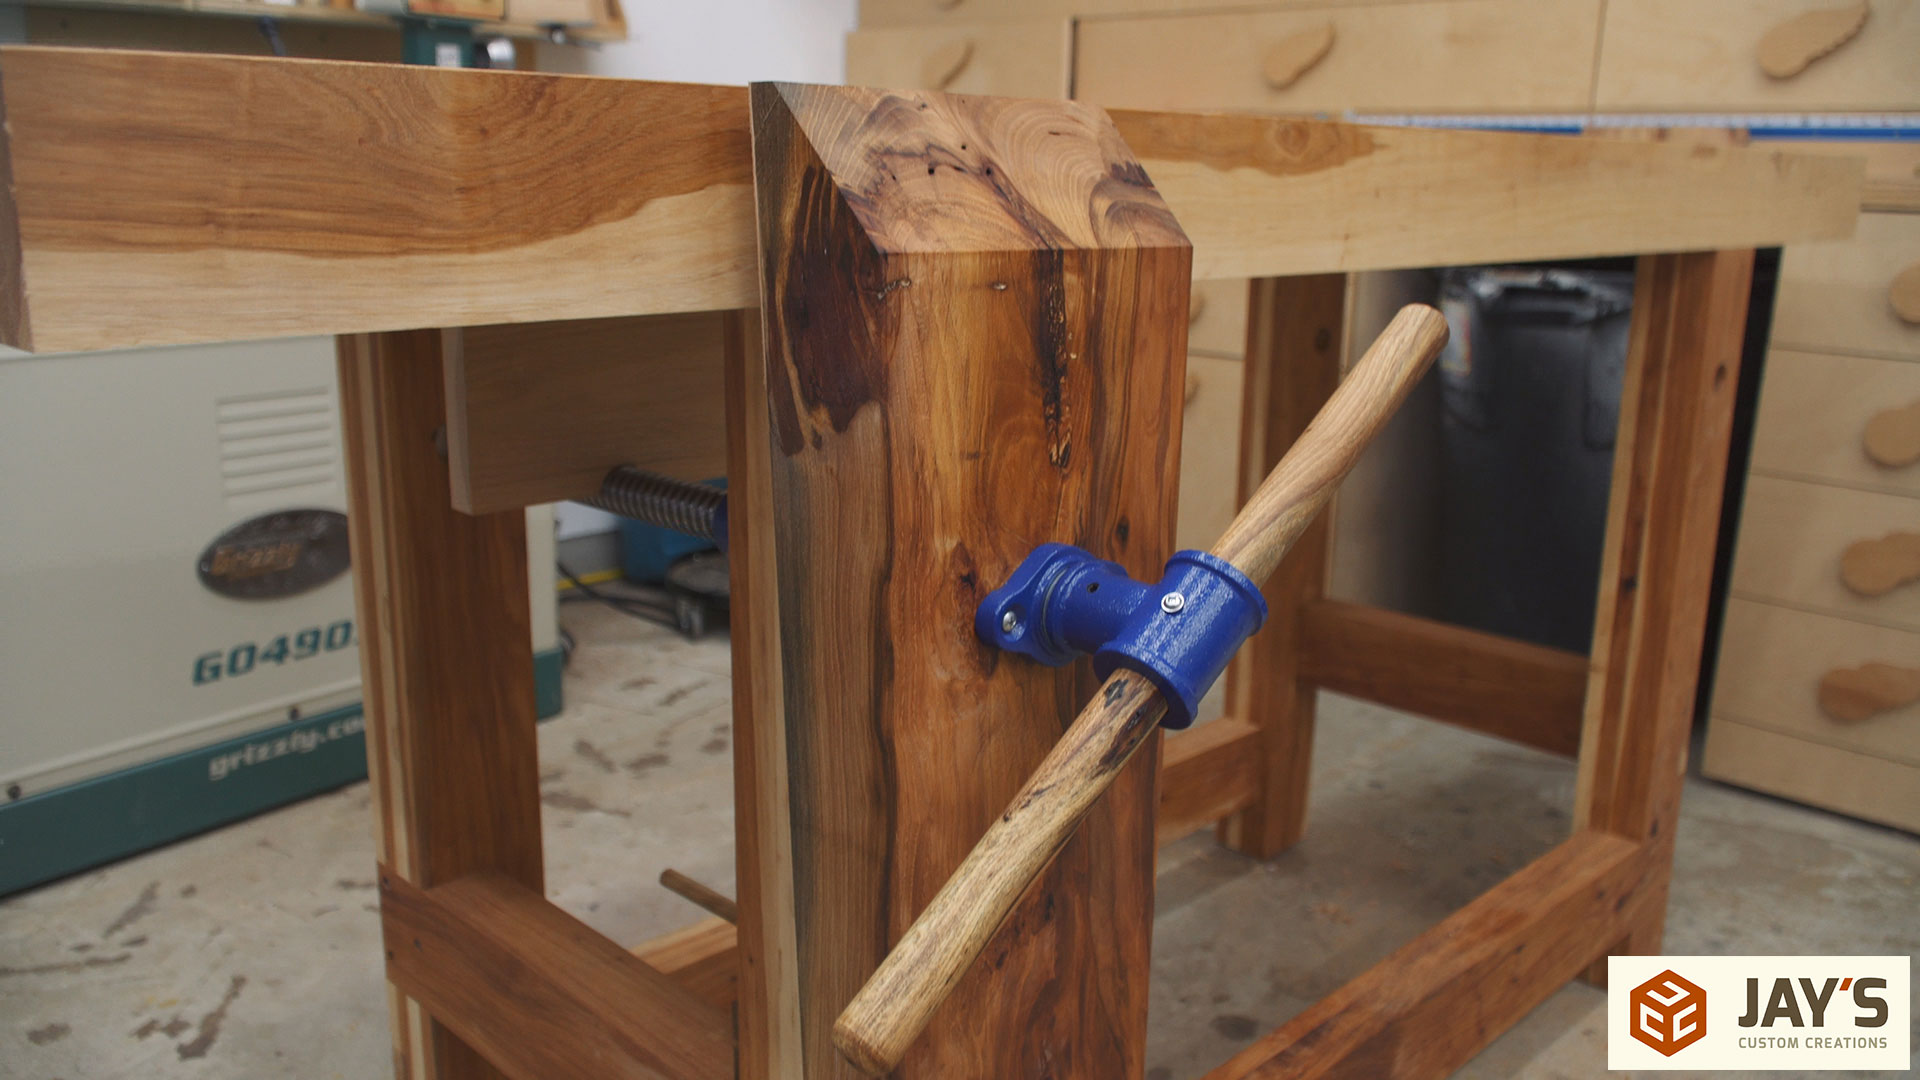
And here you can see how it works. When the vise is opened gravity will cause the chop to sag and the remaining screw inside the bench to rise. This makes the screw bind in the nut and adds resistance. With the block set in place the screw can remain at the correct angle while in use and slide as easy as the screw will allow.
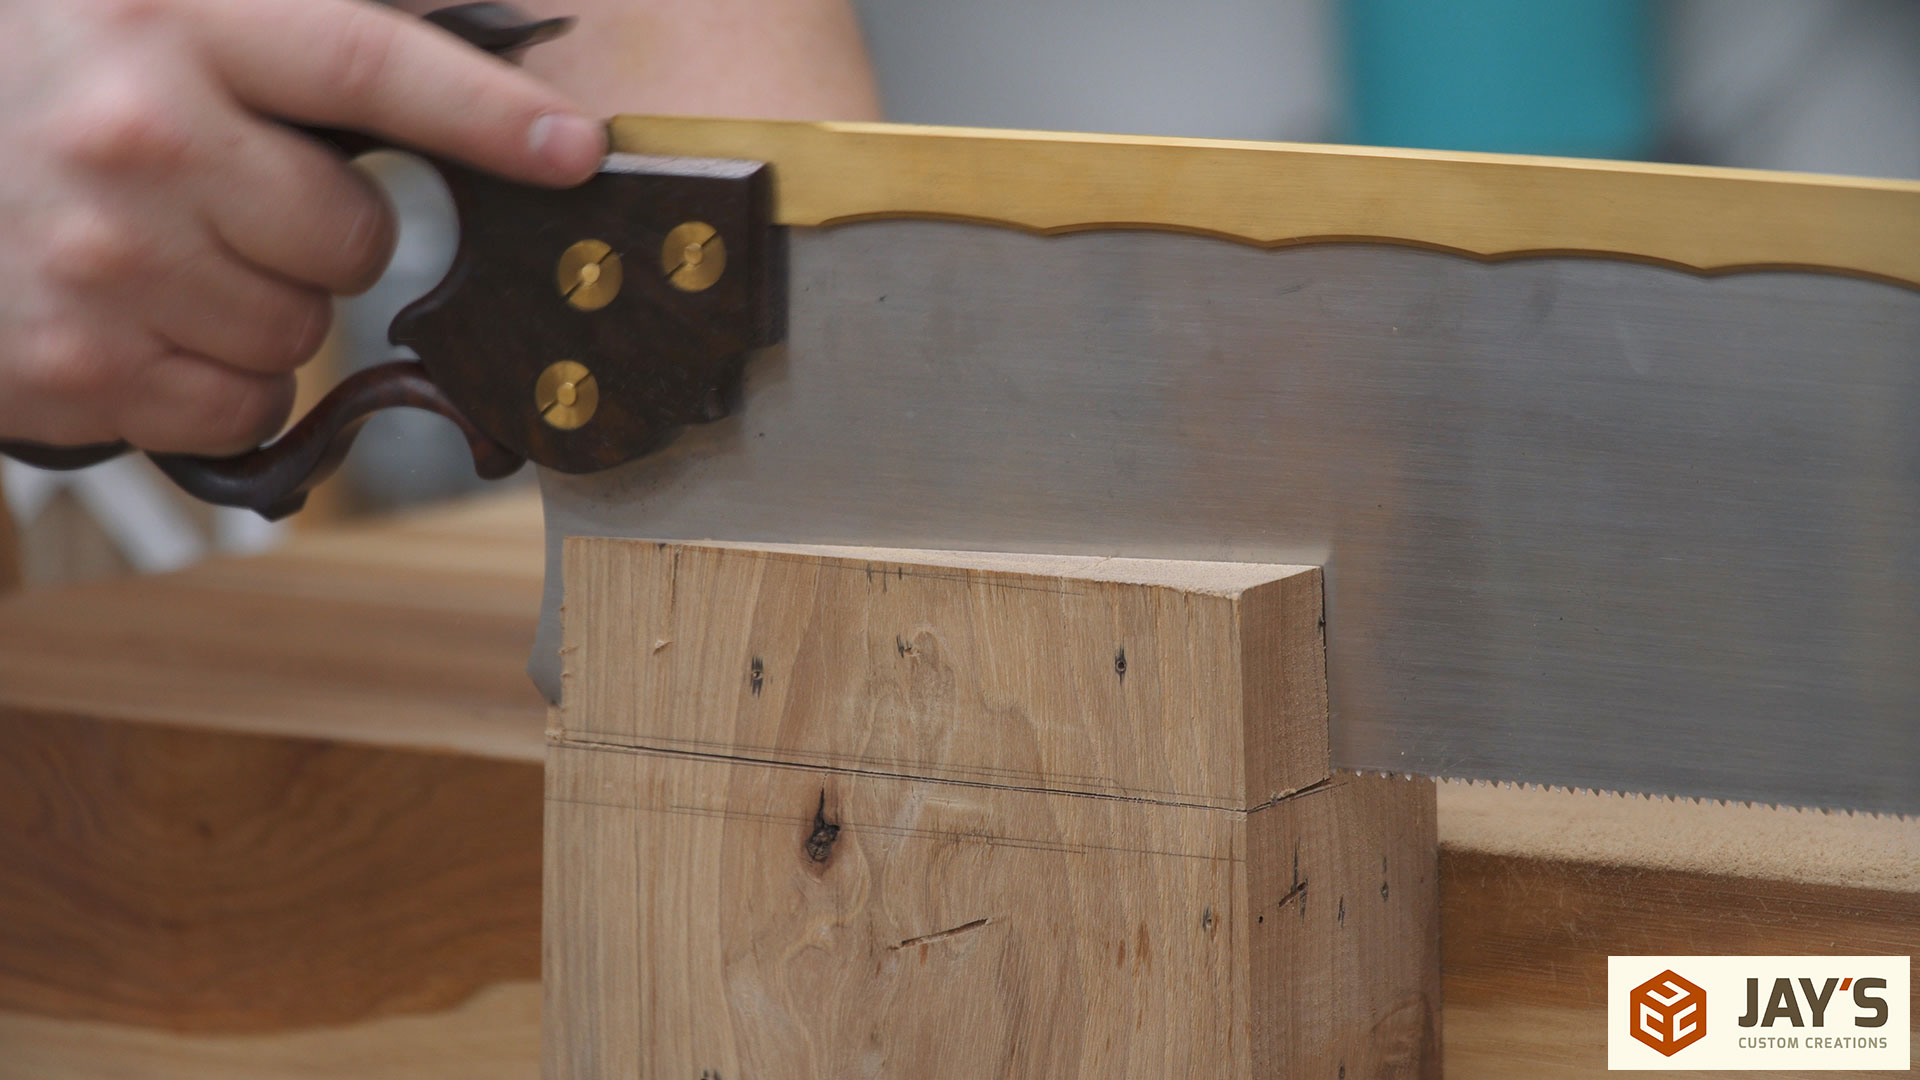
I don’t recall the last time I rotated the head of my miter saw. In this case I used it to cut a 45 degree angle on the top, outside edge of the chop. This allows for a hand saw to get closer to the work piece that is in the vise rather than raising the work piece.
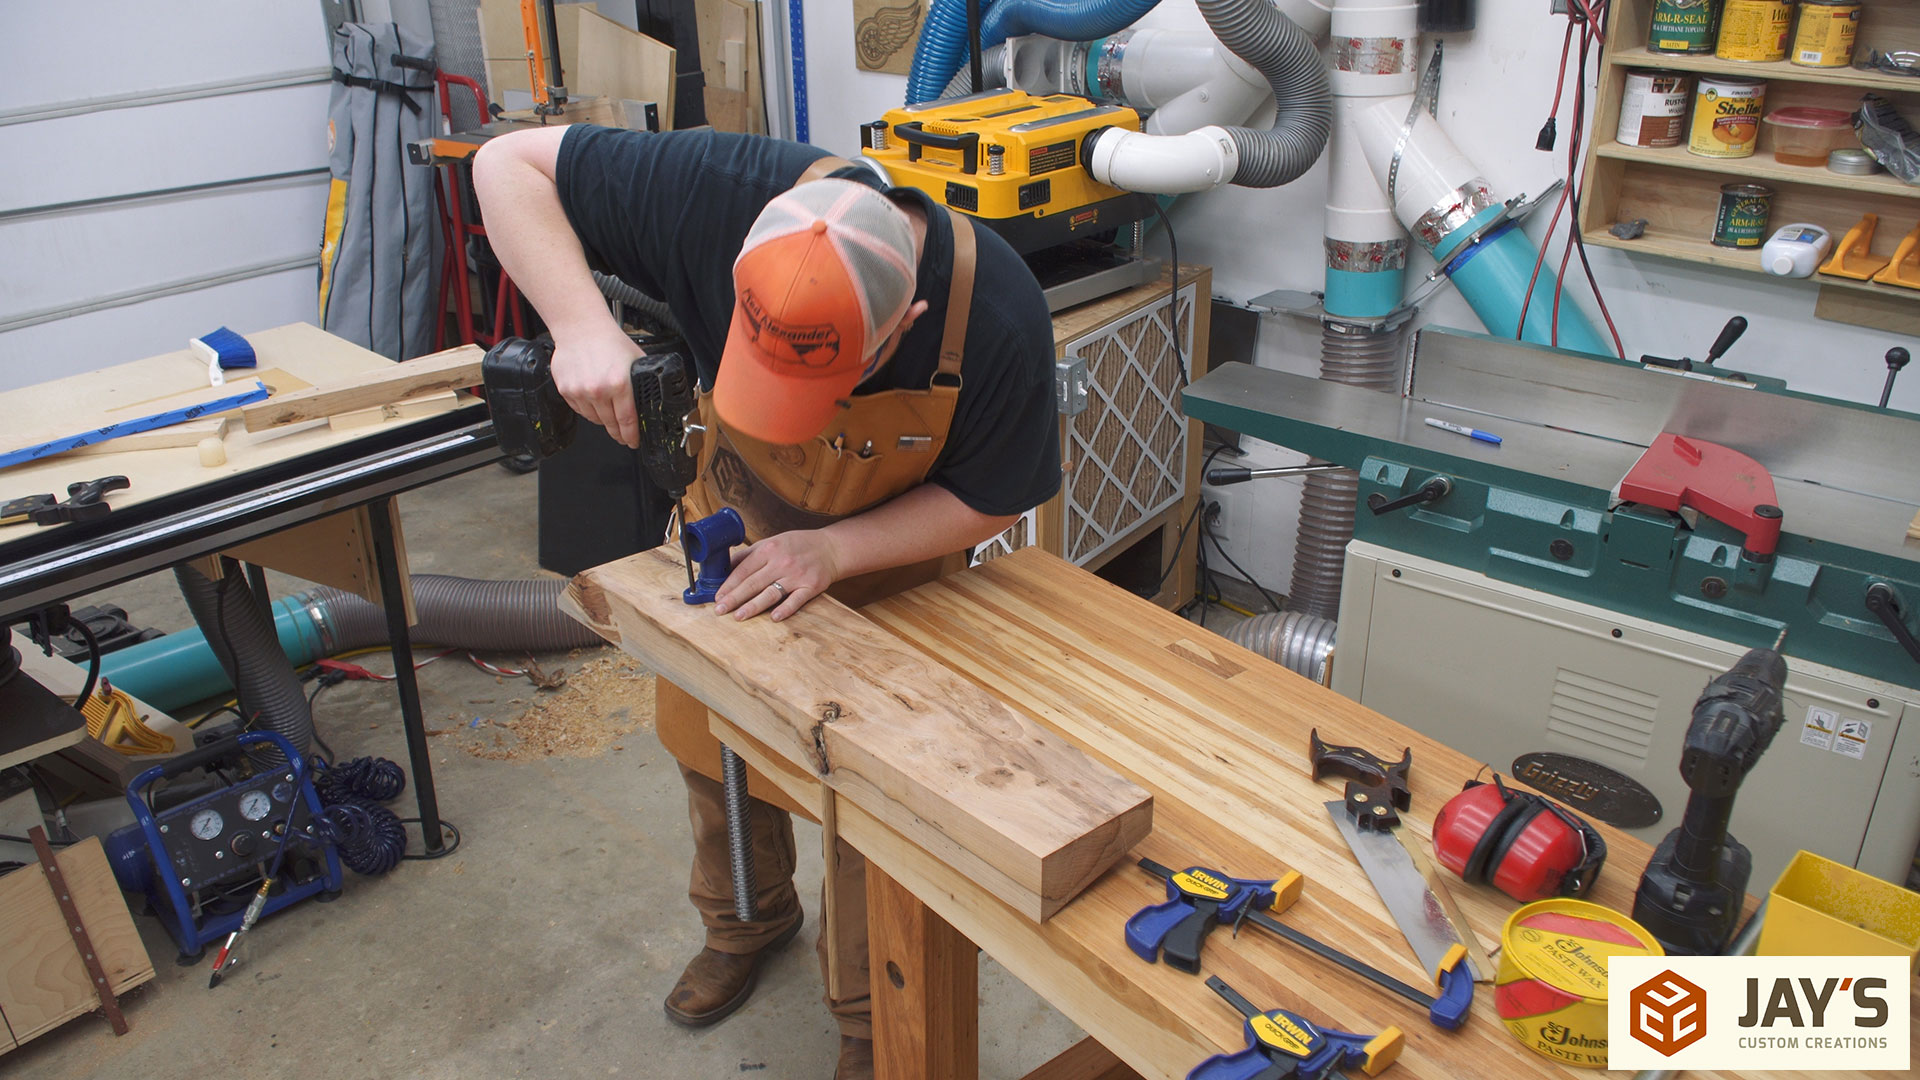
Then a 1/2” hole is drilled directly outside of one of the workbench leg outlines previously drawn on the inside of the chop.
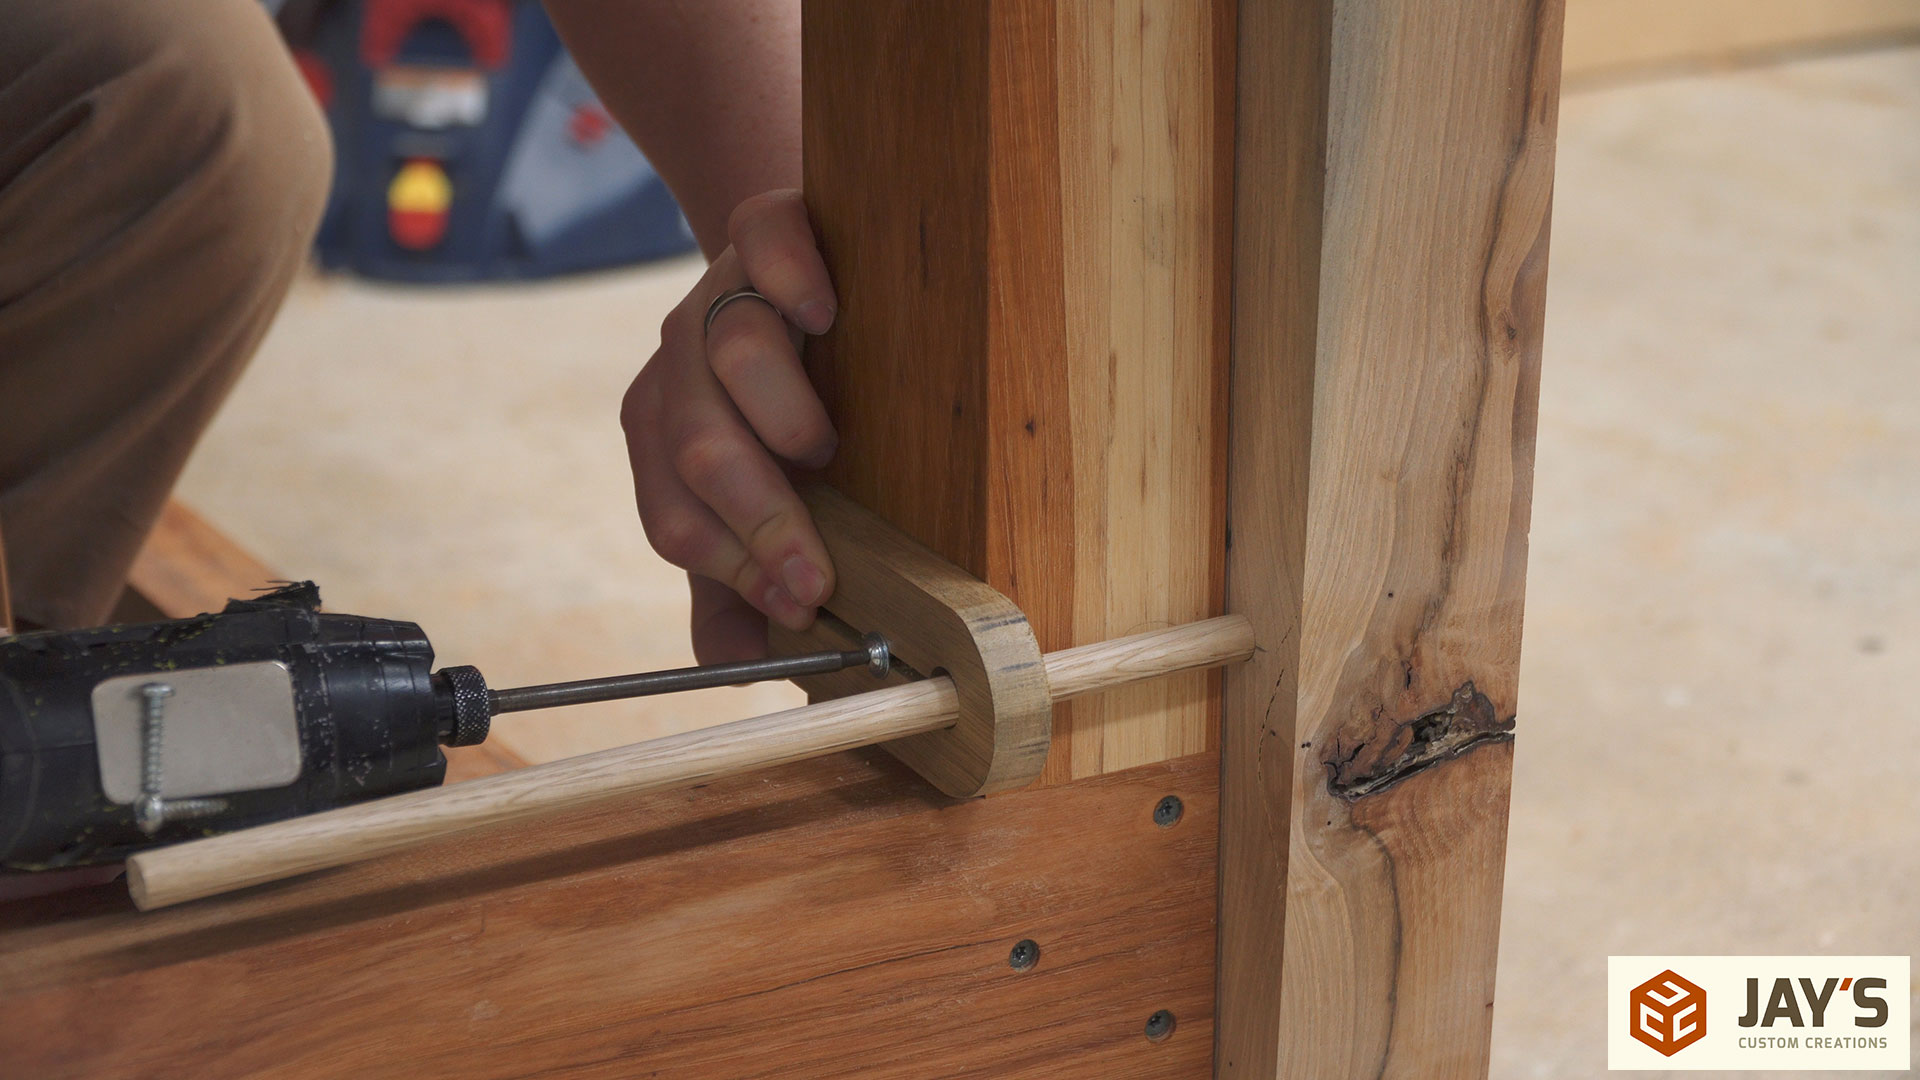
I’ll be using a dowel to prevent the workbench from rotating clockwise when tightening. To hold the dowel in place I made a simple adjustable block from a scrap of hickory. Same stuff, different color.
Before assembling everything for the last time I needed to cut the matching wedge angle on the bottom of the chop. You can see that the wedge I’m using doesn’t taper down to a point. It stops at about 3/4” in width. With the chop elevated by about the same amount I traced the angle making sure it intersected the corner of the chop. This means when wedge is at the halfway point of the chop the top of the chop can still rack inward and clamp something very thin like a card scraper. I want the wedge to be at the very least 50% engaged with the chop at all times. If the wedge is only engaged with about 1/4 or 1/3 of the chop the chop will tend to rack laterally when tightened. Positioning the wedge cutout like this maximizes the total width of the wedge.
The other line needed for the wedge cutout is determined by the thickness of the wedge. With both the wedge and the chop resting on the workbench I transferred the height of the wedge to the chop. Keep in mind that when the chop is mounted it will be offset from the ground by a 3/4”. This means that when the chop is mounted the cutout will be slightly higher than the wedge. This makes sure that the nails I drove into the top of the wedge to make pulling it back with my foot easier will not interfere with the wedge cutout.
I used my carcass saw and tenon saw cut the wedge shape into the chop. Hickory is no match for a sharp saw :)
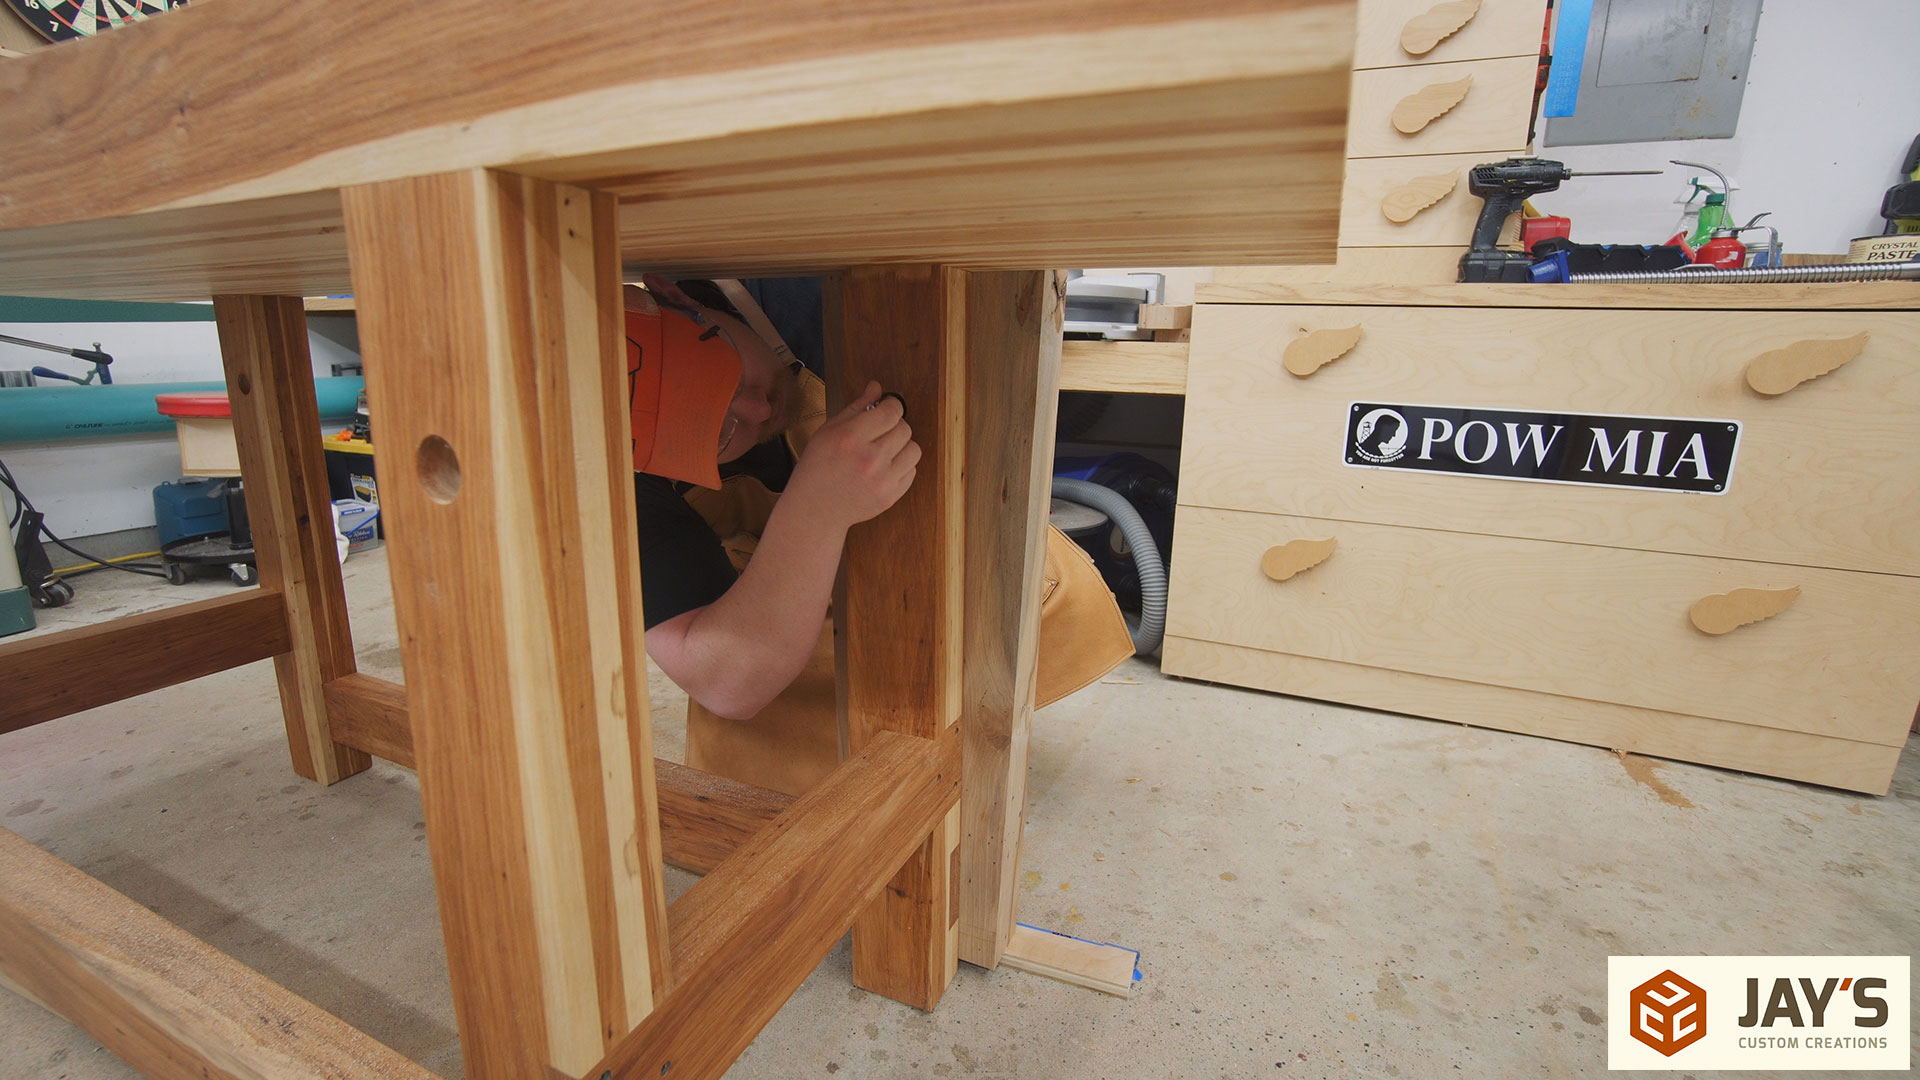
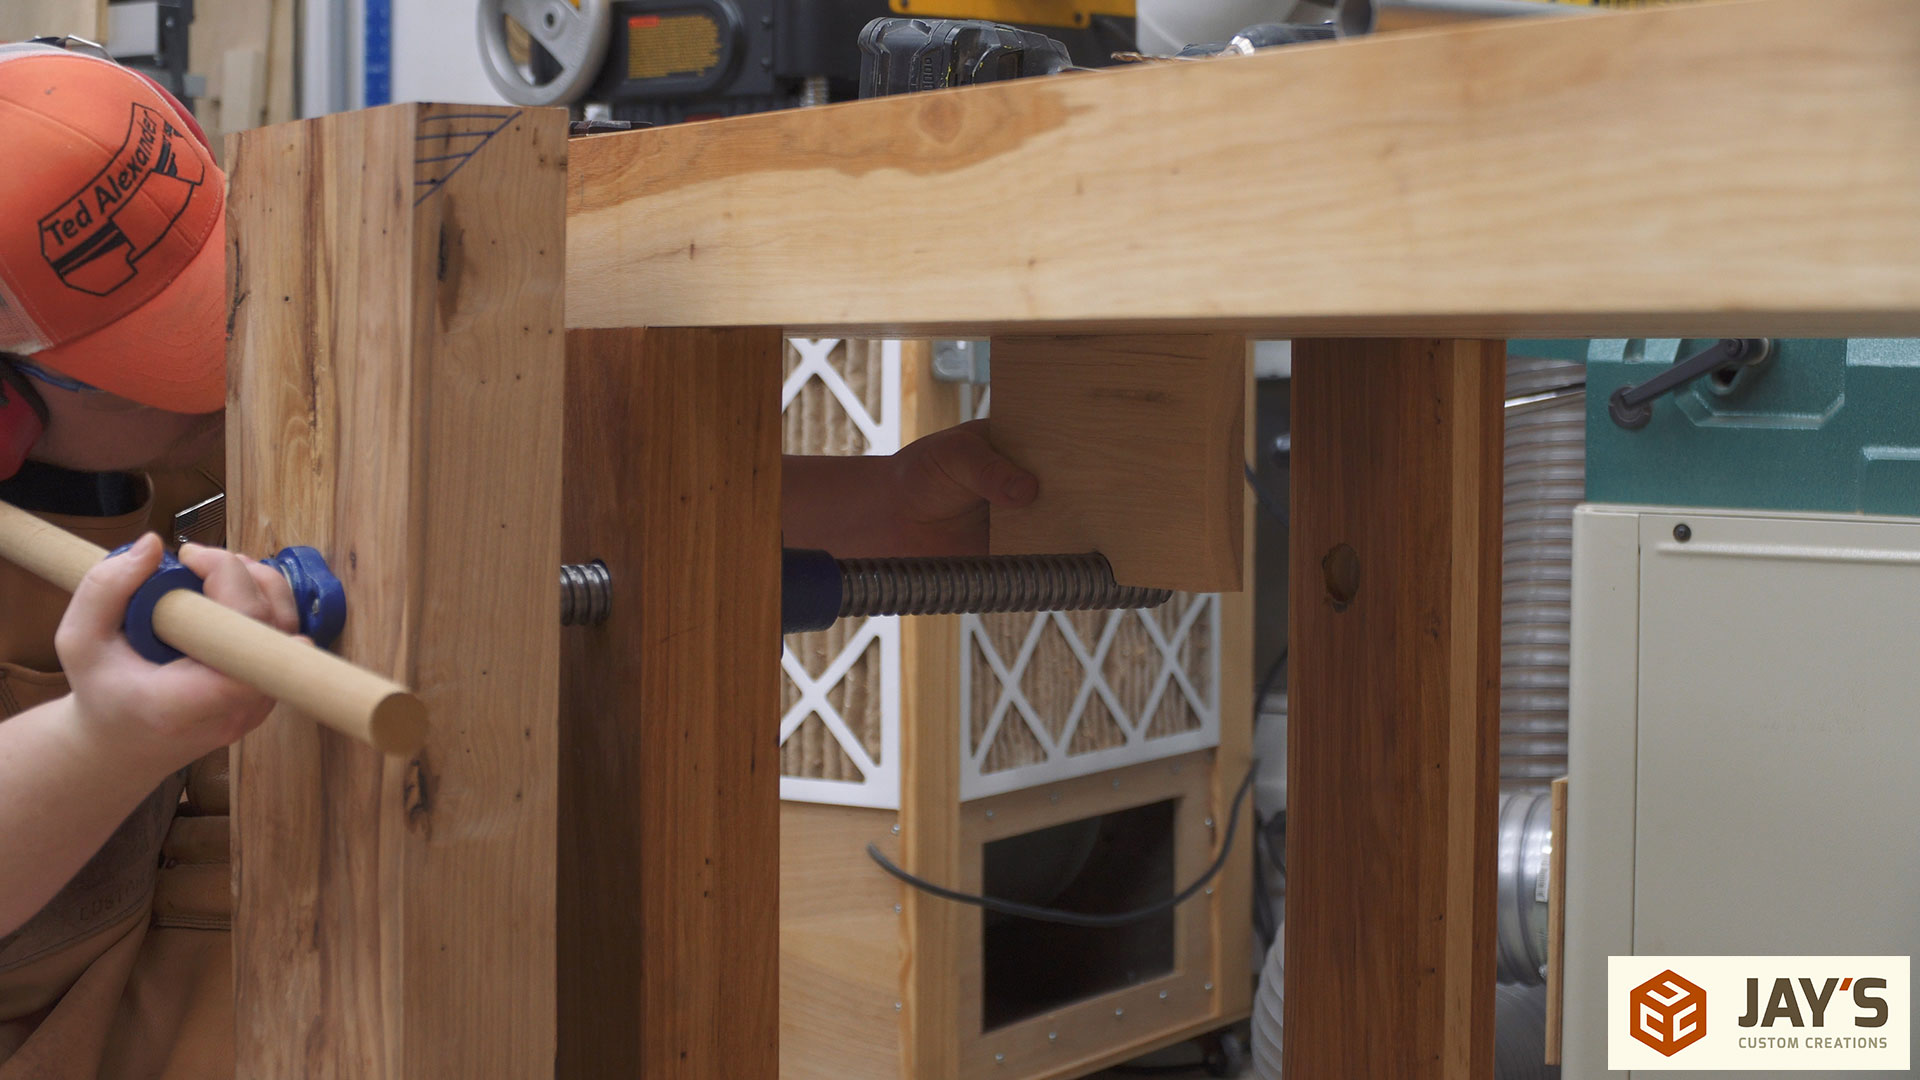
Assembly can finally begin. I started with the dowel. No glue here. It was crazy tight without glue.

Followed by adding the screw once again.
With the chop tightened against the workbench the dowel retaining block can be added. I cut a slot in the block to allow easy positioning of a screw. One screw with a washer is all that is needed.
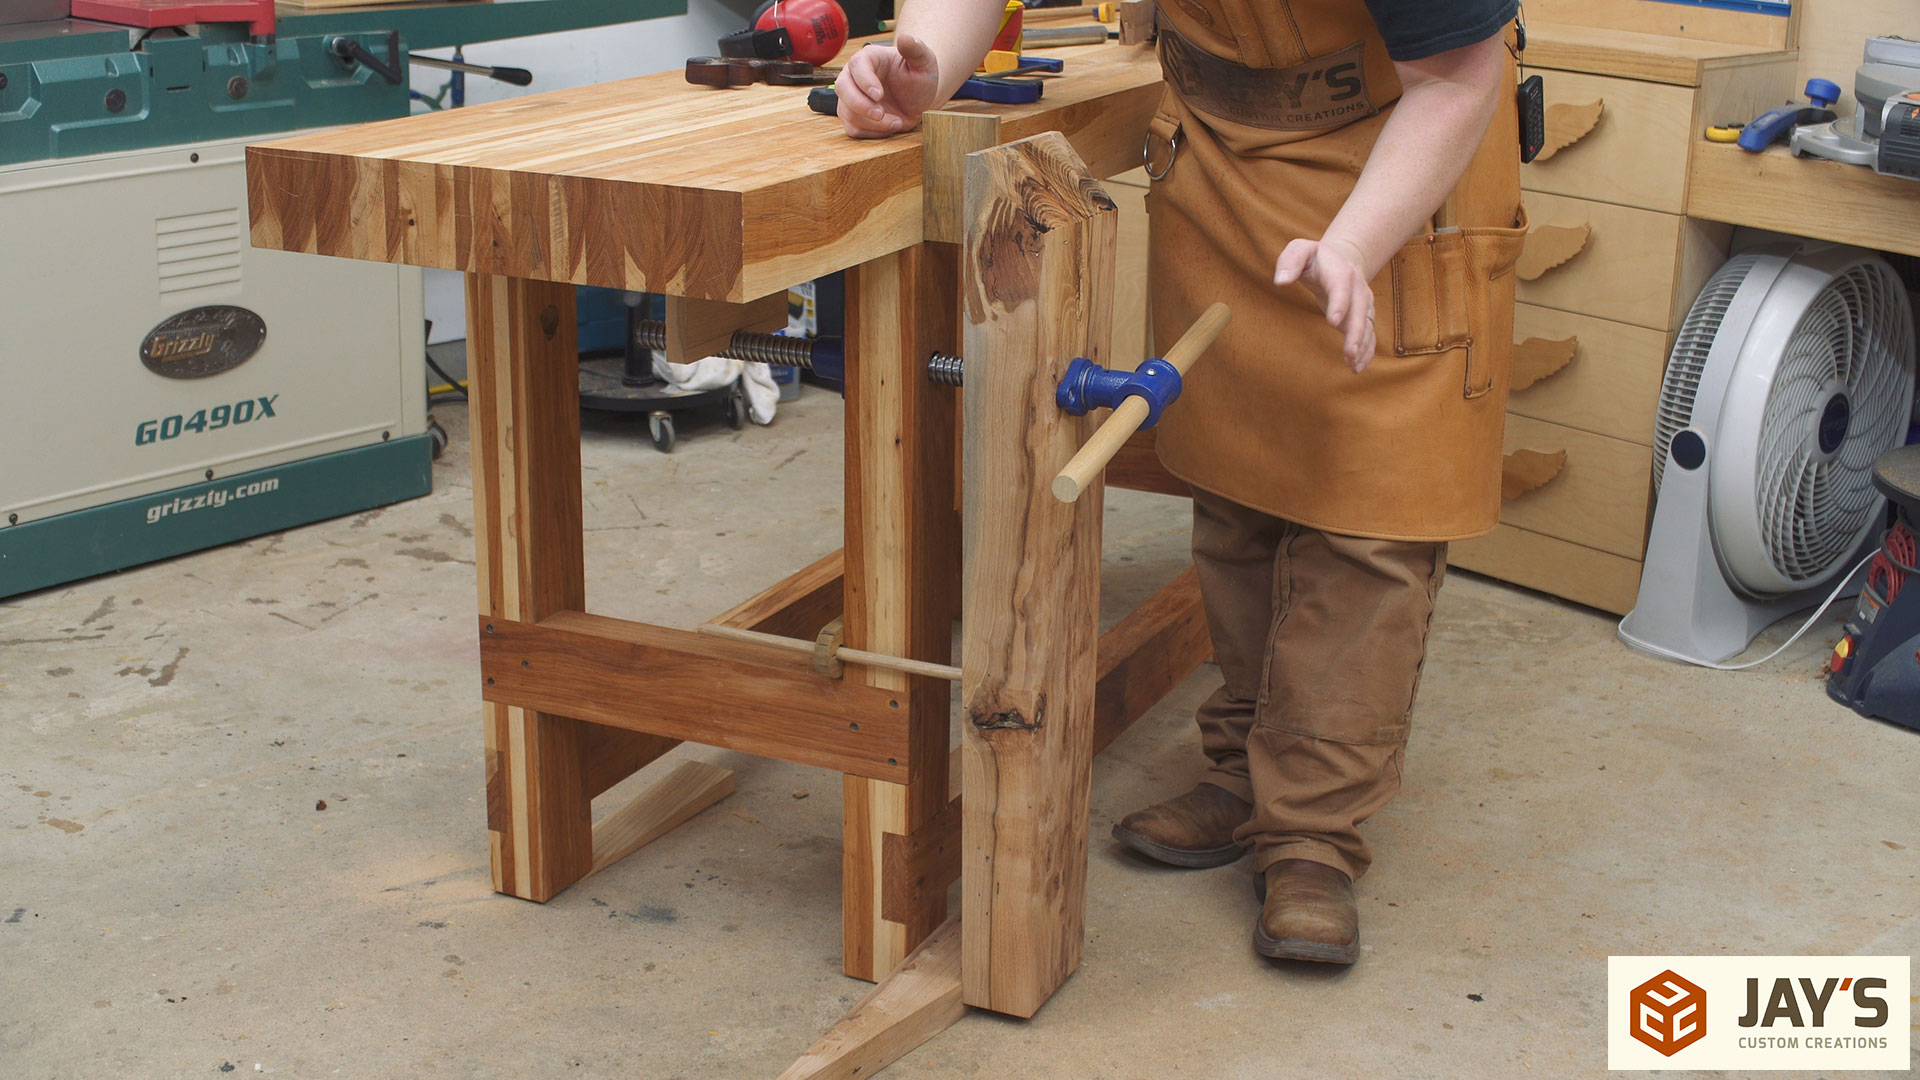
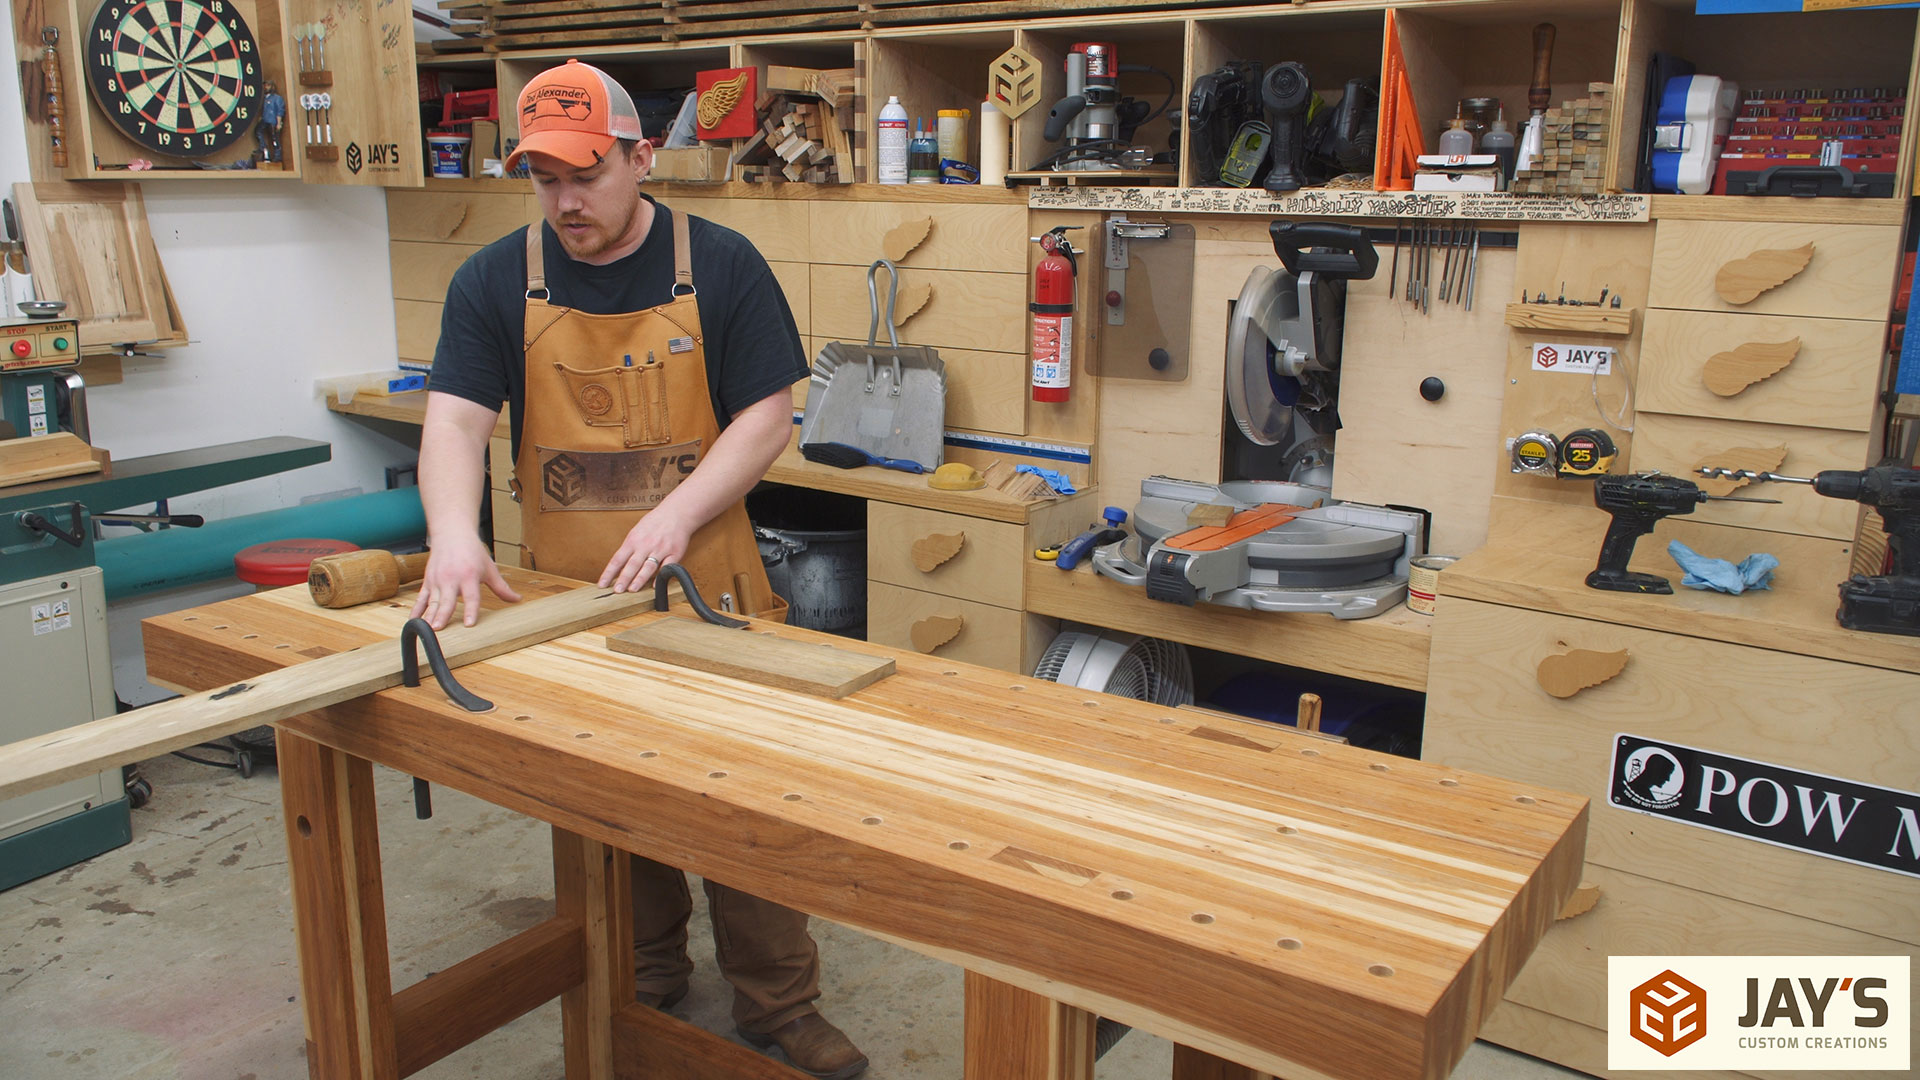
A quick demonstration of how easy and effective the wedge is. Pull the wedge back, tighten the chop just until it makes contact with the material in the vise, kick the wedge forward, tighten the chop. This is all done seamlessly and utilizes an extra limb (leg) that you aren’t normally using. A traditional pin guide requires you to bend down and change the pin location every time you change thickness of material. You can also see the dowel in action here preventing the chop from rotating clockwise when tightening. The effort involved in creating the wedge, wedge cutout, dowel, and dowel retainer is MUCH less than making a traditional parallel guide, drilling all the holes needed for different thicknesses, mortising it into the chop, and cutting a mortise into the leg of the workbench or making/buying a criscross parallel guide and installing it. And while I’ve never actually used a pin style parallel guide it seems obvious that interacting with and using the wedge system is much easier and quicker than a pin style parallel guide. A crisscross parallel guide is easier to use but costs a lot more than a scrap block of wood and is more labor intensive to install. I personally think the wedge method is the perfect balance of easy and inexpensive and it’s guaranteed to never fail.
The entire point of using this bolt on vise screw was because I had a lot of people request an option that doesn’t require a lathe. For that reason it would be silly of me to show turning a handle on a lathe. And for that reason I just cut a piece of dowel and pinned it in the vise with a screw. A quick and easy handle. ……….. There’s no way I’m keeping this piece of dowel for a handle though. I just wanted to show a method without a lathe. It just doesn’t do the chop justice. So I turned a handle out of the same hickory and installed it later. Regarding pinning the handle; I prefer to pin the vise handle at the halfway point. This increases the chances of the handle being higher and therefore will reduce the amount of times needed to bend down and pick up the handle. I also sized the handle so that it would never interfere with anything on top of the workbench. What if the handle is in the way when using a saw? Simply advance the handle 1/8 of a turn.
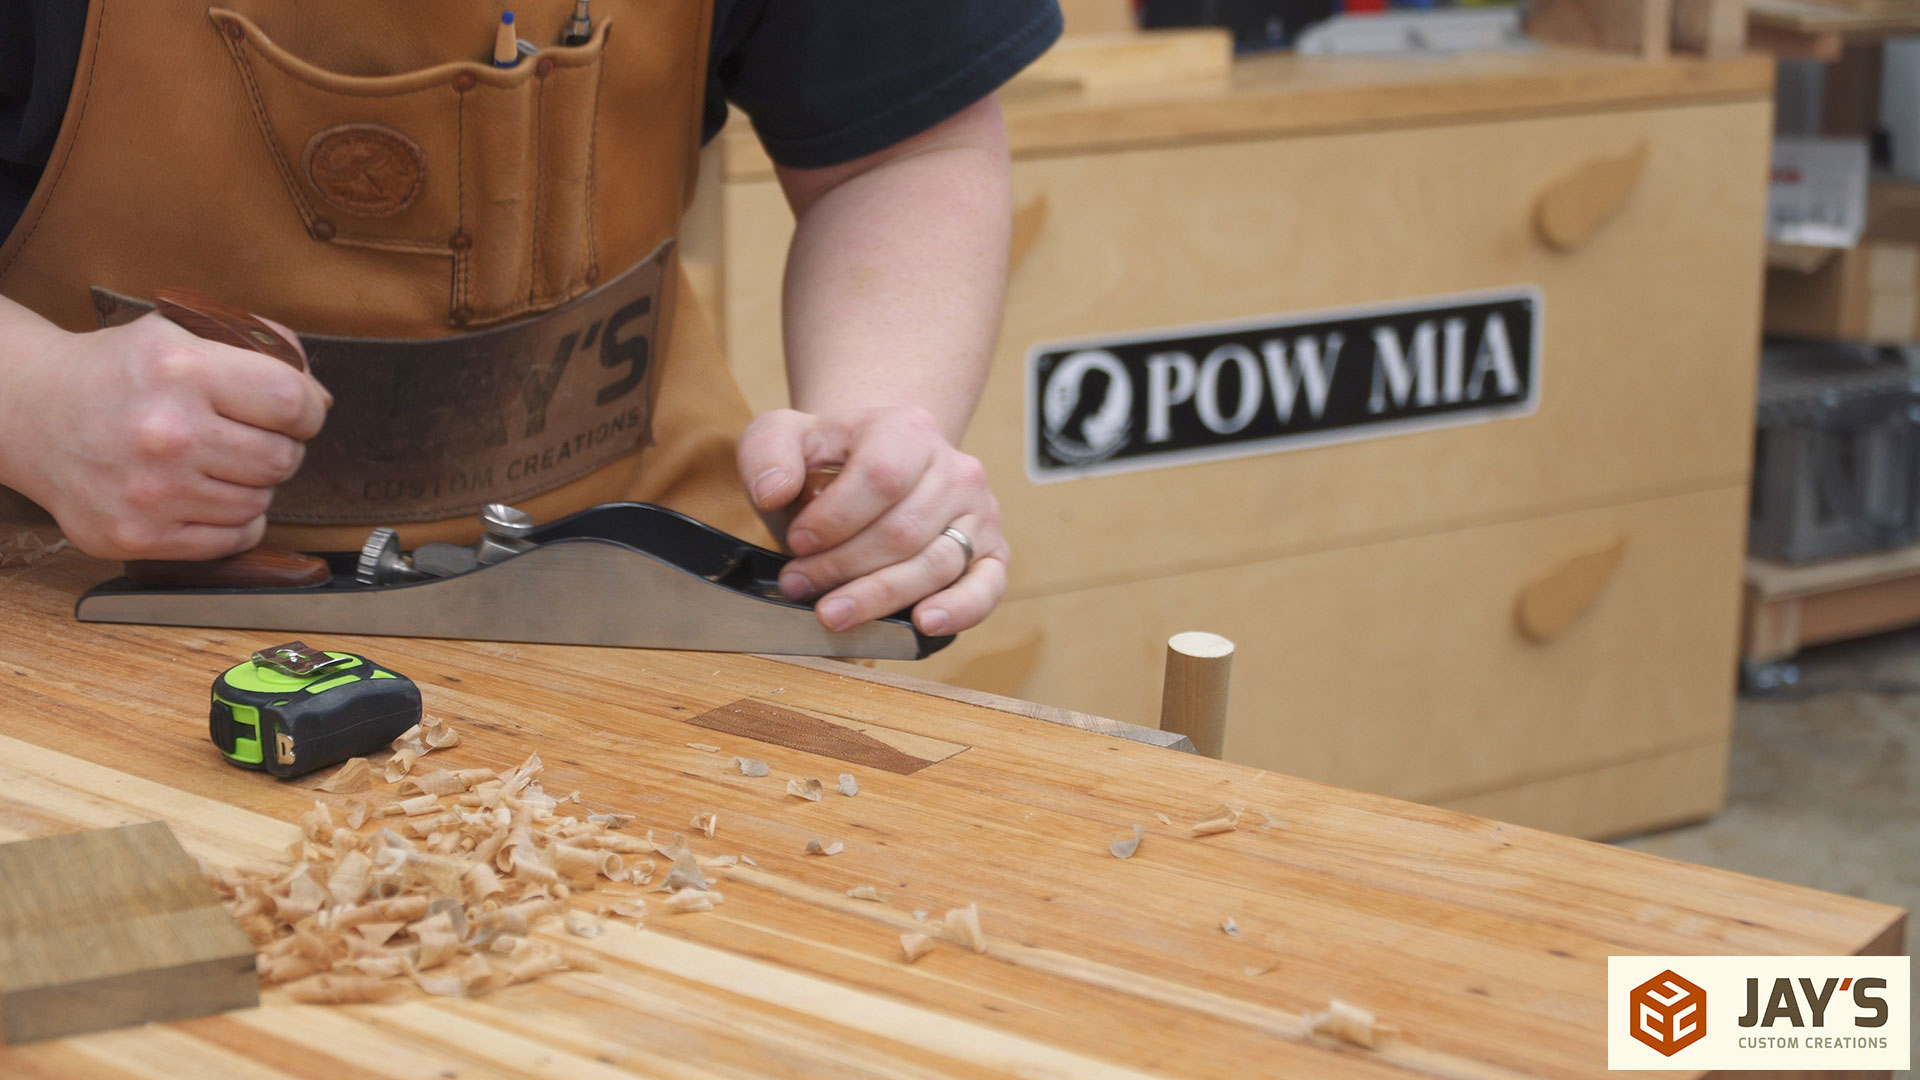
A low angle jack plane was used to flush the top of the chop with the top of the workbench.
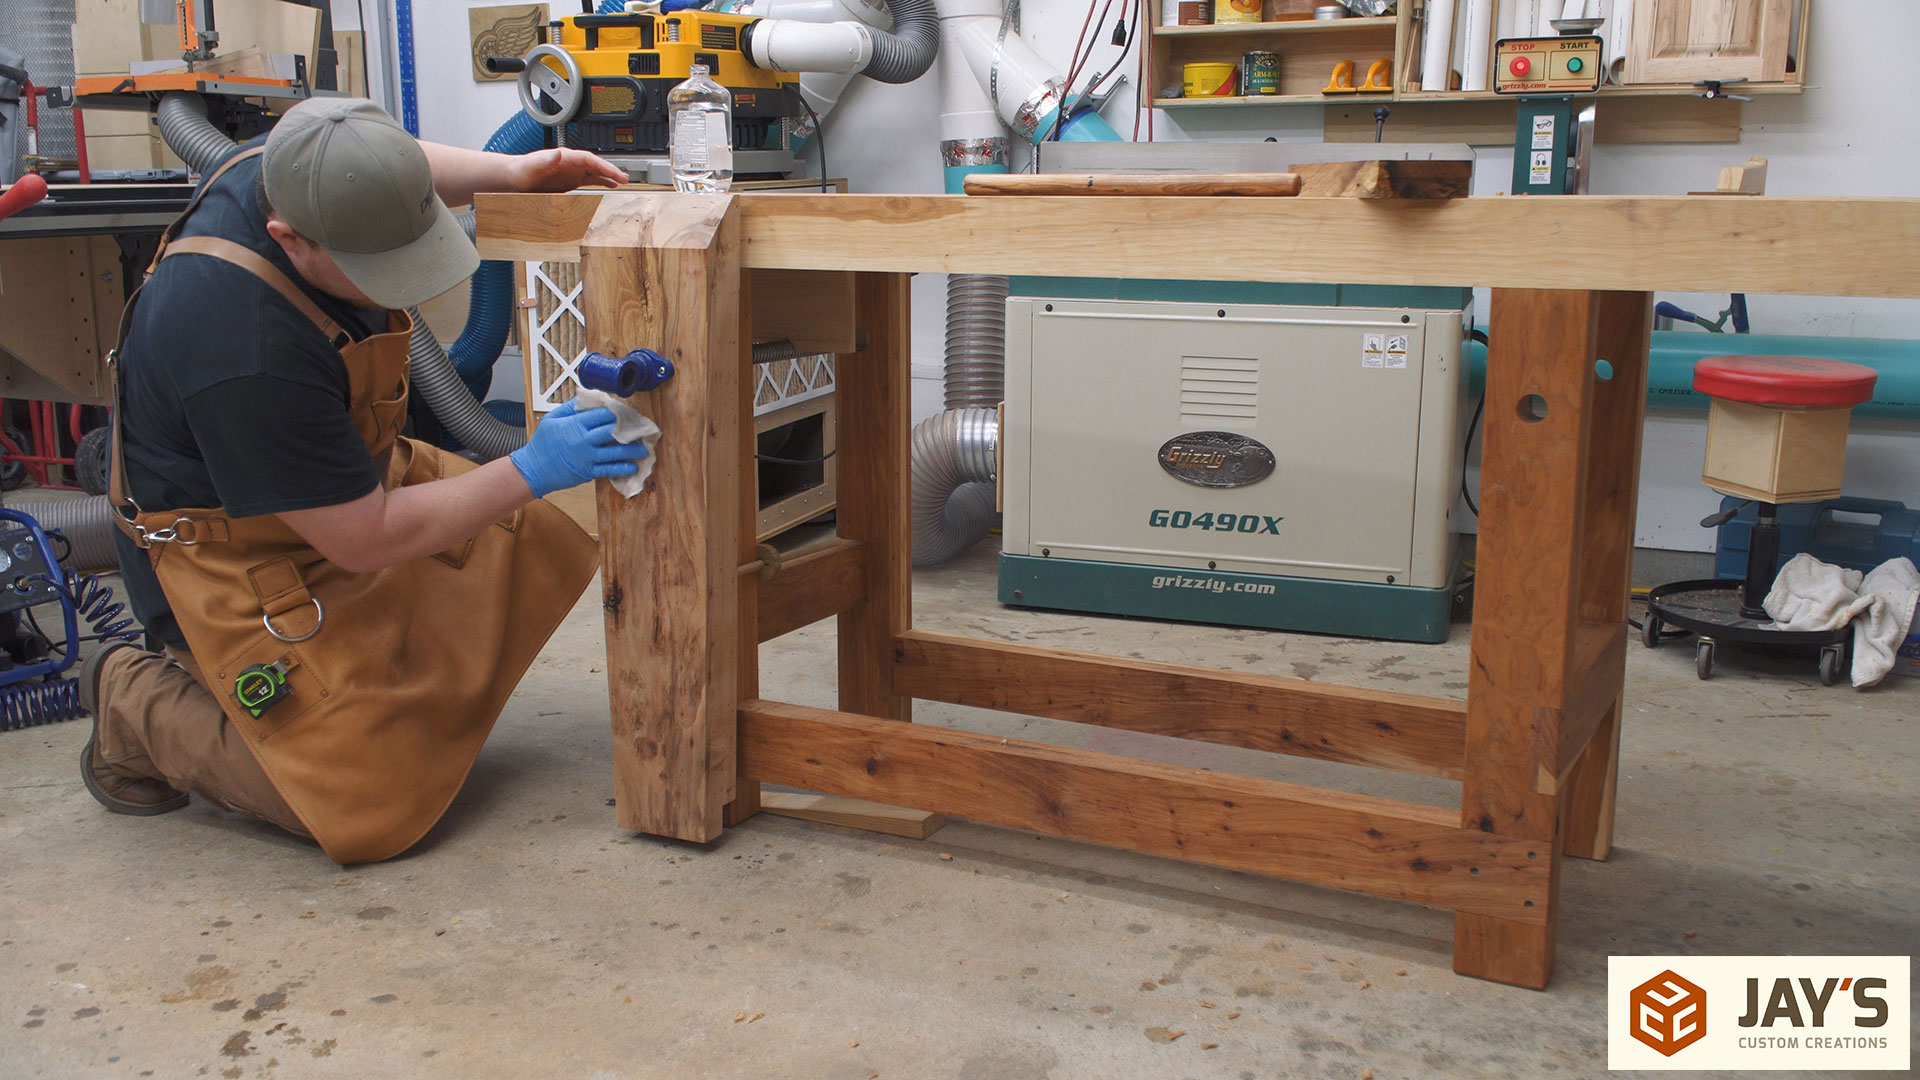
For a finish I went with mineral oil again. It’s the same stuff I put on the workbench. It doesn’t offer much protection but it does make the grain pop :)
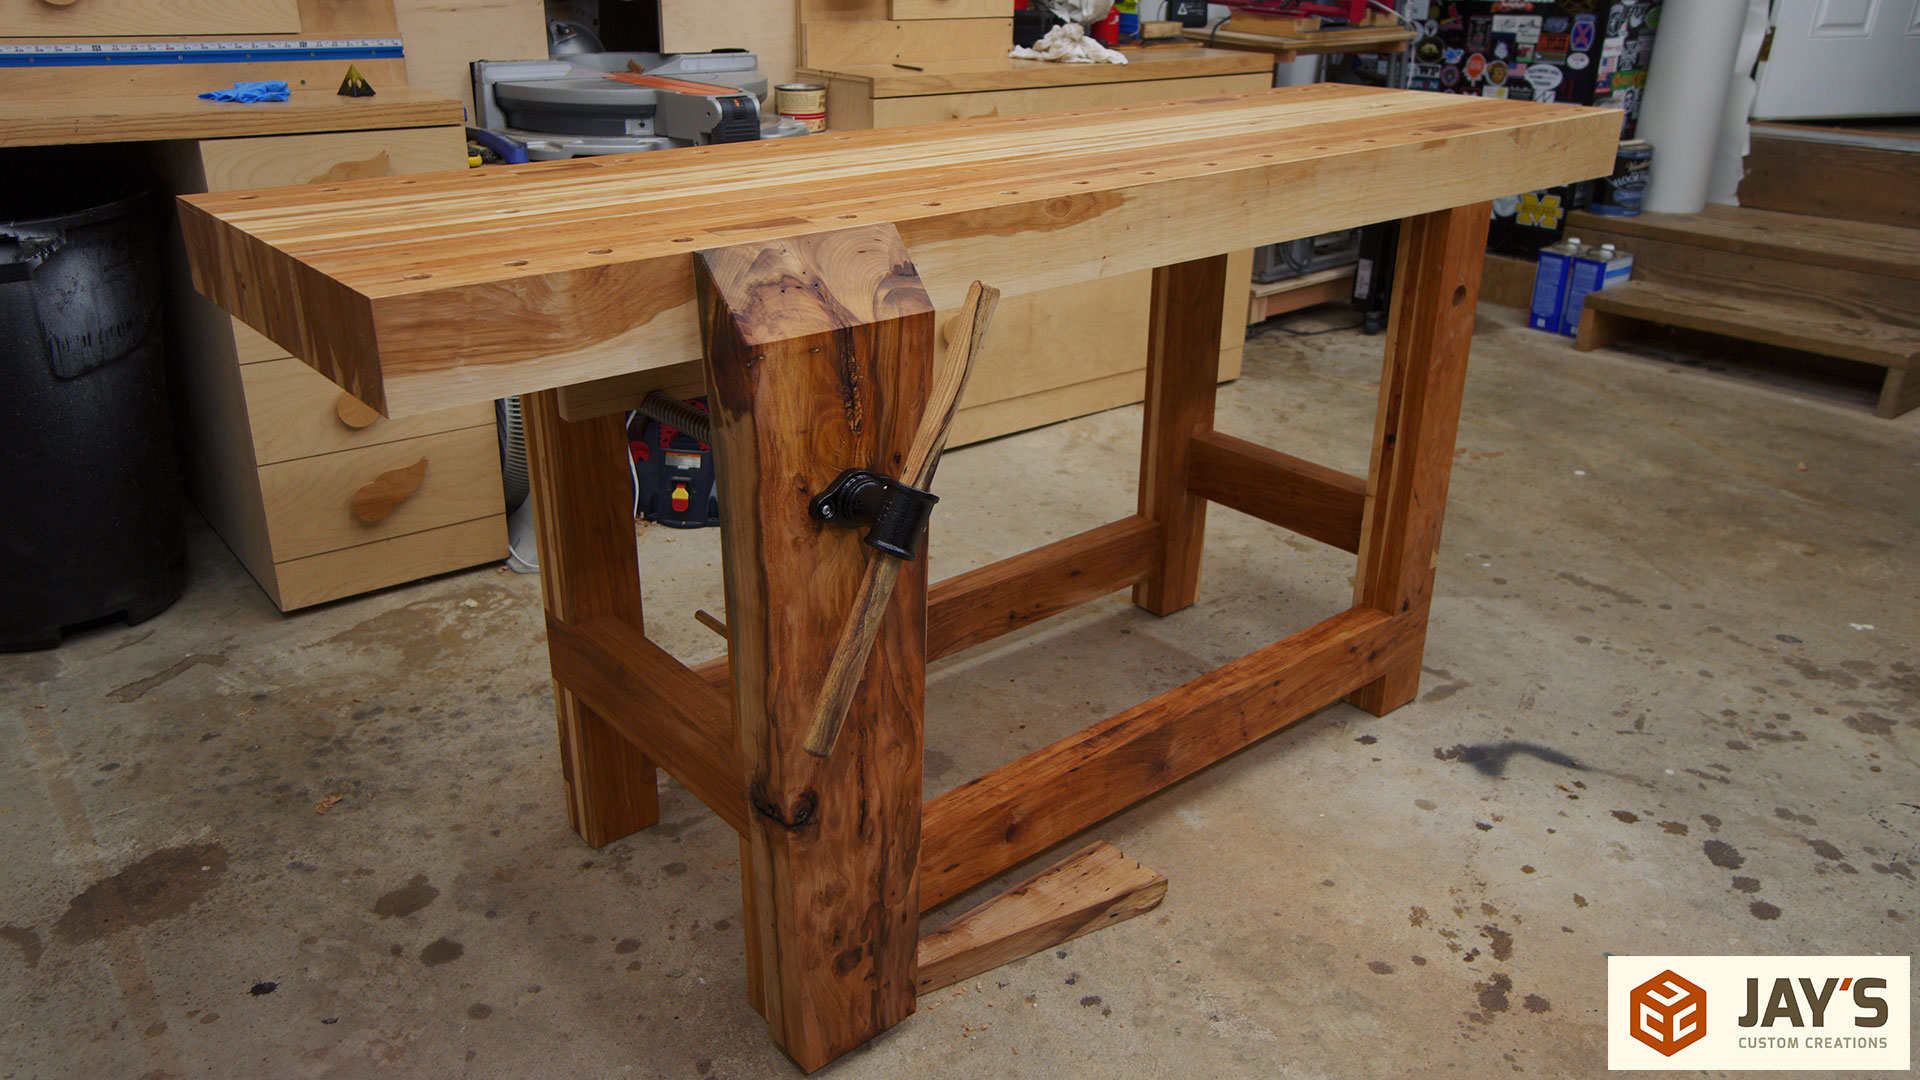
Here you can see the top of the chop with the turned hickory handle. Again, pinned in the middle. This wood definitely has a lot going on. But that blue…….I’m not so sure about that blue…
When it was all said and done I ended up moving the dowel to the other side of the leg. I noticed that if I was a little aggressive in kicking the wedge the dowel would bend in its original location. Moving it to the other side of the leg allows the leg to prevent bending a little bit.

I added a piece of leather to the inside of the chop only. I’ve found that a piece of leather on both the chop and the workbench is unnecessary. One piece of leather will add more than enough grip.

At this point the vise is done and I focused on adding dog holes to the top. I went with a 4” spacing between the legs and a 3” spacing outside of the legs. This combination, along with a Veritas Wonder Dog, should accommodate all lengths of wood smaller than the maximum of this bench.
After laying out the location and using an awl and combination square to make a center point for each hole I used a 3/4” auger bit to drill the dog holes. It’s easy to make sure the drill bit is vertical in the left to right direction while looking at it and to help make sure it was vertical in the front to back direction I used a scrap piece of wood with a 90 degree cut to place against the bit and give a quick visual guide. This worked quite well.
I ended up putting the same row of dog holes on the opposite side of the bench and two dog holes in between the rows but just outside the legs. This will allow me to clamp a panel with the wonder dog and a dog in each row. I can see this being nice for doing breadboards on the end of a panel. Also, because the dog holes are regular 3/4” holes I can use my holdfasts in any one of the holes. This really adds convenience. In my pine workbench I needed to counterbore the bottom of the dog holes to reduce the thickness of the top engaging with holdfasts in order for them to work properly. These seem to be working well enough on the thickness of this benchtop but if they ever stop working I can always counterbore the bottom of each hole. I may go ahead and do that soon so I never have to do it when it’s not convenient.
I also ended up painting the vise hardware black. It looks so much better against the hickory now. The blue just stuck out too much. Bench; done. Vise; done. Time to get to work and use it.


Great video, Jay. I really like that hickory. Hope you enjoy your bench.
Thank you, Scott. This hickory was truly a diamond in the rough…..the key word there is rough..
I enjoyed your instructions on how to install the vise. The hickory is beautiful
Richard
South Carolina
Thank you for the feedback, Richard.
Does that mean you got rid of your assembly table? Great video, web page and bench! -John.
Yup! The assembly table now lives at a local cabinet maker’s shop. Thank you for the feedback, John. I appreciate it.
I agree the hickory is beautiful, thanks for the video.
You do such a nice job on building these projects and also on the video output.
keep up the good work, I look forward to it weekly.
Thank you very much for the feedback and kind words.
Great looking bench and vise. Same for your southern yellow pine bench.
Thank you!
Often, it is difficult to watch a YouTube video and duplicate the process. By writing this article with photos, you have really enhanced the learning experience by allowing me to print the steps and go page by page. This is a lot of work on your part, but one of the main reasons I subscribe to your channel. Sometimes entertaining and I get a chuckle, but always informative. Hope to see you in a Texas event sometime in the future.
Thank you very much for the feedback, Steve. It is definitely appreciated.
Amazing Video and article Jay, thanks as always for making great content. I’m in the camp of having purchased your bench plans and made the bench but was dissapointed that Dema was no longer selling the hardware. I’m probably going to purchase this hardware and make a leg vise as some point soon so thanks again!
That’s one of the reasons why I wanted to make this video. A lot of people weren’t able to get one from Dema (can’t blame him for it not being worth it to make more). All of the dimensions from the original workbench plan will work with this screw. Just change the center hole for this size screw.
In a word….. beautiful
Love that hickory slab vice and hickory bench, thanks for detailed descriptions on the how/why of your design choices. I enjoy showing non-woodworking friends and family your videos because you have a unique ability to entertain and inform. Keep up the great work!
I enjoyed your video and article, You also did a great job of listing everything you use, but I would love to find a leather apron like the one you have. Would you share where you got yours?
Thank you
Lee Summers
I enjoy your video`s. Ran across a video of a different knee vise and wondered if you had seen it. Very interesting design. https://www.youtube.com/watch?v=uRlKoqUoKcM
Jay, thanks for posting the link to the vice screw. I’ve been looking for materials to create my own vice and this solves a lot of the pieces for me.
Keep up the great work!
Jay – awesome bench and great video as always. Quick question, how far from the edge of the bench did you place the dog holes?
Thanks – Mike
That hickory sure is some nice looking wood. I’m in the process of building my leg vice and am planning on going the wedge route. I’m cheap and it looks easy to use. What angle did you use on the wedge? Thanks