I have seen some pretty fancy saw horses here on the internet. Some fold up and hang on the wall. Some fit together like a jigsaw puzzle. Others are big and bulky. But do we need all of that? I need my sawhorses to be strong, but not too heavy so they remain easily portable. They need to be able to take a beating from a circular saw. They need to be relatively small so they take up less space when stored. Oh, and they need to stack so that multiple saw horses only use one footprint. So what I have are, in my opinion, the best saw horses. It’s an I-beam style saw horse which doubles the sacrificial surface life as well as gives an incredible amount of clamping area. To build one set (2) you will need the following:
Materials:
- five 8′ 2x4s
- 44 3″ screws
Tools:
- powered or hand saw
- drill
Step 1:
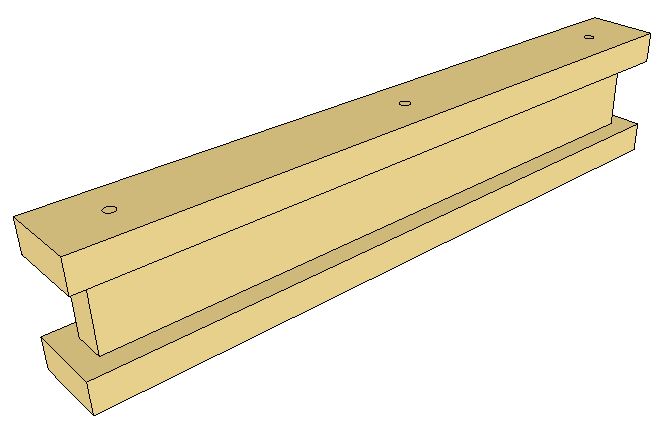
Cut all of your materials to length. This is too simple of a design to make a cutting diagram so the cuts are as follows:
- 10 pieces at 30″ long (legs and center of I-beam)
- 4 pieces at 32″ long (top and bottom of I-beam)
Step 2:
To make the I-beam arrange one 30″ piece vertically between two 32″ pieces as shown and secure them with three 3″ screws on top and bottom. Make sure to center the 30″ board so that there is a 1″ overhang on both sides. On previous saw horses I made all 3 pieces of the beam the same length. You wouldn’t believe how many times I wished the middle board was shorter so I could put a clamp right on the end.
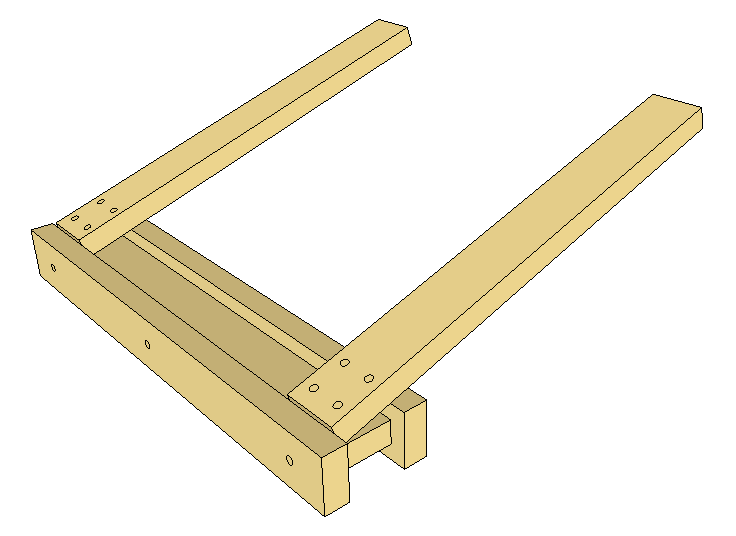
Step 3:
Lay the beam flat and start screwing two 30″ legs down. The legs will fit into place on an angle. Make sure you position the legs so that they are even with the center 30″ piece so you are not covering up the end clamping area. In this diagram, the lower 2 screws should be screwed in vertically and the other two screws should be screwed in at an angle to go directly into the bottom piece of the I-beam.
Step 4:
Flip the assembly over and secure the other two legs in the same way.
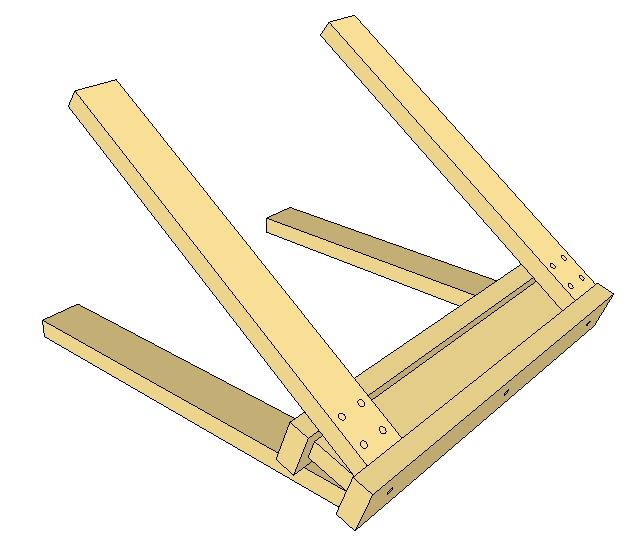
That’s it. As you can tell these are incredibly easy to make. They also stack for easy storage that only takes up one footprint.
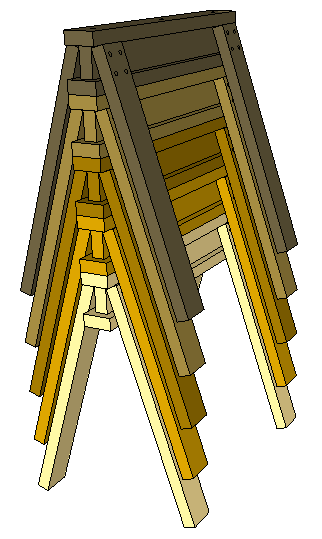
As you can tell I get a lot of use out of my sawhorses. Here are a few pics of them in various applications in my shop followed by a short video covering the build.


Really neat will be making a couple of these myself. One quick question. Do you need to cut the feet at an angle so they are flat to the floor?
PS – love the site, favourite one around
Glad you like the site and thanks for stopping by!
Cutting the bottom of the legs will make no difference in stability. The only benefit that could be gained would be less of a chance for extension cords to be snagged when pulling them around the sawhorse. That being said, I have had my set of 4 in my shop for about a year and have never had a problem with extension cords. Your choice really.
Very smart, and very stout. Those’ll hold bout everything.
Nice, man. Thanks for taking the time to put this tutorial together. Wood is good.
These are great. Love the clamping space. Will be whipping up four of them post haste. Thanks for posting the plans.
You are a good person to share your knowledge with the world! You make it look so easy.
Thanks man, let the fine comments of gratitude be a stimulus to keep on posting!
Many thanks again!
Hello Jay,
My 12 year son built 2 of YOUR saw horses in an hour or so this past weekend. We needed them for another project we were about to start on. Very simple to build and inexpensive.
Thank you
Next, your band-saw boxes.
Very cool. They sure do come in handy!
Jay I’m just starting to get into woodworking and thought this would be my first undertaking….I was wondering if you drilled pilot holes for the screws? Another rookie question, if you do pilot holes what size drill bit should you use compared to the screw you use?
Thanks!
Hey Ray. This is a great first project as you can use it for help with future projects. I did not pre drill these holes but you can if you prefer. The main thing is to countersink the head of the screw by about 1/2″ so that your saw blade does not hit the screw if it goes slightly into the top of the sawhorse.
Every screw has a “shank” size. This is the diameter of the screw without any threads. You want to use a drill bit that is the shank size or slightly smaller. Harder woods are more prone to splitting so its best to pre drill. Softer woods are more forgiving so pre drilling is not always necessary. When working with pine I ALWAYS just use a brad nail as a drill bit. It’s quick, easy, works great, and they don’t break as easily as drill bits.
Woodworking is very rewarding and addicting…..good luck!
Thanks again Jay! Also when you suggest to countersink the screw does that mean to drill it down an extra 1/2″ after it has been drilled down all the way and should I bother with pressure treated wood?
Found your site here this morning, Jan.12, and decided there was time to get a couple of them together after lunch. Scaled them up to the working height of my antique Workmate. Worked a treat and my next project, a long table is already on them.
Thanks Jay!
By the way do you or your family own a motel?
Sorry, ya probably get that too often
Tala!
Nice! Glad you were able to find them useful.
Yeah I get the motel joke a lot. Doesn’t bother me though.
Just another thank-you for posting these. I’m building out a workbench following Paul Seller’s videos, and two of these was my first step. I modified the design a little, though, and put the top of the i-beam on with… pocket hole screws. I had the jig lying around, and it seemed like an easy way to make the sacrificial tops as metal-free as possible.
At this point, they’re still the legs on my half-finished table, and they’re holding up great. Thanks!
Thanks for the tip Jay. I built a set today in just about 1hr. I used the Kreg 2 1/2″ HD screws and the HD jig drill bit to countrer sink the top screws.
Very cool! Glad you could find them useful.
Hey Jay, great plans and sawhorses! I knocked four of them yesterday in a snap. Love the fact that stack up, I plan on making couple more next week. Best plans out there, thanks!
I made a set of your sawhorses when my old ones started to fall apart. One addition I made was to add 4′ cross pieces to make a sturdy table. The cross pieces have a 2×4 on the wide side screwed to another 2×4 on the narrow side. The top piece is cut shorter to match the I beam piece on the sawhorse. To hold the cross pieces in place I drilled holes and used some 3/8 x 6″ machine screws to hold the cross pieces. Makes a strong sturdy table, loaned them to my neighbor and he put a V6 engine on them without a problem.
Thanks for the plans.
hello my name is Rob
and I’m new in the woodworking hobby
i’m living in the Netherlands
This project, sawhorses will be my first project
also I have looked at your site for more projects to build a small shop in the barn
thanks for all the plans
Rob ,the Netherlands
Very cool Rob. Let me know how they turn out. Good luck!
The plan is very sturdy and easy to do. however i have one quick question, I am having trouble in aligning the I Frame to the center piece. The 30 inch piece seem to move when driving the screws on the 32″ top and bottom.
Any tips to avoid this and me the I frame center? Thank you
if you can, lay the I-beam on its side so that the middle piece is horizontal. Then support it from below with a 1″ spacer on each end. Then clamp on the top and bottom 32″ board tightly. You should now be able to screw them on with no problems.
Great design and easy to follow. However, my saw horse wobbles! How can I fix this?
Hey Dave. If the sawhorses wobble the middle piece of the I-beam is not centered.
Jay, I chose your saw horse design over all others as well as buying to save money. Well, I got the materials and knocked them out last night. Dang they’re hefty! I want to say..I did glue the I-Beams. One of the I-beams shifted when I glued and screwed it therefore I had a nice wobble. Here’s what I did to remedy this. I flipped the horse over and made sure the I beam was level. I then measured the level between the sets of legs. I found one set(side to side) was off by a whole bubble. The leg where bubble was highest, I took a square and marked a line where which the bubble was level. With a power saw I shaved off increments (to that line) till each test produced no wobble. Voi·la, all legs stand firm on the floor!
Nice tip! I was considering taking a low-grit sander to it, but your way will create less saw dust.
Jay,
I just made a couple of these while building my shed. It sure came in handy for cutting the OSB. Easiest and best saw horses out there.
Thanks.
Very cool Larry. Glad it worked out for you.
Hi Jay… First time for me posting on your site…. You’ve given a lot of good info… glad I found your site. I marked this as a much needed tool in my shop. I was at the big orange store today and found some decent 2×4’s on the
discount pile, so I bout 6 for a lil over 13.00. I came home sawed the material up on my mitre saw as I pulled each board from the truck. Oh wait.. this is after I cut the material for the pocket hole blanket chest… So I got some work to do now… Again Thanks for helping out us ones that want to learn
Just made a set.
Thanks Jay.
What brand and model drill are you using?
My Hitachi didn’t have the lasting power to countersink screws in I-beams.
Thanks again. I really enjoy your site.
Just a thought. Since modern glues are so strong I wonder if it might be wiser simply to glue the I-beam together and only use screws to attach the legs. This way there is no possibility of a blade that is set too deep running into a screw.
I have been needing a set of saw horses but didn’t have the time to build a set. I remembered this set and without even going back I winged it. Easy Easy Easy!! They have held up great! Thanks Jay!
Hey, these are pretty cool. I’m just curious how tall the finished product is. I’m gonna make a couple of these but am wanting to possibly make them taller.
30-7/16″ tall.
I made mine taller by making the I-beams with the two 8′ 2×4’s as mentioned. This left 4 inches of scrap. I then made the legs out of two 12′ 2X4’s, cutting four 36″ legs from each.
JS Nunn. How tall were your finished saw horses?
Well, after discovering your site months ago, I have finally decided to make my first set of saw horses. Wish me luck. I will report how it all went shortly.
Just got done building a set. Thanks for your clear and concise instructions. I opted to cut 15 degree angles at the bottom of the legs. It gives them a bit stability. Thanks Jay.
Thanks Jay! I am a beginner and these were easy to make. I had one which was wobbling so just figured out which leg was the issue and adjusted it and now it is sturdy. I plan on making another one to support my work surface which has a large overhang. thanks again
thanks jay for all your plans .i love all the french cleats plans you have..how about a 12 in disc sander..keep up the great work
Your videos are outstanding and you do a great job of teaching! That’s extremely helpful for beginners such as myself. Keep up the great work!
Just built two of them in about an hour with scrap lumber! QUESTION- How do I keep them from wobbling? The legs are exactly the same length, but they’re a bit warped, which I assume is the problem. Any tips or tricks? Thanks for the plans! They’re great and simple
Remove one leg. Make sure the remaining three are firmly sitting on the floor and reattach the fourth leg. A little wobble isnt really a problem though. Two of mine wobble and I’ve been using them for a few years now with no issues.
Fantastic saw-horses. I had a couple plastic jobs that were just not providing the needed stability. Built a couple of these (for the same price as the plastic things) and I’m never using another type of saw horse again. Thanks for the plans.
How long would the legs need to be to make them 36″ high?