Check out this great outdoor furniture set that Ken made from my bench plans. He made a few changes like adding another seat slat and stretching the side table for a bench length table. Great job! Ken writes:
Hi Jay
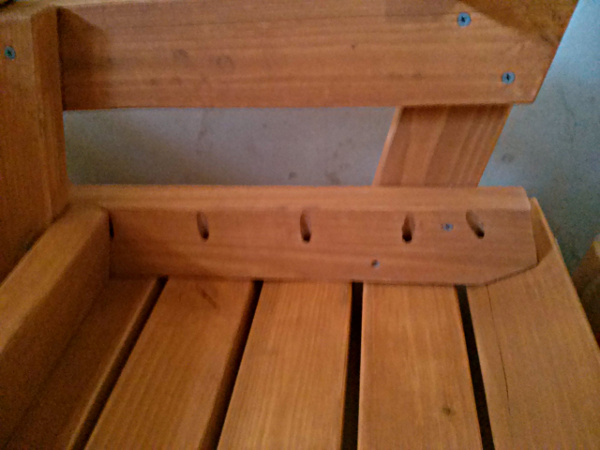
After making this bench set I just couldn’t kick my mother-n-law off the bench. She said it was VERY COMFORTABLE. My wife and “mom” both stated that the seat was a little too narrow so I added a fifth board at a 15 degree angle. This gave a little more seat and hide the underside of seat. To attach securely I extended the 20″ to 22 1/2 combo cut. See photo of the pattern. The combo cut is a 15 degree and a 75 degree. I also shortened the back support 2 pieces by a 1/2″ so the end cuts would hide a little. 31″ cut to 30 1/2. The wife REALLY liked the changes…. after all. Happy wife…Happy Life
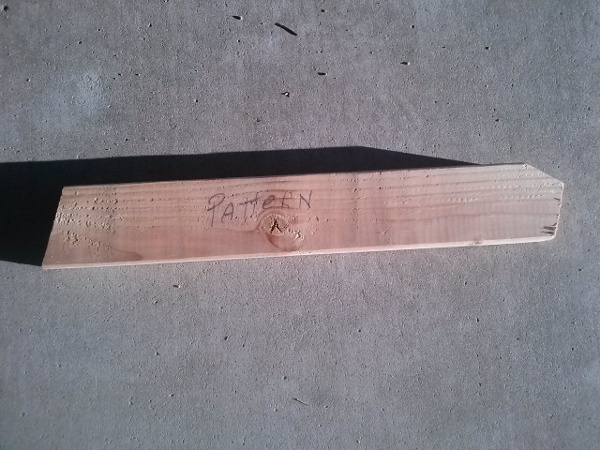
Here is the combo cut photo to replace the 20″ boards to enable to mount the 5th board on the seat.
Here is the finished project looking at the underneath of the bench seat. I also sanded and beveled every end cut to give a great finished look.
This photo is the support extension combo cut for the 2 x 4 bench for the extra angle board.
The original is a 20″ long point to long point.
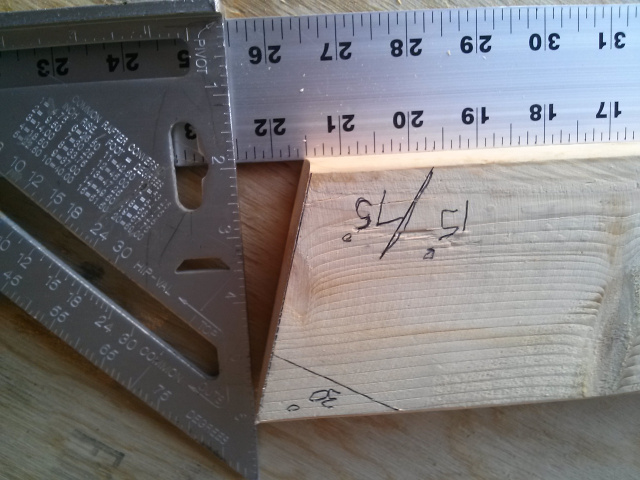
If you took a stock board square cut (90 degree) on both ends and cut it at 22 1/2″ in length.
cut a 15 degree angle on each end. measuring “LONG to SHORT” will be 21 1/2″
Measure 19 1/2″ from the short angle to the right to mark your 30 degrees (this is the support for the board).
**NOTE: When drilling your pocket holes make sure you drill 90 degrees and center of the now cut 30 degree cut.
Once your original 4 boards are screwed in place. Take a straight edge (could be anything… ie a straight 2 x4. Lay this across the 4 boards and temporarily clamp down a straight board on each side. Set your 5th board on the 30 degree angle and push it tight to meet the clamped down straight edge. This is for when you are seating on the bench the angle board wont be at a higher elevation than the bench seat boards. Before gluing and screwing it in place. Confirm that the gap space reveals between the boards are the same on each end. Because wood is NOT a perfect material you may have to make field adjustments (cuts) to account for twist in the board or to correct the height elevation. Reminder: The first dance always has the toughest learning curve.
Hope the picture is more insightful than my words.
If you would like to download an updated SketchUp file CLICK HERE. Thanks Doug!
Every time I try to measure the “template” I get a 30deg angle and also can’t figure out what measurement the 22.5″ corresponds to — nothing on the “template” looks like it measures that distance. Can you please confirm the angle and size? I have adjusted my copy of the sketchup model, but I am assuming that my measurement of 30deg is correct. I will submit the new file once I figure out what actually Ken actually did.
Any results on Doug’s question? I am also confused with the measurment and angle cuts.
Thanks in advance and keep up the great work. ^^
Ken has left some additional information regarding his changes. Hope it helps!
Ken has left some additional information regarding his changes. Hope it helps!
Jay where has he left them please can’t find um lol
Great site mate well done
Cheers Rusty
Yeah, that helps. I’ll send Jay an updated sketchup file soon. However, as I was waiting I noticed the chair with arms, and will probably try to make a version with both arms and the 5th angled seat slat.
Looks great. Questions… What did you use for you finish? And did you finish the pieces prior to assembly? Thanks.
I use Thompsons Water Sealer on mine. I usually get the Honey Gold color. It looks like Ken chose the same thing in his set. I have done both but I prefer to stain after that way I get a nice glue bond for the wood. I spray my sealer on with a 2 gallon pump garden sprayer to completely saturate the entire project, let it sit for about 10 minutes, and then brush any runs or bubbles out.
Awesome, thanks.
straight ahead dude
Nice pieces of outdoor furniture! The material used is absolutely great. This is indeed great for gardens and even patios. Thanks.
Nice!
I know this is several years after the post, but I only just discovered Jay’s site and I liked the design of this project. I am big on design. Almost anyone can make something, but can they make it functional (if it performs a function), pleasing to the eye and comfortable for the user (if it is to be used in some way). The angled edge on the front of the bench is what I am referring to. It takes extra thought to add that feature, but if you’ve ever sat on a bench or chair that cuts off your circulation, you know how much of a difference it can make. Nice work, Ken!