This project was not scheduled to happen this week. I was actually intending to make another piece of 2×4 furniture but after getting the 2x4s in the shop I got frustrated with knowing that I would have to constantly move them around during the project. I had no place to store any of my lumber. So out of necessity I changed course and decided to make a lumber rack.
The final design was not the original design. I actually made a SketchUp video covering the initial design. Just before I left to get the materials for the lumber rack it dawned on me that it would be not only cheaper but much, much easier to use pipes for the arms instead of plywood and 2x material. I also have a free set of PDF plans for you to download at the end of this article.
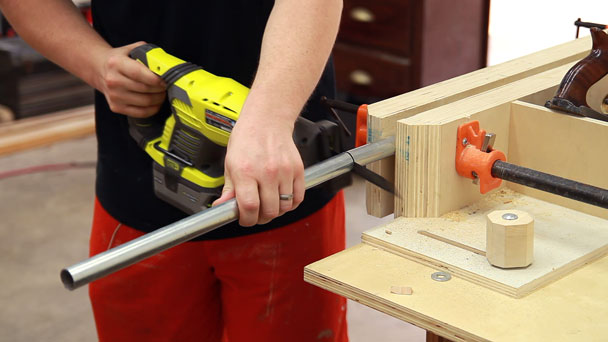
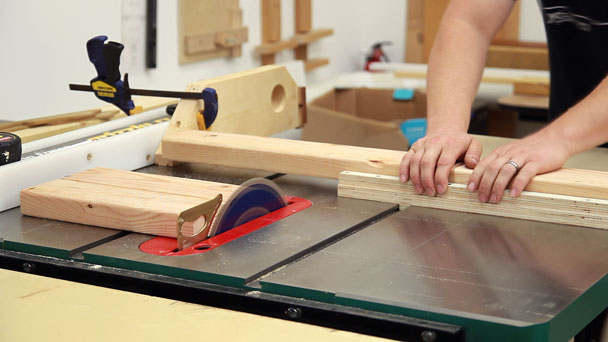
For the pipes I chose 3/4” EMT conduit. Mainly because its cheap and I’m a cheapskate. I can get a 10′ piece locally for less than $5. 1/2” iron pipe was more than twice the price and if the conduit is strong enough to do the job…why pay more? I’ve read online that this particular conduit will do the job just fine but I wasn’t too sure yet. So to start I made a single test arm to see if it would hold my body weight. The arms are all going to be 16” long with 3 of those inches inside the 2×4.
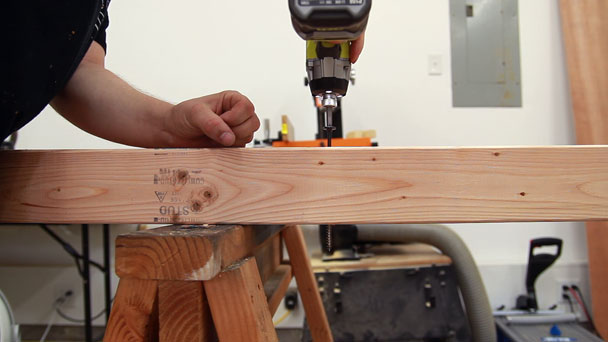
The holes the pipes will slide into need to be on an angle so the wood will be less likely to slide off. I find it to be much easier to shim my add on drill press table instead of adjusting the factory metal table. This makes it very easy to return to a normal perpendicular drilling state.
And then a hole is drilled in a piece of scrap wood.
Taddaa!! It held all 180 pounds of me with no problem. I searched Google for how much an eight foot 2×4 weighs which turned out to be an average of 10 pounds. So if this individual arm can support me than theoretically it can support 18 eight foot 2×4’s. Multiply that out by the 6 arms that will form one shelf and that comes to 1080 pounds if evenly distributed. There’s no way I’m going to put anywhere near that much weight on this lumber rack. So this tells me that 3/4” EMT conduit will do the job just fine and there is no need for me to purchase more expensive pipe.
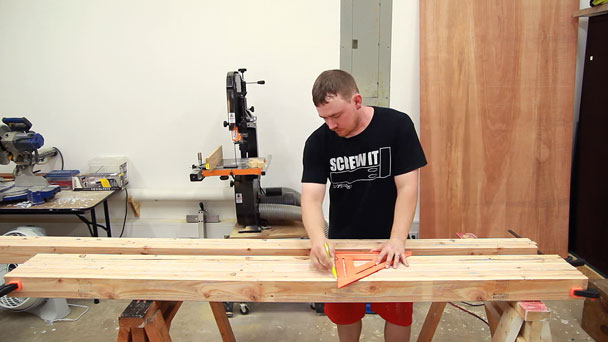
So with the strength confirmed I started the build of the actual rack. I needed my lowest shelf to be a little more than 3′ off the ground so I trimmed my eight foot 2x4s to seven feet long.
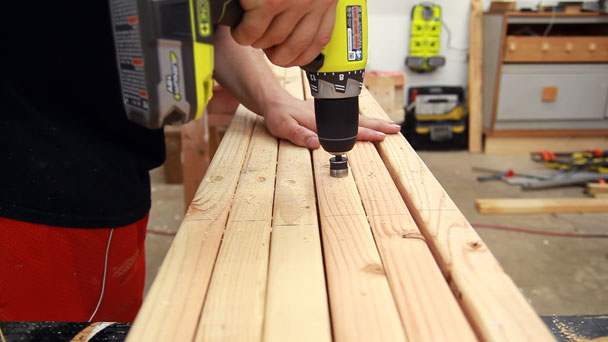
Clamping all of the vertical boards together will allow you to mark them all at the same time. Just mark the hole locations on one and transfer the marks with a square. The spacing I went with was 4” from the bottom for the first hole and 11” on center from the first hole for the remaining holes.
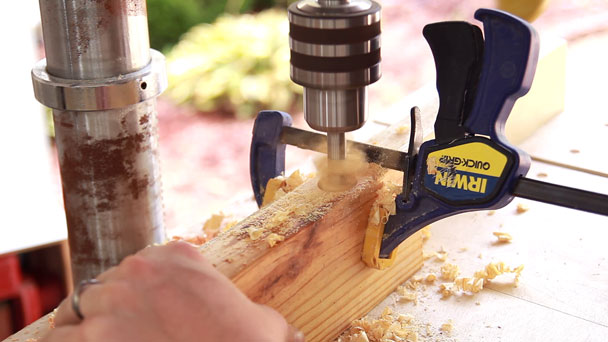
The closest drill bit I had to the size of the pipe was 1”. It was a little large for my liking so I added a few more degrees to the drill bit than what I was shooting for. It worked out alright.

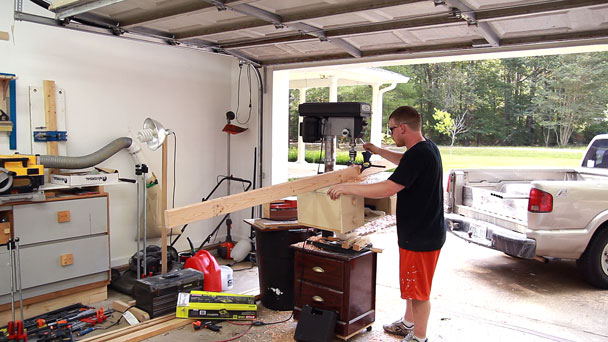
And here’s why I love this drill press table. It would be hard to support that long of stock on the regular metal table that comes with most drill presses. In this picture I have the 2×4 clamped to the fence. This makes it much safer to drill the holes without having to worry about holding the board down.
To secure the vertical boards to the wall I used 6” washer head screws. I drilled pilot holes for these first but the drill bit wasn’t long enough to go through the full 3-1/2” of the 2×4.
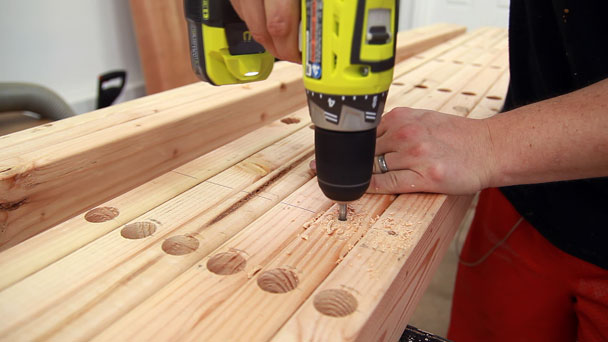
So to finish the hole I drove the screws through each pilot hole and made sure it punctured the other side.
With the exit hole located I was able to countersink the back side of the 2×4. As the screws penetrate the drywall they will mushroom a little bit of material on the surface of the wall. The countersink allows room for the mushroomed material so that it won’t prevent the board from sitting flush on the wall.
My lumber rack was planned to go all the way to the ceiling so I referenced the height of all of my boards directly off of the ceiling. If your lumber rack is not going that high just screw a board to the wall below where you are putting your lumber rack and reference the bottom of each vertical board off of it.
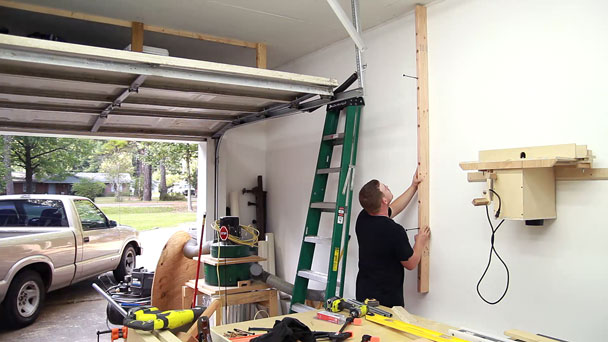
I used two 6” washer head screws on each vertical board as well as a few 3” decking screws through the pipe holes. The pipe holes were not through holes so there was still some material left for the screws to grab to. Each vertical board is spaced 16″ on center to secure directly to the wall studs.
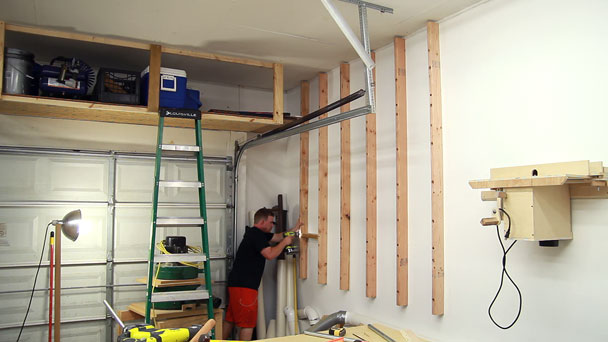
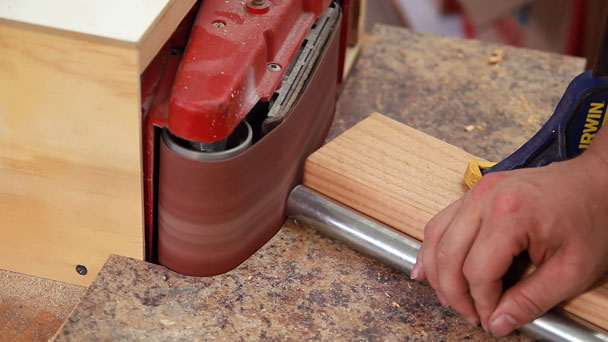
Next all 42 pipe arms could be cut. My cheap homemade sliding moxon vise proved to be invaluable again. I LOVE that vise!
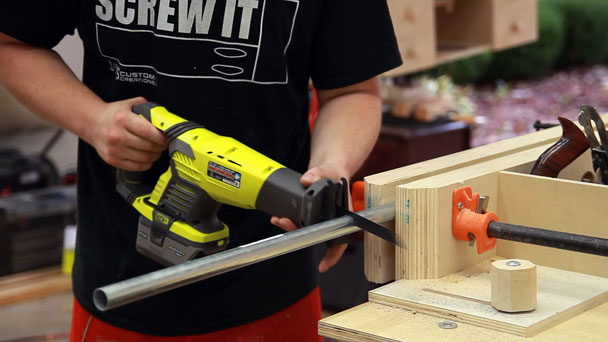
After cutting the pipes they all needed to be deburred. A few rotations on my belt sander platform did the trick.
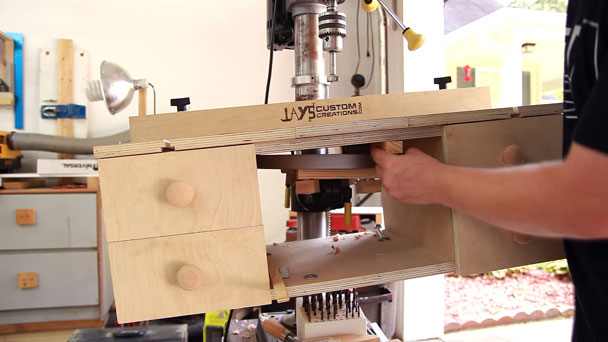
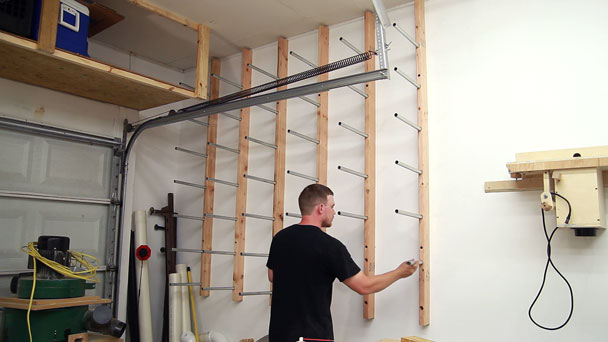
Finally the pipes can be installed. Do you remember from my over the garage door shelf project when I said it was a future project and I didn’t need the storage yet? Well…..I’ve got one side nearly full now.
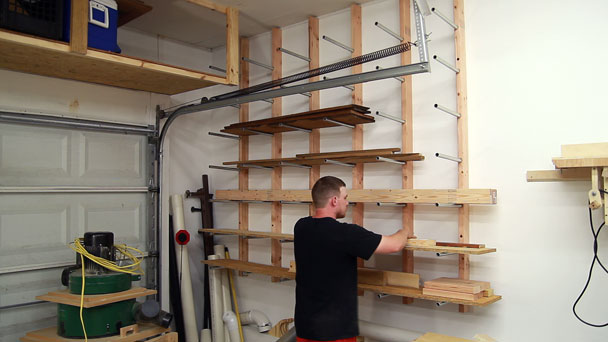
And the lumber can be loaded up. The top three shelves are not that convenient to get to which is perfectly OK. Those shelves will be great for long term lumber storage to either further dry wood or at least get it acclimated to the shop environment before working with it. I was also able to use the scrap OSB from my garage door storage shelves on the lower two shelves of this lumber rack. This will allow me to store shorter lengths of wood that would otherwise be hard to hold on pipes that are 16” apart.
In the end I’m incredibly pleased with the results. It utilized a wasted space in my shop that I was wondering what to do with. Hopefully you were able to get some ideas from my lumber rack and are able to save a few dollars by using EMT conduit instead of more expensive pipe. As always, be sure to subscribe to my email newsletter to be notified of new content as soon as it is released. Have a great day folks!
Free Plans
If you liked this project and found it useful please share it so others can do so as well. Thanks for stopping by folks and have a great day!


Love this project. Simple yet perfectly functional. Love watching and reading about your projects, they’ve got me motivated to start trying at least small projects of my own.
That’s very cool Michael. Good luck!
gracias por compartir esta idea practica facil y economica jorge de argentina
No hay de qué. Gracias por visitarnos.
Good project. I like the appearance of the conduit over 2x lumber. Thanks for all the time you spend putting all this stuff together.
You’re very welcome Darren. Glad it can be of some use to you. Have a good one!
looks great. I like the conduit a lot better than the 2×4 with plywood that you used in the other plans. I was afraid that would not hold up to the weight of the wood.
Hey Steve. I’m sure the wood method would hold up just fine as well. There are a lot of ways that will work but in the end I don’t think there is a cheaper route than the conduit.
Can you think of any other (possibly more) inexpensive piping?
I don’t think I’d be putting 1080lbs on the 2×4 walls in my garage, I would trust it to not fall in. XD
I cant think of any 3/4″ pipe cheaper than EMT.
Very nice. I’ve started intensely looking at wookworking about a year ago… and started a few weeks back to get excited about metalworking too.These tubes are an interesting material (used one as a device to push my 2 year-old on his tractor around the garden) and I think i’ll use your method as lumber rack in November in our new house in France. I’m planning to use it for some home-made pipe clamps too. Again, thanks !
Thats nice to hear Marc. Good luck!
I’d probably end up attaching some 2x2x2″ wood bumpers at the end of these protruding pipes, at least the ones that are knee/hip/eye level for me kids, me wife or meself…
I don’t think that’s necessary…but I don’t have any little ones running around either… Have a good one Marc.
Jay, so glad you worked out this variation. I was expecting to go down the iron pipe path, but the cost was off-putting to say the least. An inexpensive add-on suggestion is to check out the Cap Plugs website as they have both PE and vinyl caps that are likely to fit the tips of the EMT for pennies each, and protectively capped tips don’t need to be deburred.
A happy benefit of the EMT is that it’s galvanized, so it’s less likely to react to sap or moisture in the wood. If you have the need for cheap, enhanced protection, I’ve had good luck using underground pipe wrap tape.
Thanks to your figuring out just how strong the EMT is, I now have a great solution for how to use EMT for my mobile sheet goods cart — SUPER!
Very cool Bradley. Hope your sheet goods cart works well.
Jay, I wish I had seen this a few days earlier! I just made a rack with 2x3s and plywood. Could have saved $ and time. I glued and screwed the brackets, took some time to cut the plywood glue and screw things together, oh well, it’s done now! I love you projects!
Jay, I like that idea. If you ever run across a daybed with the futon mattresses you can cut those pipes out also I use the frames secured from ceiling with chain ( hit joist with lag screws ) for storage. No need to build anything and there strong.
Hi Jay. Do you think 1/2” conduit will be strong to support lumber well?
I have no experience with 1/2″ conduit so I can’t say.
Hi today I just bought 3/4 conduit for a test. The hole by my 7/8” forstner is too small and 1” is too big. Was yours just fit tightly?
I used a 1″ bit as well. The conduit does not fit snugly. But it isn’t a problem. Just increase your angle when you drill the hole to compensate for the pipe leaning in the hole. The pipe does not have to be snug in the hole. It’s strength will not be affected if it can move around and as long as the final result of the pipe angle is about 5-10 degrees You shouldn’t have a problem of it falling out.
try a 7/8 spade bit it bores a slightly bigger hole than the forstner.
I bought a 15/16” forstner bit from Lee Valley with $12 anyway.
Jay – Great idea! I was so inspired that I built one of these racks last weekend. It is now loaded with wood and it works great. The one thing that I did differently is that I cut the conduit with a pipe cutting tool like you would use for cutting copper pipe. The tool was relatively inexpensive (less than $20.00) and it naturally pushes the sharpest edge to the inside of the pipe eliminating the need to debur or sand. I contemplated dipping the exposed end of the pipe in Plasti-kote as well but found that the freshly cut exposed edge is not that sharp. I look forward to seeing your next project. Thanks!
I really should have bought a pipe cutter for that. Oh well. Glad it works for you.
Scott,
That is a great idea on the copper pipe cutter. I was dreading the cutting/deburring process. I have a couple of those things. I’m going to start cutting my first segments in front of my computer lol.
I hope Jay doesn’t get mad, but I bought 5 foot emt and I am going to use 15 sections instead of 16″ :)
If you’re concerned about the ends of the arms, these little chair bumpers fit perfectly and make them nice and safe.
Item 2517T84 at McMaster-Carr.
I paid less than $12 for a pack of 25 of them. Works great!
I built this a while back, before I saw your video. My initial mistake was that I used 2×2 for my uprights, which didn’t give me enough purchase on the condition, so they would slip out and tip down from lack of support! Not a good situation! So then I found your video, and the light bulb came on. You’re absolutely right, conduit will absolutely hold the weight – I weigh 246, and a single pipe held my weight. I’ve put as many as six 2x12x8 on a level, with no issues.
What angle did you drill your holes at for the conduit, and what length did you cut the tubing?
I’ve built loads of these racks now. Instead of one area with lots of levels I have only two levels of racks, but they are up against the roof and take up 2/3rds the length of the walls up there. I get a lot of storage and it’s out of my hair, so to speak. In the area behind my table saw I added more levels further down as it’s a dead space pretty much.
Love it! Just bought everything at Home Depot tonight and will be building mine this weekend! Thanks!
Any reason you couldn’t drill and insert the conduit directly into the stud for an even cleaner look?
I think it would be difficult to get the conduit holes at the correct angle, but maybe you have a better idea. It would look nice.
This is exactly what I was thinking. My concern would be weakening the stud, so perhaps 1/2 inch diameter EMT or iron pipe would retain the structural integrity. I would be drilling into a 2×6 exterior wall so a depth of 2.5 inches would leave three inches of stud untouched. You could also stagger the the supports in a checkerboard pattern with one stud supporting every other row and the adjacent stud supporting the alternate rows.
Did you try this Mark?
Jay, Did you drill the 3/4 inch holes all the way through the 2×4? I couldn’t find anywhere where it explained how deep to make the holes. By the way, I’m new to your web sight and it’s great. Keep up the good work.
In the article I said the holes were not through holes. There was some material left behind the hole. I have no clue how much I left though. It’s not incredibly important. Maybe 1/2″
I just completed my rack using your plans, Jay. I am very glad that I found your video, thank you!
I just completed this project for my shop. I don’t have a belt sander but ended up cutting the conduit with a pipe cutter and it gave me a nice smooth edge without needing to de-burr it later. Thanks for the great plan Jay!
Nice project. One question: What does EMT mean?
Electrical Metallic Tubing
Nice plans. Do you think if I were to extend the conduit out maybe 20 inches total, it would work for shelves?
I would think so. Maybe make a simple test piece or two to try it out.
Just completed this project for my shop: https://goo.gl/photos/eLrpcGsfttLQUAbH8 , it’s a much smaller version but I wanted to use this dead space above the fuel tank. Now I just need to build a small frame around the tank’s gauge to make sure that I don’t accidentally break it :). Thanks Jay !
(note that some pipes are missing)
Looks like a good use of your space.
Jay,
Finally got around to building shelves to hold my wood….liked this idea and decided to make similar shelves…except after starting to cut the 3/4 EMT with my Sawzall (there were 32 cuts I had to do) I elected to use a pipe cutter instead…it was quicker and left no jagged edges on the outside of the pipe. I simply took the reamer I use on copper pipe and ran around the inside and it was done quickly and pretty cleanly. Just a passing suggestion for anyone else.
Jay,
Thank you for the time and effort you put into making this video. I had a similar pipe rack at my previous house and I’m looking to build another one, but your AMT conduit pipe idea is interesting. My legacy rack used iron pipe (not cheap) and it held a ton of weight.
Along those lines, I’m concerned about your weight test…remember that in your test, you also have a 2 x 4 wooden piece that is also transmitting the same load to a structure using a couple of metal fasteners. So, you need to consider not only the strength of the conduit, but also the strength of the piece that holds it (2 x 4). Whichever has the lower yield strength (when something deforms and doesn’t return to its original shape after the load is removed) will be the limiting factor. This is expressed in pounds per square inch (weight divided by the area absorbing the applied weight). Also, the test was instantaneous and not left loaded over time.
Since you built the rack, have you experienced any loading issues?
No loading issues at all. I’ve currently got one row stacked with 10′ long 11″ wide 4/4 red oak stock.
In the electrical business? We tape all the pipes together tightly on each side of the cut then use a sawzall, chop saw, or skil saw with a metal cutting blade. I am not 100 percent sure, but I think you could get away with fewer uprights.
I know this is an ancient thread, but I just tested 1/2″ EMT. When I put all my weight on the end of a piece protruding 12″ from a tight fittiing hole (11/16) in the 2×4 it fails miserably. But that isn’t a reasonable test, IMHO. So I got out the bathroom scale and gradually put weight on the middle of a 12″ piece, and it failed at around 130lbs. If you use 32″ centers you’ll have 4 pipes for 8′, 520 lbs at their center. Oak is about 45 lbs/cu ft so 8′ of 12″ oak stacked 12″ high would be 8 cu ft or 360 lbs, 70 % of failure, and I doubt anyone is going to do that. At 16″ OC it would be, duh, almost twice as strong. I just happen to have a bunch of 1/2″ EMT scraps which is why I’m considering it. You could also slip a dowel into the EMT for added strength, although I haven’t measured the dowel diameter.