In this tutorial, I will show you how to build a bench and a couple of side tables. However, in the video tutorial, I will only be building the bench. The tables are pretty self-explanatory and I had no need for them at the moment so I did not include them in the video build. The bench utilizes pocket holes to secure the slats with no visible screw heads. Don’t worry if you do not have a pocket hole jig. The slats can simply be screwed down from the top as well. I have included a picture near the end of this article to show you the bench without pocket holes.
Click here to download a .zip file containing the SketchUp file for this bench.
What You’ll Need:
- Eight 8′ 2x4s
- 24 2-1/2″ outdoor screws
- 21 2-1/2″ outdoor pocket hole screws
- Outdoor wood glue
- Miter saw or hand saw
- Drill
- Pocket hole jig
Step 1:
The first step is to cut all of your pieces according to the materials list. You can make every cut with either a hand saw, circular saw, or in my case a miter saw.
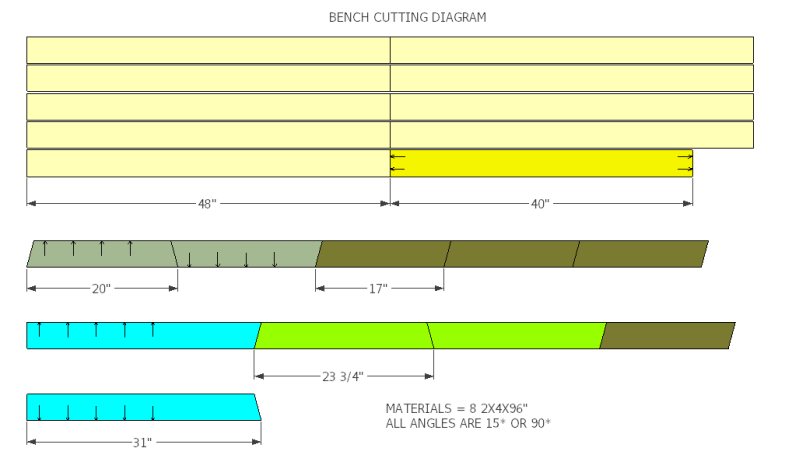
With all the pieces cut, arrange them so that the good side is down. We will be building from the inside out to minimize the appearance of screw heads.
Step 2:
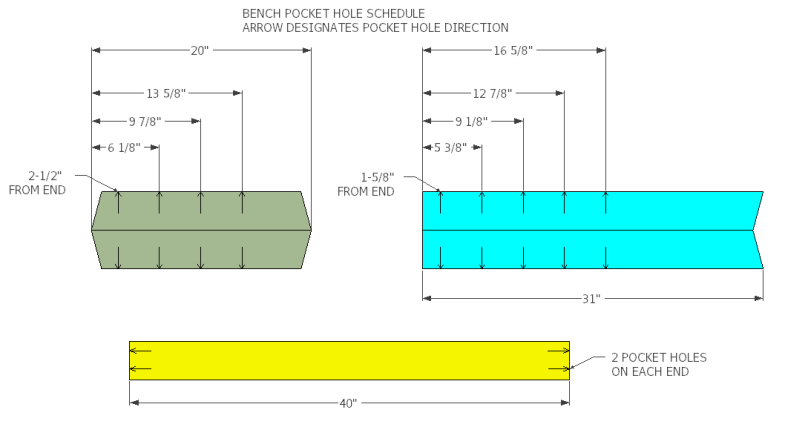
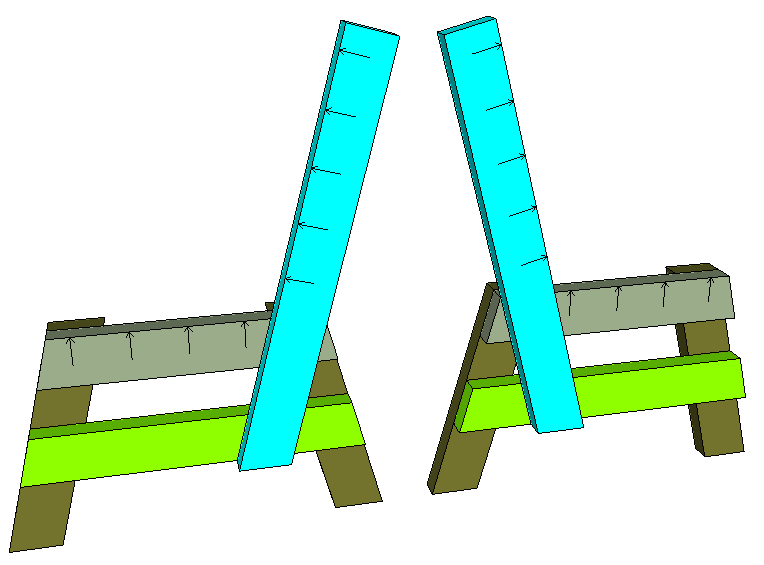
To further reduce the appearance of screw heads we can cut pocket holes with a Kreg Jig on the upper horizontal leg pieces (20″) and the back supports (31″). You can locate the pocket holes using the included diagram. Remember to flip the cuts for the left and right pieces so you don’t end up with two left legs. You can skip this step if are going to secure the slats from above with screws.
Step 3:
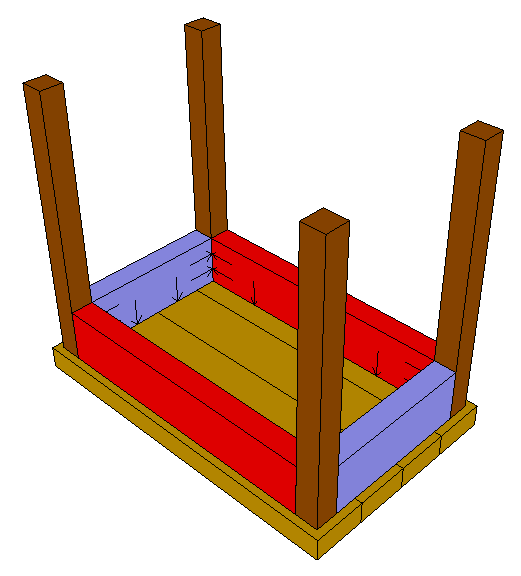
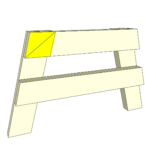 The legs are assembled with the horizontal members on top. Start with securing the 20″ piece to both legs first. When these pieces intersect they form a parallelogram. Be sure to put your 2-1/2″ outdoor screws along the long diagonal of this parallelogram as shown with this small image to the left (disregard the colors of this image). This will provide greater support. Use glue and two 2-1/2″ screws at every joint. Use another piece of 2×4 as a spacer to locate the lower horizontal member (23-3/4″).
Step 4:
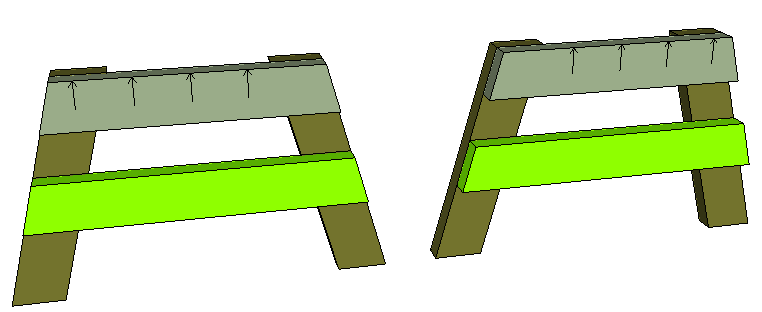
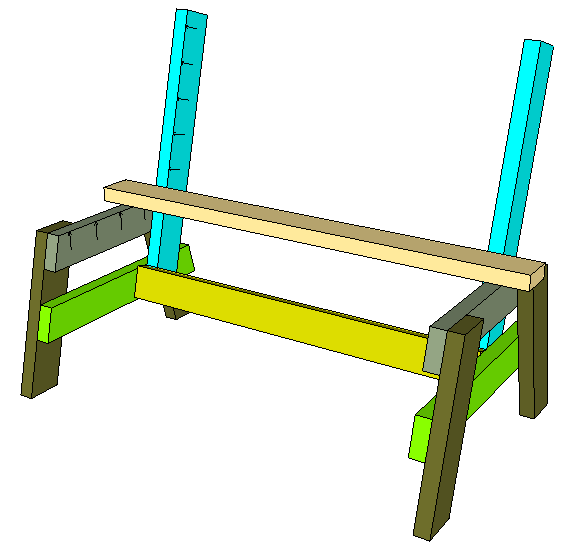
Next, attach the back supports so that they intersect the top corner of the leg assembly and are flush with the bottom of the lower horizontal leg member. Make sure that you do not overlap any pocket hole locations and that all of the pocket holes face the inside of the bench. Each overlapping parallelogram gets glue and two screws along the long diagonal. It is also important to make sure these are attached at the same angle. I always secure one all the way and start with one screw on the second assembly. This way I can place them on the ground and make a slight adjustment if needed. Then finish securing the second back support.
Step 5:
The 40″ seat stretcher is attached next. This piece connects both leg assemblies together. If you did not use pocket holes you can use two 2-1/2″ outdoor screws to attach directly into the lower part of the back supports. If you used pocket holes make sure you position the board so that the pocket holes are in the back.

Step 6:
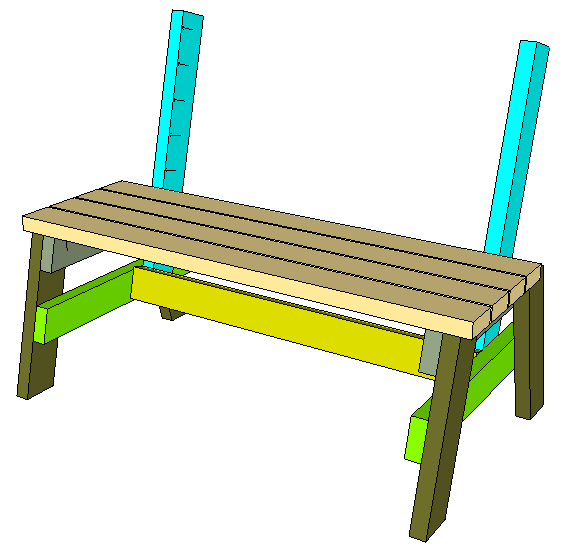
I always attach the back seat slat first. Make sure the good side is visible on all of your slats. Push it all the way against the back supports and attach it with glue and screws. If you are using pocket hole screws like me this first slat will be a little tricky to secure. I had to lift the leg assembly slightly and use a 6″ extension for my drill to be able to screw it down. The rest of the seat slats are secured the same way. I designed this bench so that you could use a standard wood pencil as a spacer in between slats. If you don’t have one handy, the gap is 1/4″ between slats.
Step 7:
The back slats are secured the same way. However, I always increase the spacing between the seat and the first back slat just slightly. I use a permanent marker for my first spacing here (about 1/2″). Then I use the pencil again to space the rest of the back slats. I think it just flows a little better this way.
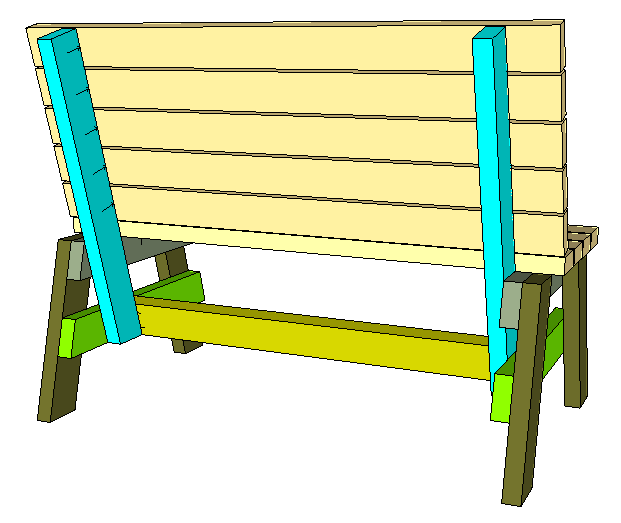
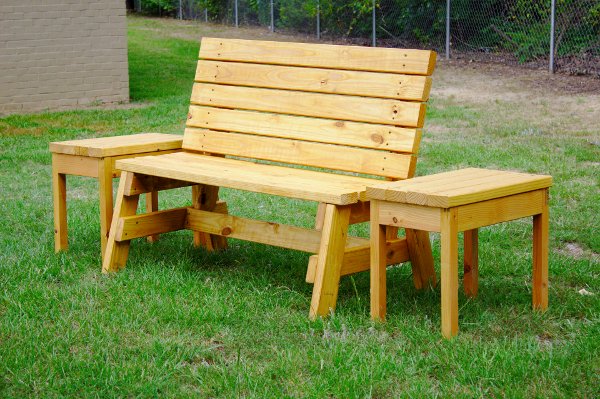
That’s it for the bench. And here is the completed result. Nice and clean…


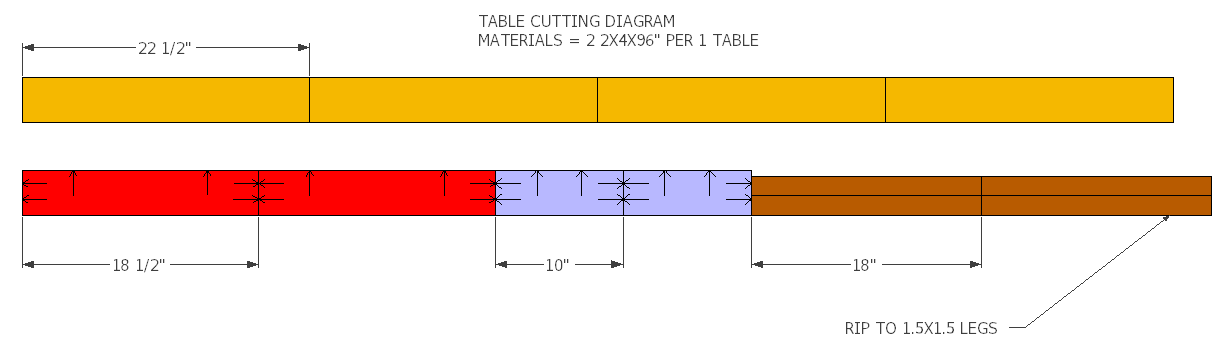
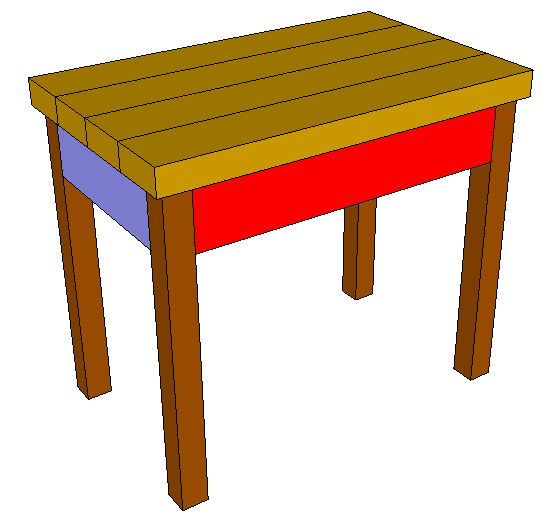
2×4 Side Table
In the video, I only built a bench but here I want to include the instructions to build a couple of side tables as well. These tables are very easy to make. You will need to use a pocket hole jig for this table. The table will go together pretty fast. Here’s what you need for each table:
- Two 8′ 2x4s
- 24 2-1/2″ pocket hole screws (Kreg Blue-Kote)
Step 1:
Cut all of your pieces according to the cutting diagram. To make the legs you will have to make two rip cuts with either a table saw or a circular saw.
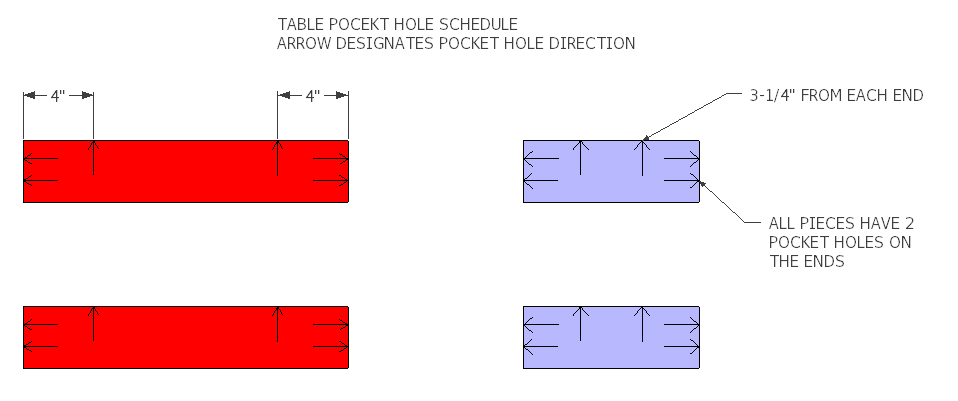
Step 2:
Next, drill all of your pocket holes according to the included diagram.
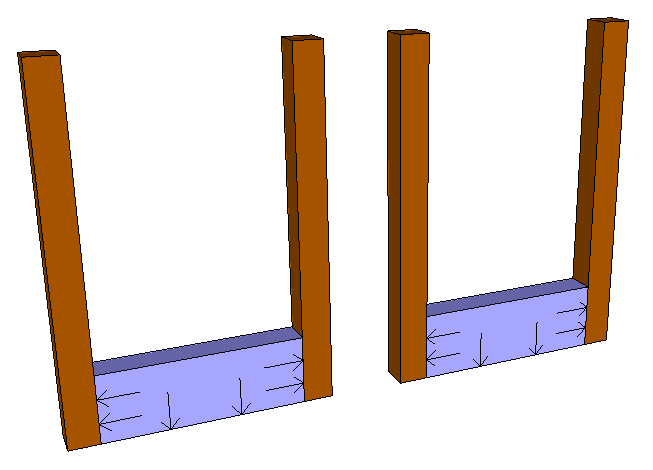
Step 3:
Assemble the short side of the table first. It will be impossible to get a drill in here if you start with the long sides.
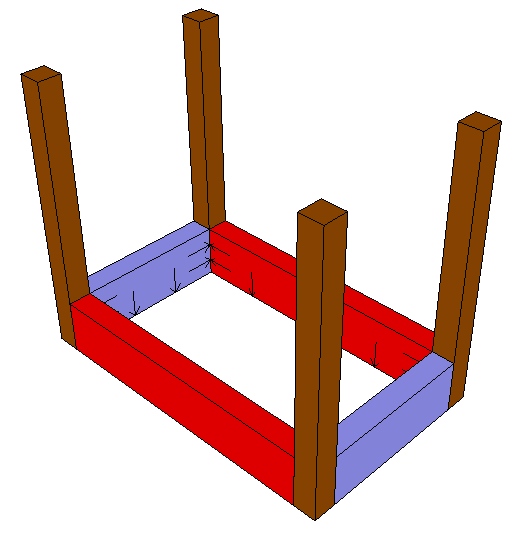
Step 4:
Connect both short sides by attaching the longer sides.
Step 5:
Lay your slats out with a good side facing down and attach your frame to the slats. If you followed the pocket hole schedule you will use two pocket hole screws in each slat. You can add spacing if you like but I have never had a problem without a spacing.
 That’s it. I hope you can make this project, with or without the tables. Here is an example of a set I made with the tables and without pocket hole screws. I secured the slats from above with regular outdoor screws.


great build jay as always those angle cuts what degree are those
15
Hey !!! One Great Bench, Thanks Mr. Jay Bates.
Fantastic work – I have a slew of salvaged 4′ 2×4’s, and a 13’x11′ firepit area to spruce up at the beach for our wedding reception in 2 weeks. You just made my life easy, and my in-laws even happier, ha! And to think they were going to burn all those 2×4’s….
Is there an easy way to add arms?
Jay, How much do you sell the benches for?
Materials + $10
You only charge $10 for your time and labor?! I take it you’re not subsisting on this?
I no longer make projects to sell. When I was making these I would batch them out for a local salesman. At that time I could average about 2 per hour, sometimes 3 if I had a large order. At the end of the day it’s just a 2×4 bench. It’s hard to make a killing with outdoor 2×4 furniture.
Still, $20/hour honing your skills sounds like a win to me. No one ever paid me $20/hour to do any of my other hobbies.
The first couple benches would probably take me all weekend though. :-)
Jay, How many of these would you say you’ve sold total?
Hi Jay
Could some teenage boy scouts build several of these benches. What is your estimated time for boys with some adult guidance?
Sure they can! It would be a great project for boy scouts. I can build one in a half hour to an hour. I would say give them 2 hours to be safe.
I’m a novice woodworker Jay. Very glad I stumbled across your youtube videos. Great guidence. This bench will be a great start to my future woodshop. I’ve been building some hay feeder boxes for my horses, but this will give me another avenue to pursue. Thanks much !
Dreat plan, thanks.
Do you have the plan for the two connecting benches that fold in to make into a picnic table?
At this time I do not
I made the bench, table and chairs for my first ever woodworking project. They turned out great and my neighbor even bought them from me which wasn’t my intention but kinda cool. One thing I need some advice with is level the legs. Is there a system to doing this? Sometimes my chair legs don’t come out quite right and wobble a little. I cut one leg and then another hoping to get it right before I end up with a chair or bench that is two inches tall. I’m a total newbie. Does anyone have any advice?
Don’t take too much off. You only need to reduce the length of ONE leg of a four-legged structure to make it sit on all four legs equally. Choose the leg that seems to be bearing the most weight. You’re probably taking too much off at once.
You can do it this way. BUT, if you adjust a piece of furniture for uneven ground, as soon as you move the piece even slightly, it will wobble again. Better to put dirt, gravel or a wood shim under the leg that’s off the ground. This is usually the way people do it even for indoor furniture on a completely level floor.
Cut your first board and write “Pattern” on it. The next board you cut, lay it down on your table and place the pattern board right on top of it. Then take both ends and make sure they are tight together and gently rub your finger over the ends. They should fell as smooth as ever when you do this, this is how you can tell if the boards are aligned as close to perfect as you can get them before cutting. Once you have done these steps you’re ready to cut your board. Once you have cut board #2 take the board that has pattern written on it and repeat the steps until you have all of your boards cut. Here’s some great advice before you go cutting your “Money” lumber, cut a few scraps the same way, the same set up and mark the first board again as “Pattern” and get in the habit of doing that and almost all the time you will get as close to perfect cuts as you can get on cutting any board you put your hands on. This is what I do and I hope this helps you as well. Happy cutting!
Hi,
It’s quite hard to understand the inch system you write in.
> Eight 8′ 2x4s
does this mean 8-feet long boards, 2 by 4 inches thick?
I found the skp file, and things are much clearer now.
Hey Jay great job! As a previous viewer stated I would also like that bench with arms, just like the Swing Bench with legs, Im pretty Handy all around but with your easy to follow instructions I’m pretty sure I can do it. Also I’ve another doubt local hardware stores the treated lumber is very poor quality, mostly stored on moist locations and bent, would I’m better off using regular construction grade lumber and stained and finish it after built?
Hey Michael. I’m on my phone so I can’t post a link but for arms check out my horse bench tutorial. Combine whatever features you want from each.
I actually prefer to avoid treated lumber. Yes, you can use regular lumber and stain. I use thompsons tinted water sealer with good results. Remember that the #1 killer for outdoor furniture is water rotting the legs from below. As long as you get a good sealer on the bottom of the legs and keep it in a non muddy area it should last a long long time.
u could always use epoxy on leg ends after u stain helps in prolonging them.
great design. very easy to understand video and plans. thank you. keep it up.
Do you know how to make a folding adirondack lawn chair?
I do not have any plans for one at the moment. Sorry.
Awesome and thanks. My parents are in their 80’s and I am going to build a bench and a couple of tables for them. I look forward to your articles.
If you want a bench with arms, cut your legs at 25″ instead of 17. Use jays example on how he builds his chairs, use those arms for your bench.
Thank You my mother loved her bench /Users/billwarmus/Downloads/IMG_20140328_154843.jpg
Hi,
just built yourmockup using your measurements and they are off. I think your numbers are not the bottom but the tops of the boards. for others who may try in the future. had to tweek a bit but I have a close working model of what you designed
Please verify your measurements. Thousands of these benches have been made according to the diagrams with no problems. There are no top and bottom measurements when cutting according to the cutting diagram. They are all longest side measurements.
Jay, would it be possible to add a set of rockers to the bench to turn it into a rocking love seat
Yes. I’ve wanted to do that forever but just haven’t gotten around to it. My thoughts would be to make the back legs lower so you lean a little more back and then add the rockers. Let me know how it works out for ya.
Jay, do u have a recommendation for the rockers? Size. Length. Any help would be appreciated. Thanks.
I honestly have no clue. It’s more of an experimental thing.
hey. i have a question what are the angles for this bench i have no clue where to find them or how to get them. if you could tell me i would greatly appreciate it
thanks
Do you have a plan for a longer bench? Five or six foot. Love the bench, just need it longer. thanks!
Thanks for the great free plan. My mother-in-law had planted a memorial apple tree last year for her late husband. It unfortunately lacked a comfortable place to sit where they chose to plant it. This bench (made from his recycled wood) made her cry while giving me a great big hug. Thanks from us both.
https://plus.google.com/111202271634620160664/posts/ak51MCDMTRa
That’s awesome news Allen. I’m glad you found it useful :)
This was my first woodworking project, and it turned out great – thanks for the plans!
http://instagram.com/p/tgUjrvqpkB/
I’d expect your how-tos would be well received on instructables.com.
Looks great man!
Thanks Jay! About 6 years ago I built a cappuccino table and appreciate how much mathematics is involved! This was a very easy build for an unskilled craftsman like myself and allows for a double of goofs without needing to start over. I can’t afford to make pocket holes so I subset my screws from the top and that worked great for me. I think I’ll blog about this and post your link! awesome possum.
http://www.freddythunder.com/blog_images/1415574667image.jpg
Looks good Freddy!
Thank you very much. I built these today and boy do they look great! Just awesome. : )
Very cool George. Glad you like them.
in the cut list you mention that all angles are 15 degrees or 90 degrees. I’m pretty sure that what you meant was 75 degrees or 90 degrees.
A 75 degree or a 15 degree cut are the same depending on where you measure from. When you are using a miter saw you set the angle to 15 degrees on the miter saw gauge. So yes, it’s a 15 degree cut…which is also a 75 degree cut.
Thanks mate very nice. I had a good time making this bench for my first project. I live in Australia and all our sizes and measurements are different but I made it happen anyway. Thanks again.
My 9 year old grandson built the bench as his first ever wood project. It took him 3 hours plus stain and varnish time and he did all the marking, cutting and screws by himself. I did make sure he did it safely and helped hold the pieces. It turned out great and this week, he will build the end tables. Great plans! Thanks
Hello Jay,
This is a Great project for our boys to build.
Thank You!
Jay,
Do you have any photos available of this bench finished in a stain/water sealer for outdoor use? I’ve read some tips that include using a slow setting epoxy on the end grain of the legs to prevent it from soaking up water, I’ll be sure and do that as well.
The second to last picture in this article shows the bench and tables in a Thompsons Honey Gold Water Sealer.
Hey I was wondering how much stain you would have to use to cover the bench and table, do you have any idea?
What is the measurement from the front of the stretcher to the front end of the bench slat? I would like to make one of these benches to go in our storm shelter and store supplies under it. The tote with supplies is 20″ deep — so I need to make sure there is plenty of depth under the bench. I will probably have to lengthen the depth of the bench seat to accomodate.
Great looking design though!
It’s about 10″ from the front of the leg stretcher to the front of the front slat.
Thanks Jay! I guess I’ll add 10″ to all of the horizontal leg pieces and that should allow for 3 additional seat slats. This should provide enough depth for storage below the seat. What is the height to the bottom side of the seat slats?
The distance from the ground to the bottom of the seat slats is about 12-1/2″
so did you put something on it to protect is from the weather?
Jay, thanks for posting this bench plan. I like the fact that it doesn’t have arms, I have been looking everywhere for plans to build a bench to sit outside and play my guitar on.
I just finished mowing my lawn, sat down on my bench that I made 4 or 5 years ago and read this comment. Thanks Cj :)
How much in materials did this cost to build the bench?..Screws etc? – Franklin. Charlotte, NC
I don’t remember. Just multiply the number of 2x4s by the cost you can get locally and add about $5 for the screws.
When I was connecting the short skirt pieces to the 1.5″ legs, my 2.5″ pocket screws went through the leg and out the other side. I believe the plans called from 2.5″ pocket screws. Is this correct, or should I be using 2″ screws.
It may be the pocket hole machine I was using…an air compressor powered one from a friend that doesn’t allow for much adjustment to the holes I make. Any suggestions? Thanks again for your plans and your youtube channel. Keep rocking it!
Sounds like the pocket hole machine you were using wasn’t set properly for 1-1/2″ stock. 2-1/2″ screws are correct.
Sounds like the machine you were using wasn’t setup for 1-1/2″ stock. 2-1/2″ screws are correct.
jay , how hard would it be to make this bench in 6 or 8 foot. i imagine there would have to be some extra support in the middle. have you made a longer one? if you have a couple minutes could you walk me though.
I’ve seen a couple 8′ versions. Just make the slats as long as you want them to be and make a third leg assembly. Put the third leg assembly right in the middle. Super easy.
Thanks for the plans, the benches were ready to build and look great.
Thanks for sharing this easy to build solid and inexpensive bench! Just what I was looking for.
http://i.imgur.com/mQitu1Q.jpg
Going to try the pocket holes for the next one
Looks great!
Hi Jay how long are the legs on the bench are they 20in
hi Jay how long are the legs on the bench
All of the dimensions are shown in the diagrams. They are 17″ on their long side.
How much profit and cost to buy all materials to bulid and how much to sell
Great bench design Jay. I modified this a bit to use the remaining composite deck pieces I had laying around. I made the seat and back from the decking, and added support underneath and behind to keep the decking material from flexing. These are really solid benches!
Glad you like them. Thanks Ted.
It looks like you aren’t using pressure treated material, but I could be wrong. What do you use to treat for outdoor use?
I would be interested in making a couple for my house and some for sale (I curently make coffee and end tables along with dinning room tables mostly on the higher end) I’m looking at producing something on the lower end of the money and I think these would work plus they are a nice design what do you get for them as I need a starting point
Thanks
It cost me around 40.00 for lumber ,screws,and glue. I sell them for 80.00.hope this helps you. And a special thanks to Jay for the design. It helps with some extra cash.
I want to thank you for the easy pattern and great video. Last night I purchased the supplies and today I’m sitting on a new bench! I have never built anything from scratch and was able to make this bench without any problems. I was kind of nervous to use a saw, but I read the instructions and followed your pattern exactly. Yay! I am so proud of myself. I am going to build two tables and two chairs as well now that I have the confidence.
It really makes me feel good to read your comment Cecilia. Thank you very much for reaching out and I’m super glad you were able to make them :) Rock on :)
I have just finished this project, using recycled wood and coated with a satin varnish. It has a beautiful appearance. Full credit to Jay on this one, well done.
Hi Jay,
Made one of these for my house and the mother in law was so impressed she demanded I make one for her! I improvised a bit and didn’t put the last slat on the back rest, then cut off the top of the support, this allowed it to sit under the window at my house. Great plans, thanks for sharing
Jay
These little benches are great! just made one out of some 2x4s I scavenged off of some 10′ pallets that I rescued from the dumpster…great plans and videos thanks for sharing!
this may sound stupid but without a miter saw how do you cut the 15 degree angle?
Use a protractor and a pencil to draw the 15° line, then use a jigsaw or circular saw (or whatever saw you have) to make the cut, following the line.
Be “extra” careful to cut one at 15′ … then use that as a guide for the rest. You would pick up a half decent compass (adjustable square) from most DIY stores.
Jay I need the dimensions for the chairs…I made the bench and table already, I just added a cross piece of 2 x 4 in the front for them to rest their feet on, I hope you don’t mind…some couple saw this on you tube and asked if I can make it for them…I just need to make 2 chairs…I need the dimensions for the arm rest and the cross piece the seating slats go….after this I’m going to make a set for me and my daughters….
Thnx Jay
Joe Sarmiento from Guam U.S.A.
How high does the bench bottom sit? I would like mine to sit about 20 inches from ground to seat bottom. Thanks!
The seat height should be about 18″. Just add about 2-1/4″ to the legs to get it close to 20″
Built one today, very easy with your plans.
Thanks
Jay-I just finished building the bench but I used Redwood instead. Very sturdy, comfortable and finished it in less than an hour. 1 down 3 to go. Thanks for the plans!
I made one of your benches in a 6′ version with great results at first, but after about a month all the legs don’t sit even on the concrete . I used pressure treated lumber and everything looked great at first . What did I do wrong ? Should I have used another material like cedar or cypress ? Any help would be greatly appreciated . ! Love your videos and website, thanks for all you do !
Wood will move slightly regardless of what you do. Sometimes it’s hard to predict. Pressure treated lumber is normally the wettest when you use it. Sounds like after a month or so the pressure treated lumber dried out slightly causing the wood to move a bit. Regardless, you have a couple options. You could determine how much one leg is elevated off the ground when the other three are flat and remove that much material from the closest leg. Or you can drill a hole in the bottom of the leg and use a small galvanized lag screw to level the foot from below.
how do i download the plans i cant figure it out
Just built two of the benches and a backless version, too. My timber wasn’t quite 2×4, but real easy to adapt the dimensions. Looks really good and is rock solid. £70 spent on materials to seat 6; compared to £200+ from IKEA. Thanks for the design and great instructions. Next project will be to follow the same kind of design and build a matching table.
Hi Jay…. I made your bench today with structural pine 70 x 35 mm. I improvised a little and added an arm rest on either side. This bench is awesome and a fantastic project for the family and it now looks grand standing on my porch . I stained it with Danish oil. Thanks mate. Edd.
Can I ask how you added the armrests? I’m thinking of doing the same. Thanks
What is the best way to add the armrests?
made a bench today with premium white wood lumber and I would like to protect the wood from the rain and sunshine. I like the natural look so what would you suggest to cover it with?
I’d suggest spar urethane but it will probably yellow it slightly.
thanks!!!
Jay, Your not going to expect this one! I just made two of your benches and four side tables, they worked beautifully on the sides of a gazebo entrance to my apartment. This is in Kingston, Jamaica :) Thanks!
Hi Jay, I like your bench plans. I want to make one for my daughter for Christmas. She would like one with arms.
Can you please send me the cut list for this modification? and any other helpful hints.
Thank you- Richard
Would this kit work for the project?? Kreg MKJKIT Mini Kreg Jig Kit
Thanks again, Richard
Yes
A big improvement would be to make the seat sculpted. All you would have to do is change the two 2X4’s that the seat screws into into 2X6’s and cut a curve into them. I have built several English Garden Benches with sculpted seats and they are very comfortable to sit in. I always use Pressure Treated Lumber as well as it will last much much longer outdoors. These aren’t living room furniture!
A properly sculpted seat starts down more sharply near the back and then gradually rises near the front of the bench. Just make sure both sides have the same sculpted shape and are installed with the same orientation.
Also, you could build it as shown and purchase cushions to make the bench more comfortable to sit on.
Hey Jay.
awesome job!
Can you please tell me the model number of the drill you are using? It seems to be a Bosch Impact drill, but I’d like to know the model number.
Thanks!
Jay…can I get a reply please?
Thanks.
regards,
Imran
Hey Imran. I don’t recall the model number and I no longer have them. It is a Bosch 12v impact though. I think they still sell it at Lowes.
Thanks Jay.
I’ve settled for a 10.8v model,I’m sure it will work well enough.
all the best with your work in 2016.
Regards,
Imran
Hi Jay, I used your design to build the bench during the Christmas Holidays. Boy, what a stress reliever. Thanks again and I’ve recommended your site to a few of my friends.
Glad to hear it was a stress reliever :) Hope you get lots of use out of it.
Can you help me out with a few questions I have. Email me at your earliest convenience. Carlosponce88@yahoo.com
Very easy to follow design. I just made one for our front porch in about 45 minutes. Thank you very much for sharing!!!
This was great – thank you so much. Made one in a few hours, added 18inches and another support. Your plans were spot on. Thank you!
You are a very nice man.
Thank you for the plans!
Thank you for your video.
Love this pattern. Made one and got requests for two more from friends!!! Very easy to make!
Great and simple. Thanks
“Click here to download a .zip file containing the SketchUp file for this bench.” After I clicked and extracted all files and it won’t open. Can you send me a link for SketchUp?
Thank you,
Mike
Google is your friend when you need an answer :)
Try here: https://jayscustomcreations.com/sketchup/
Thank you for posting the schematics. It was really easy to build with some recycled wood I found. The wife loves it and I have you to thank. Your awesome????????
Do you have any advice how to scales these measurements down to make a children’s bench?
Jay:
We want to stain the 2×4 bench with Penofin brand. Do you suggest we stain each piece of wood before we build the 2×4 bench or we stain after the bench is completely built? Which is easier to do from your experience?
Thanks,
Wlee
I don’t have a pocket hole tool. Can I make the table without doing pocket holes?
Yes. Absolutely. I’ve made more without pocket holes than with pocket holes. Just screw through the other side of the adjacent board. No problem.
Just made a bench today which the wife loves very easy to do and great plans easy to follow thanks for the plans and video I see me and my son making more of these together.
Thanks Jay,
Really easy to follow instructions and video.
Bought myself a Kreg pocket hole jig 320 and made the bench this weekend.
We needed a simple bench plan for my grandson and I to build together, and came across your website. The goal was to make something useful and at the same time help him learn how to safely use the shop tools. He has now completed 5 benches, is excited about making the picnic table next. Your layouts and directions are so easy to follow. Thank you for sharing on your website!
Really like your video and plans for the bench with back. I am a beginner at this kind of project, so I have an ignorant question. If I want to use treated lumber, I have been told that the glue will not be effective, as it cannot penetrate the wood. If this is so, should I substitute bolts for the screws on the weight and torque bearing joints?
Can i use this design with pressure treated wood and if not what wood did you use
Pressure-treated wood is probably the best choice for this build.
Thanks for the plans. I modified them a bit to use some leftover high end pressure treated wood, some 2×4’s, 2×8’s and deck boards. Much easier than I thought it would be because of your easy to follow plans. Not bad for my first project. Wish I could post a picture!
Best directions and easiest project ever. I am building three for trail benches in our 31 acre woods. This is the first time I have seen clear directions on one of these sites. Not much of a builder, but these turn out nice.