FREE DOWNLOAD AT THE END OF THIS ARTICLE. I have always wanted to turn my sitting bench design into some type of swing. Recently I was asked to make a swing so I figured now would be a great time to do so. The swing that I came up with is made from eight 2x4x8’s and four 3/8″ eye bolts. My cost was around $40 with a build time of 5 hours. I wish I had a place to hang one of these because this has turned out to be one of my favorite projects in a long time. I hope you enjoy and can build one of your own. When you get to the end of this tutorial don’t forget to download the free plan!
Step 1: Cut
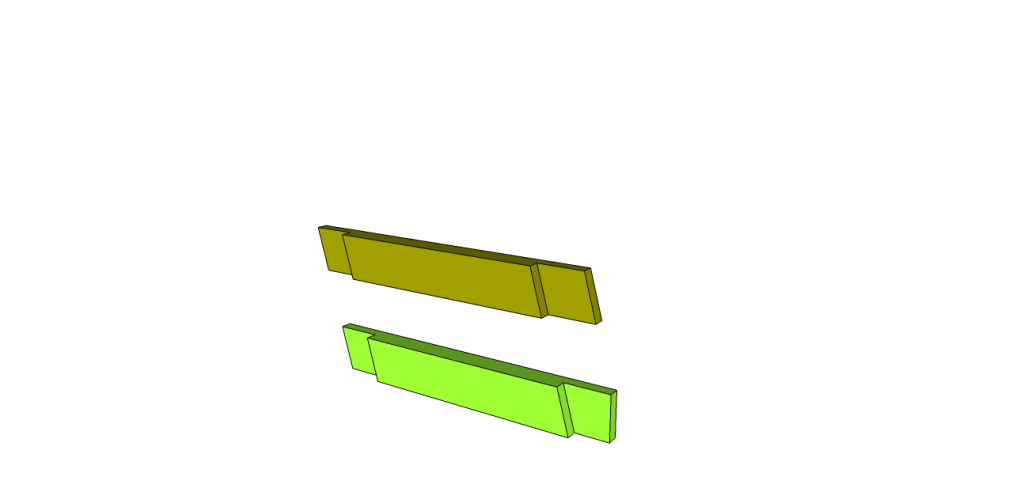
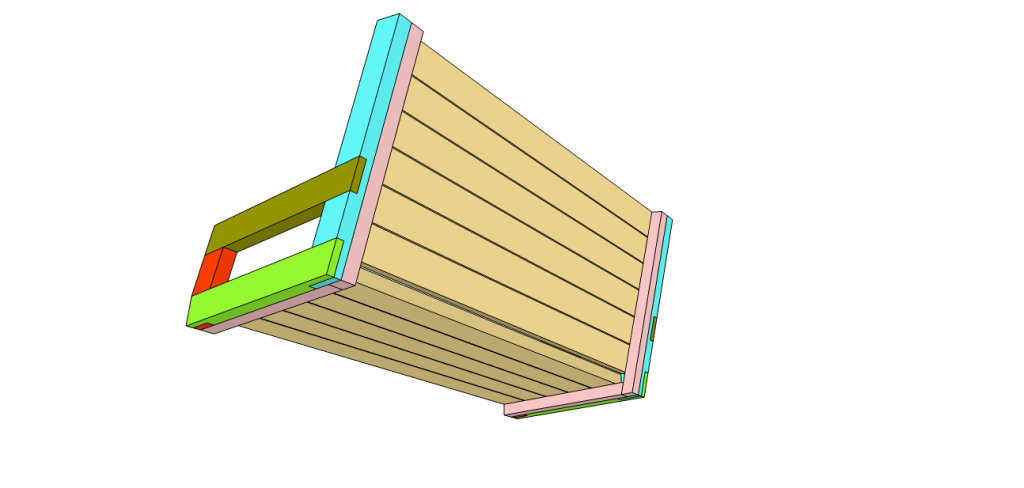
Cut all of your parts to length and width according to the cutting diagram. The width (3″) needs to be cut first with the arm components. Typically I like to have all my parts cut before assembly but there are a few parts that need to be measured after some assembly is done (pink)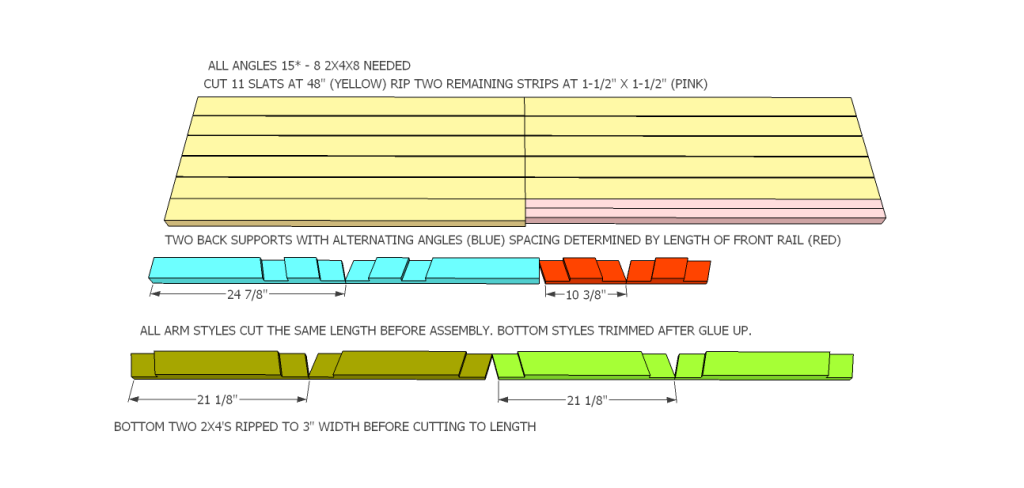
Step 2: Half Laps
Half lap joints can be cut with various tools. In this project I used my table saw with a dado blade. It is the quickest and easiest method for me. However, if you do not have a table saw you can either cut these with a hand saw and chisel or a circular saw and chisel. For a good explanation of cutting precise half laps please refer to the video at the end of this article.
Step 3: Glue Up
With all of the arm components cut and fitting together nicely you can glue all of the pieces into place.
Step 4: Trim The Arms
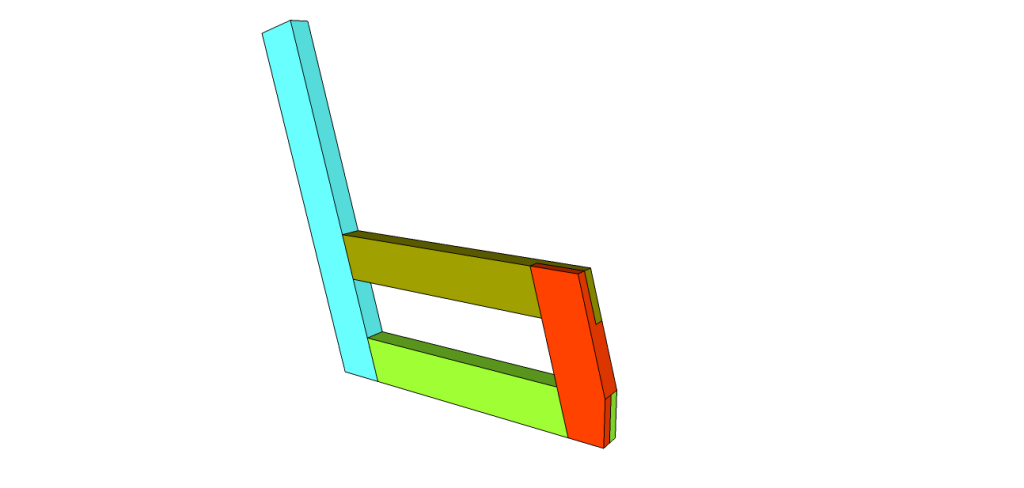
The front of both arm assemblies needs to be trimmed slightly (red/bright green). A cut perpendicular to the bottom needs to be made where the half laps intersect. This point is where the seat slats will start.
Step 5: Add Slat Supports
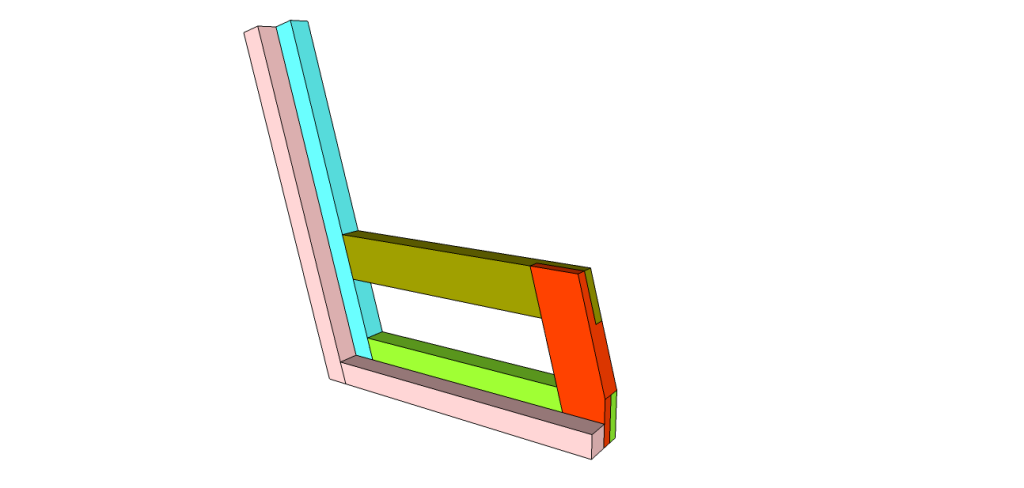
The slat supports (pink) can now be measured and put in place. I used glue and 4 or 5 screws to secure them to the arm.
Step 6: Install Slats
Starting from the front install the seat slats. Each slat is secured with two screws on both sides from below. Make sure you pre-drill for all of your screws so that you do not split the slat support. The space between slats is 1/8″. I used the solid end of a 1/8″ drill bit for this. After the seat slats, install the back slats working from the top down.
Step 7: Eye Bolts
I used 3/8″x4″ eye bolts on my build as they were the shortest I could find. 3-1/2″ eye bolts would be ideal. I drilled holes so that they went through both the arm and the slat supports.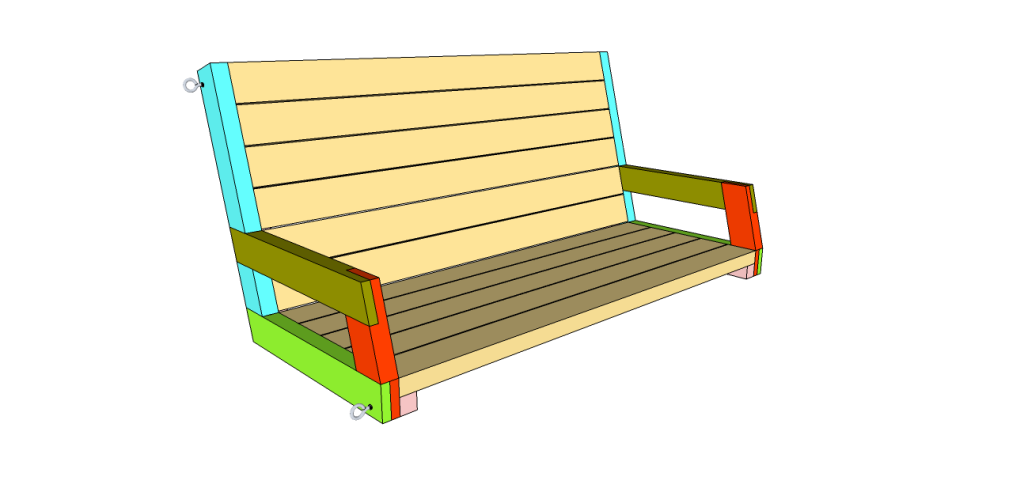
So that’s it. This was a very fun build. Like I said in the video I don’t have anywhere to hang this from. I sure wish I did because I really want one of these for myself! As always, if you decided to build one of these I would love to see your finished product! If you would like a PDF copy of the full plan as well as the SketchUp file download the .zip file below.


[…] wanted a porch swing but needed it to be low cost. I thought of this design that I adapted from Jay’s 2×4 4 foot swing. Making it 6′ means that it needed a little bracing in the middle. It was not […]
[…] you would like to see the build of this project you can click here to visit the project on my woodworking […]
It’s a very nice swing, but you can build your own stand to hang it, it should be easy to build.
Jay, what do you think about using pocket screws instead of half laps? Would they hold up?
They should.
Do you sell your benches
Amazing!!!
I sell benches
I am currently making this bench with at risk youth and was wondering if you had any ideas for armrests. i did not think ahead and thought they would be easy to just attach some armrests after it was finished but my friend who is a carpenter said they would rip out easily the way i was thinking. As this is a donation for the elderly i would like to have sturdy armrests for them to use. Any suggestions to add armrests to a completed bench and still have it be functional and look ok?
im looking for plans for a stand for this swing can you help
Jay, do you have anywhere explaining how to make the half laps without a table saw? I do not have a table saw to use, but have circular, miter and jig saws
You can use this method with a circular saw to cut the half lap joints: https://www.youtube.com/watch?v=KNX9Y2cyRhk
Thanks, Jay! BTW, you’re awesome.
I am hanging my swing today! Thank you Jay.
Awesome! Glad to hear that.
I made this swing over the past weekend. I am not a carpenter by any stretch, so it took me a couple days to complete. I made a few modifications due to the weight of the swing. I also made it a 5 foot swing. if you want to see pictures I can let you see them.
Thank you for the great idea and plans.
We’re building this right now. I’ll show pics when it done. The video was helpful!
I’m so confused. How do we attach the links? That’s probably the most important part and any figure out how to hang it! Can you help or send a photo of how to?
Use quick links to attach the chain’s for hanging.