My most popular project to date is a 2×4 sitting bench. A lot of people have shown me their completed 2×4 benches according to my plans as well as modify the design to incorporate some additional features such as arm rests or an added angled front seat slat. I’m going to add to it just a bit with this one. I was asked to duplicate a horse themed bench that had some fire damage to the slats and back but unfortunately I was not happy with the original frame. The entire original was put together with treated lumber, deck screws, and some carriage bolts. The main thing that was missing was glue. Over time the old frame had developed quite a bit of play even with the bolts re-tightened. My plan was to use my 2×4 bench frame, add arms, and use the horse theme from the original.
To get full size templates for the shaped back I decided to use a computer program called Bigprint. I was able to reproduce full size templates for the entire back without removing the first piece of wood. As a matter of fact I never removed any shaped pieces from the original. It is in the same shape as it was the day it came into my shop. I’ve already covered that process on this site. You can read about it here. Full size templates are available for download at the bottom of this page. They are PDF files. IT IS IMPORTANT TO NOT SCALE THE IMAGES WHEN PRINTING. You should have an option in your printer settings to “scale to page” or “fit to page”. Make sure this option is unchecked and that you print at full size with no scale.
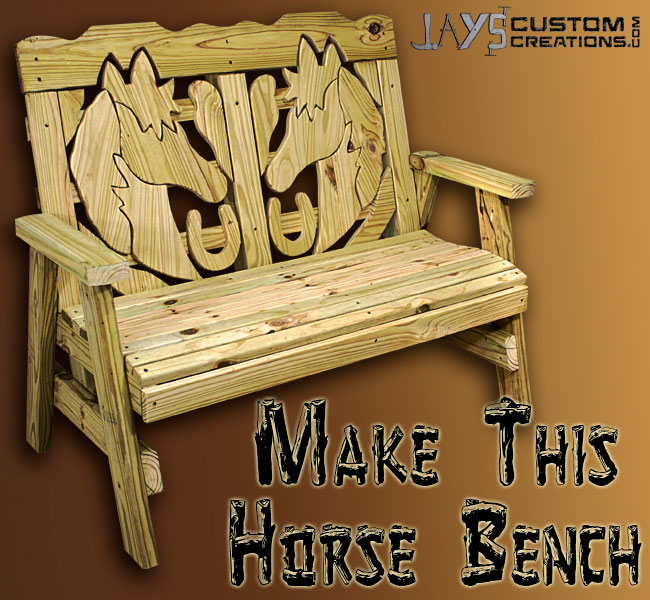
Make A Horse Bench
Read this entire plan before you purchase materials and make any changes you may need. To make this bench you will need the following:
- Six treated 2x4x96″ (or seven depending on how you install the seat slats)
- Four treated 1x6x96″
- 88 2-1/2″ decking screws (give or take a few)
- About one pound 1-1/4″ decking screws (to secure the back shaped pieces. I actually used a lot less than one pound but I cannot buy less than one pound locally)
- Eight 2-1/4″ outdoor pocket hole screws
- Outdoor wood glue. I used Tightbond III.
- One weekend (hopefully)
Cut your pieces
Cut all of your frame pieces according to the layout diagram. All angled cuts are 15° The arm pieces do not show any detail but I put a slight radius on both ends. (higher resolution images are in the download at the end)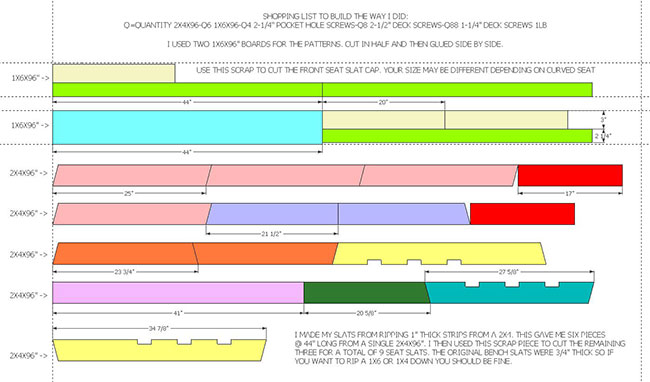
Also, if you want a curved seat now is the time to make that cut. This shape is purely up to you but here is a diagram showing roughly how I made mine. The deepest part of the cut is one inch. I also gave measurements for the locations of the high and low spots. Again, this is just roughly how I cut mine which turned out pretty comfortable. You don’t necessarily have to make your seat curved. Make sure all 3 seat supports are the same shape.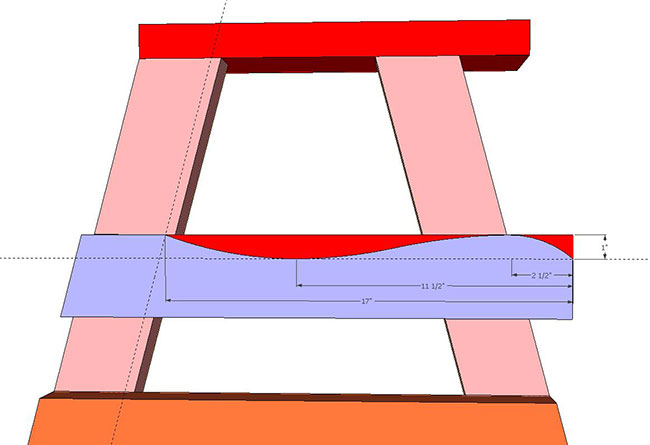
Also cut the dados in all three back pieces. I clamped all of mine together so I could measure, mark, and cut them all at once. 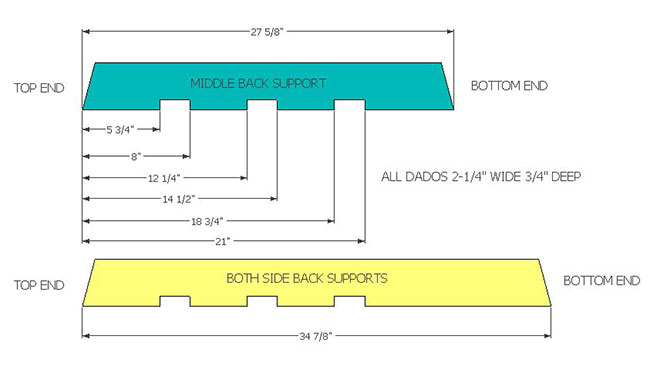
Assemble the legs
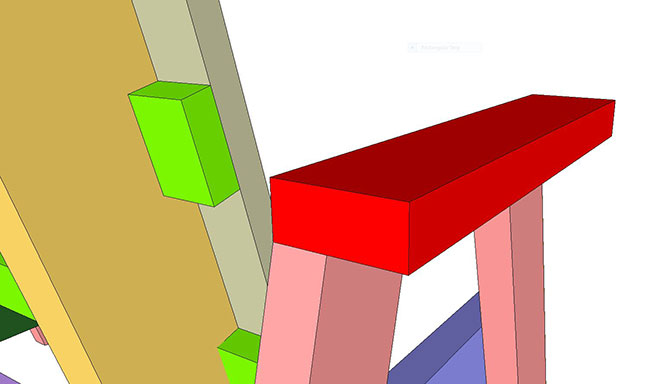
Before you assemble the legs it’s a good idea to lay out the assemblies and make sure you have a left and a right. Also, make sure you have the good side facing down and the bad side facing up. This will make the good sides more visible after assembly. With everything in the proper orientation drill two pocket holes in the inside top of each leg. This is how we will attach the arms. If you do not have a pocket hole jig (affiliate link) you can simply screw through the arm and into the leg from the top. I don’t recommend this method though. Pocket holes are much stronger and you will undoubtedly use the jig for many, many projects. The legs go together the same way as my previous bench. I used a standard 2×4 as a spacer between the upper seat support and the lower horizontal piece. Use glue and two screws at each intersection along the long diagonal. Attach the arms as you see fit. I made sure the back of the arm was flush with the back of the back leg and I used a one inch spacer to elevate the leg assembly off of my work surface and then attached the arms. This made them slightly offset toward the outside but still overhang the inside by a little bit. The position of the arm is up to you. If you make the inside of the arm flush with the inside of the legs than you wont have any problems. If you make the arm set into the bench like I did than you will have to make a small cut for the back when you start assembling the finished pieces. Here’s a few diagrams to show you what I’m talking about. I will also show the actual bench with the cutout later.
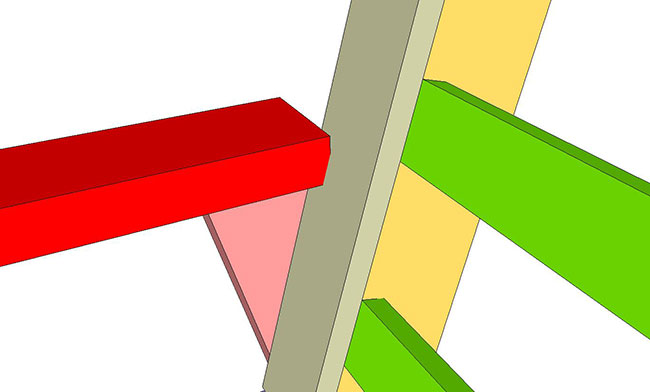
Assemble the back frame
Normally I don’t assemble the back separately but this time I figured it would be a good idea to ensure the back was even with each side. The outside supports need to be inset by 1-1/2″. An easy way to measure this is to use the middle back support on the outside flush with the horizontal runners. Then glue and screw the back support in place. I used two screws at each intersection. 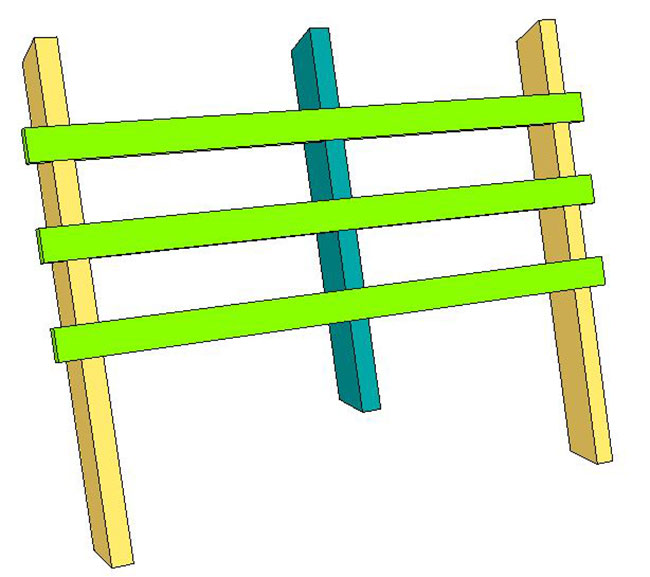
Attach the back frame
The back frame intersects the top back corner of the seat support and is flush on the bottom with the bottom of the lower horizontal piece in the leg assembly. Use glue and two screws at each intersection. I found it helpful to clamp a support block to the bottom of the lower horizontal piece in the leg assembly and then just line up the intersection. Then clamp it and screw it. 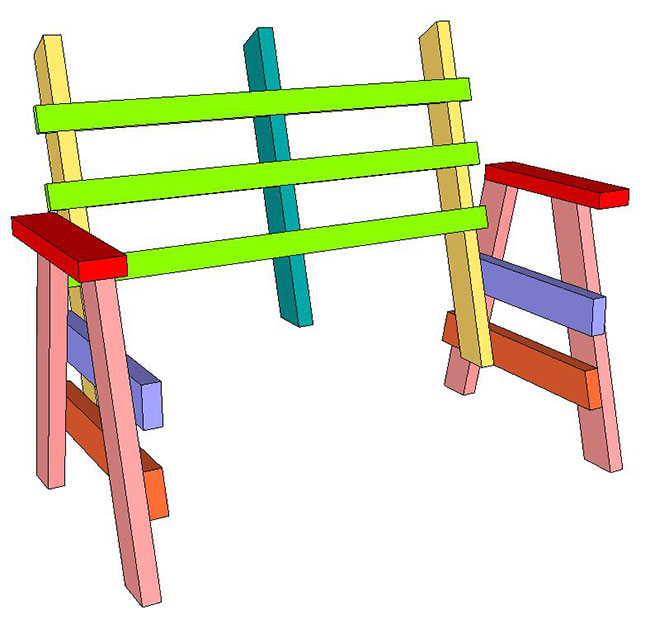
Attach the middle back support making sure it is centered on the back. Do not attach the middle seat support at this time.
Then attach the lower stretcher. Again, glue and screws. I used two screws into the back supports and then one angled screw into the lower horizontal piece.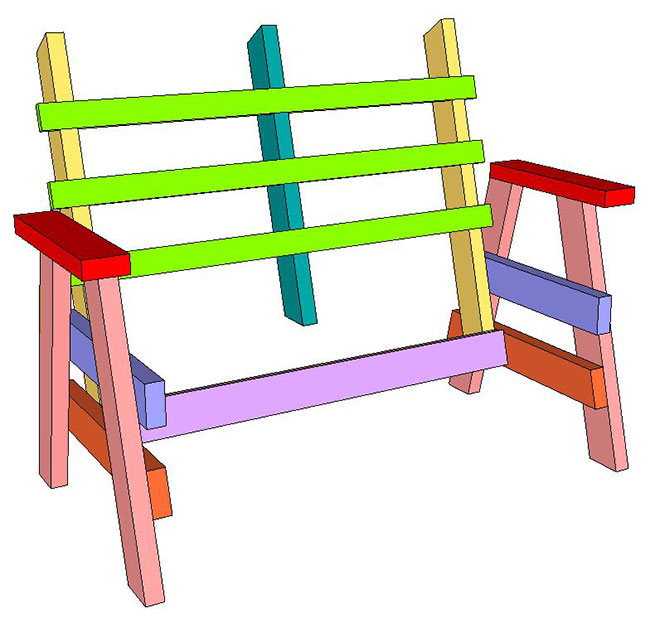
Add the seat slats
Before you attach the seat slats use a router or sandpaper to round over the top two edges. Attach the front seat slat cap followed by the first seat slat. Then you can attach the center seat support. If you watch the video you will notice I installed the seat slats in a different order. I did it this way only for the slideshow at the end of the video. It will be much easier if you follow this guide.
(method 1) Install the back seat slat next. Use a piece of 3/4″ material to space the back seat slat away from the back supports. This way the pattern pieces will have a place to go as they extend slightly below the top of the seat slats. With the front and back seat slats in place, evenly space the remainder of the seat slats. This will give you a spacing exactly like the original bench. If you want a tighter spacing follow method 2.
(method 2 – tighter seat slats, may require one more 2×4) With the front seat slat installed use a 1/8″ spacer to continue installing the slats from front to back except the back seat slat. When you get to the last seat slat you will notice one slat is not enough and two slats will be too much. Using a 3/4″ spacer on the back supports, measure the width of your final seat slat to give the correct spacing. This is the method I went with so my back seat slat is slightly wider than the rest. That’s ok with me as I wanted to have a tighter spacing. Cut this out of your remaining piece of 2×4. 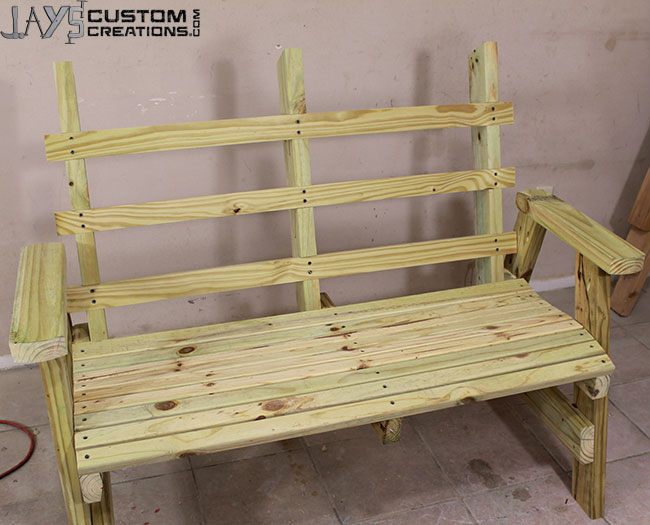
Cut the back pattern pieces
Print the included patterns, cut off the white edges, and tape them together so that the diagonal lines match up. Verify your patterns are the correct size via the included scale. Then cut them out. It’s better to cut them out over sized as once they are attached to the wood you can use a bandsaw or jigsaw to cut the line. You can either attach them directly to the wood and cut them out or attach them to scrap plywood and create templates that you can save and use later. I made reusable templates.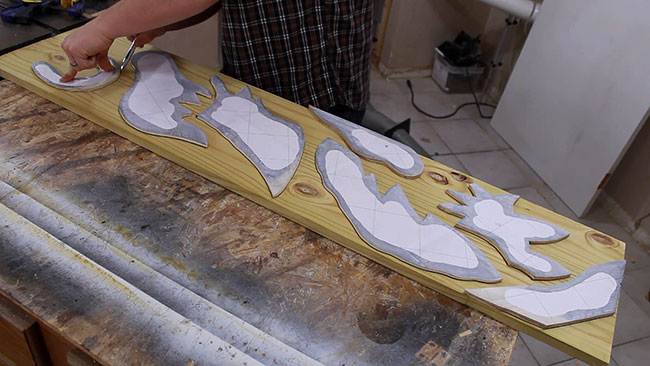
The back pattern is only half. You will either have to print and cut this pattern twice or put the pattern on a piece of scrap wood to use as a dedicated template so you can mark both sides. For the back pieces you will have to glue two 1×6 boards side by side to get the width you need. To make this easier I cut two 1x6x96″ boards in half first and then glued two halves side by side. After all the back pieces are cut lay them out on the floor or a work surface to make sure you have a left and a right. Then round over the top edges of all the pieces with a router or sandpaper. Again, make sure you are rounding over the edges in the orientation of a left and a right and not two rights.
Attach the back pieces
The three vertical pieces are attached so that they are flush with the outside of the horizontal supports and are resting top of the seat supports. Then attach the top piece above. These four pieces are attached by screwing through the front and into the back supports. Again, glue and screws. Two screws in each vertical piece and two screws in each mounting location of the top piece. I wanted the screws to be centered on the vertical pieces so I screwed them in on an angle on the outside pieces. I did the same with the outside screws on the top piece. 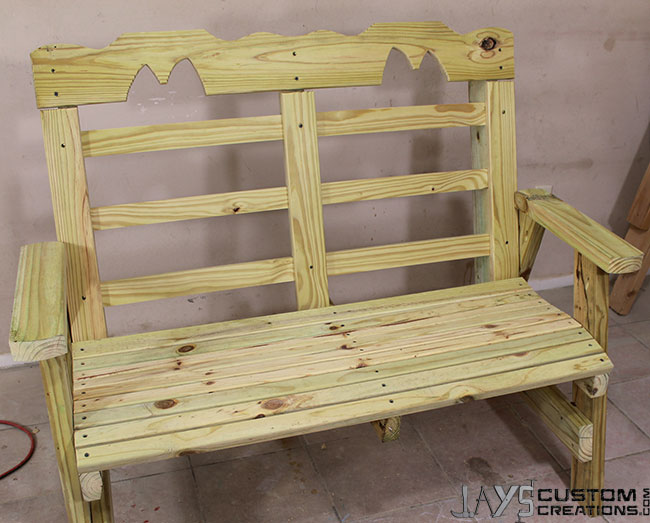
Depending on how you mounted your arms you may have to cut a small notch for clearance. As you can see here I had to do so. I held the vertical piece in place and used a regular hand saw in the same way you would use a flush trim saw to cut a notch on the arm. It may look confusing but it’s quite simple really. If you mounted your arm flush with the inside of the legs you shouldn’t have a problem. 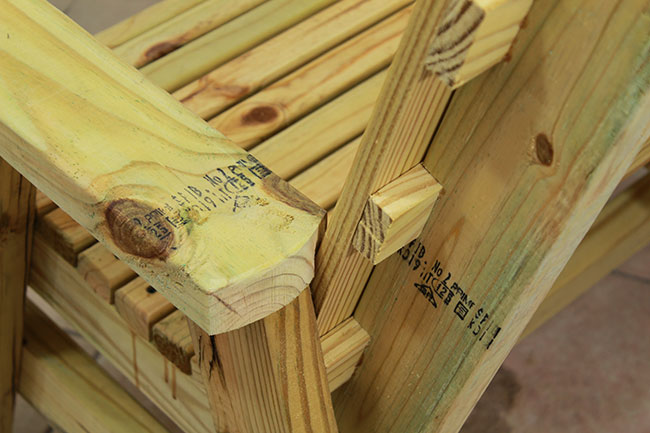
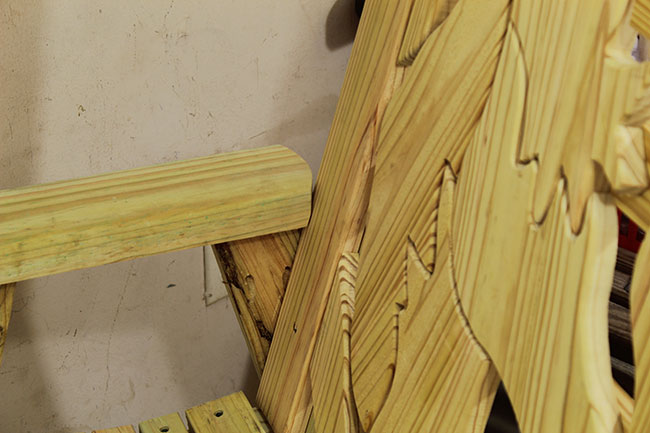
Then attach all of your back pieces. This took a little time. I had to use a bunch of spring clamps to get the head of the horse in place before I screwed anything down. Because I increased the original size of the vertical pieces the fit is tight. You should be able to get it all to fit but make sure you lay it out first. When you have it in the appropriate orientation glue and screw it in from the back with 1-1/4″ screws.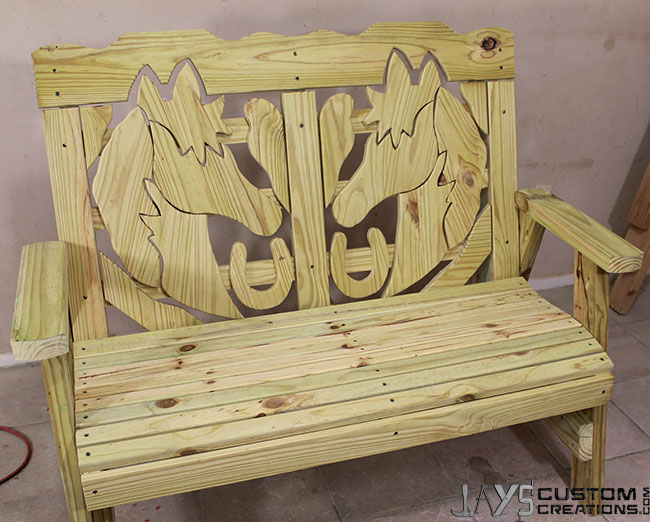
Hopefully before too long you will be able to enjoy your nice horse themed bench. This design should hold up pretty well. I hope you enjoyed this project and will pass it along for someone else to build it. Have a great day folks!
Download
Although this plan is free to you remember that it isn’t free to produce. If you would like to show your thanks please consider using the donate button at the bottom of this page. If you liked this project and found it useful please share it so others can do so as well. Thanks for stopping by folks and have a great day!


Hey Jay do you sell these templates or any templates
Hey Bill. The templates are free. You can download them above the last image in this post.
It won’t work for me?
I can’t download either, won’t unzip. Tried downloading unzip program, Got a bunch of trash on my computer. Any suggestion? Thanks
I just tested it on both my computers and a tablet. Working fine on my end. 7-zip is a free program you can use to open zip files: http://www.7-zip.org/
Thanks, Jay. I didn’t have the 7-zip program. worked fine. enjoy your wed site. Just sent you a donation as a thank you, Joel
Thanks Joel. I just got the notification. It really helps keeping this ball rolling. I very much appreciate that. Glad 7-zip worked for you.
Hi this is John Faragher
my computer wont work. cant print it (and I don’t have a printer), or download either, won’t unzip
can you email me the horse bench patteren set,
when I have to print something off I just go to the library
Hi Jay I am a subscriber of of yours on youtube.I like how you use pallet wood and stuff.I have got into that now.Hardly a mile from where I live they built a Family Dollar and had a ton of free pallets.They gave them to me I got a full size pickup truck load of them.And I didn’t even take all they had .The guy wanted me to come back and get more but I didn’t have the room to store all of them.Unless it’s plywood I won’t have to buy wood for awhile.Anyway I have got to make this horse bench man that is really nice ! I’m not into horses but I love this bench thank you !
Hi Jay on your compututer could you make templates for deer bench or rams head
jay I couldn’t get page 4 to print
Just found ur YouTube channel and website ur awesome man I really like ur projects
I love this bench.
Heads up, I also had to remove the standard margins( custom print size), And be sure to print in landscape to get the furthest left lines to print on the templates…(only took me 3 reams of paper to figure it out) But finally, Success !!!
It would be nice to have a printable template for the curved seat supports…hint..hint..
I owe you for this one Jay. I will send a donation when I get my next Pay Period.
Just finished this bench. Great project, thanks Jay!!
Your instructions are simple and easy to understand. THANK YOU . Pat Carse
Jay, Can’t I send you a donation for templates of the horse for the horse bench. I just can’t get my download to work to download the pattern, but I would be happy to send you funds to send me a copy.
I just sent you an email regarding this.
Can you please email me temple patterns. Can’t get to print
I just finished the bench, I made it for my wife for our anniversary! I will have to post her reaction later, thanks for the idea and plans.
Jay, I have a iMac with a HP printer. We can download the zip, open the zip files and view the pages but when we send it to the printer it hangs up continually and won’t finish printing. Any ideas on what we can do to get this to fully print? Anyone else having problems with Mac?
This is brilliant GREAT Thanks
Hello, can you pls tell me how you made the templates on the computer…
Can you please email me a set of the templates of the horse bench please.thank you