My first woodworking “shop” was in the living room and kitchen of a run-down house trailer (2008-ish). Nothing pretty at all but it was functional. At that time I was living on my own with a job paying just over minimum wage. The engine in my truck blew a head gasket and the only option for me to rebuild the engine without going into debt was to sell off my woodshop. I sold everything but my miter saw. It was a hard lesson learned on being prepared with an emergency fund and I’ll never put myself in that kind of situation again.
My second shop (2012) is where I started this whole YouTube and website venture. I was maintenance at an apartment complex which allowed me the opportunity to clean out a junk apartment that was previously used for storage and use it as a shop. At that time the only woodworking tool I had was a Kobalt 10” sliding miter saw from my previous shop. I used it to build my wife’s grandmother a 2×4 sitting bench and the positive feedback from friends and family fueled the fire to get back into woodworking. I took an initial $200 investment from my household income to batch out a bunch of them to sell. That investment and a lot of sweat was the beginning of a snowball that has become my shop.
Fast forward two and a half years since the start of shop #2. My wife finished college and my online business was at a sustainable point for me to leave my day job which lead us to house shopping. We ended up getting our first house together on July 2nd 2014. The house we found fit literally every one of our criteria including the most important for me which was a two car garage. With an empty garage to start my current shop I gave the walls a fresh coat of white paint and ran new electrical wires for the shop inside a long box along the bottom of the left and rear walls.
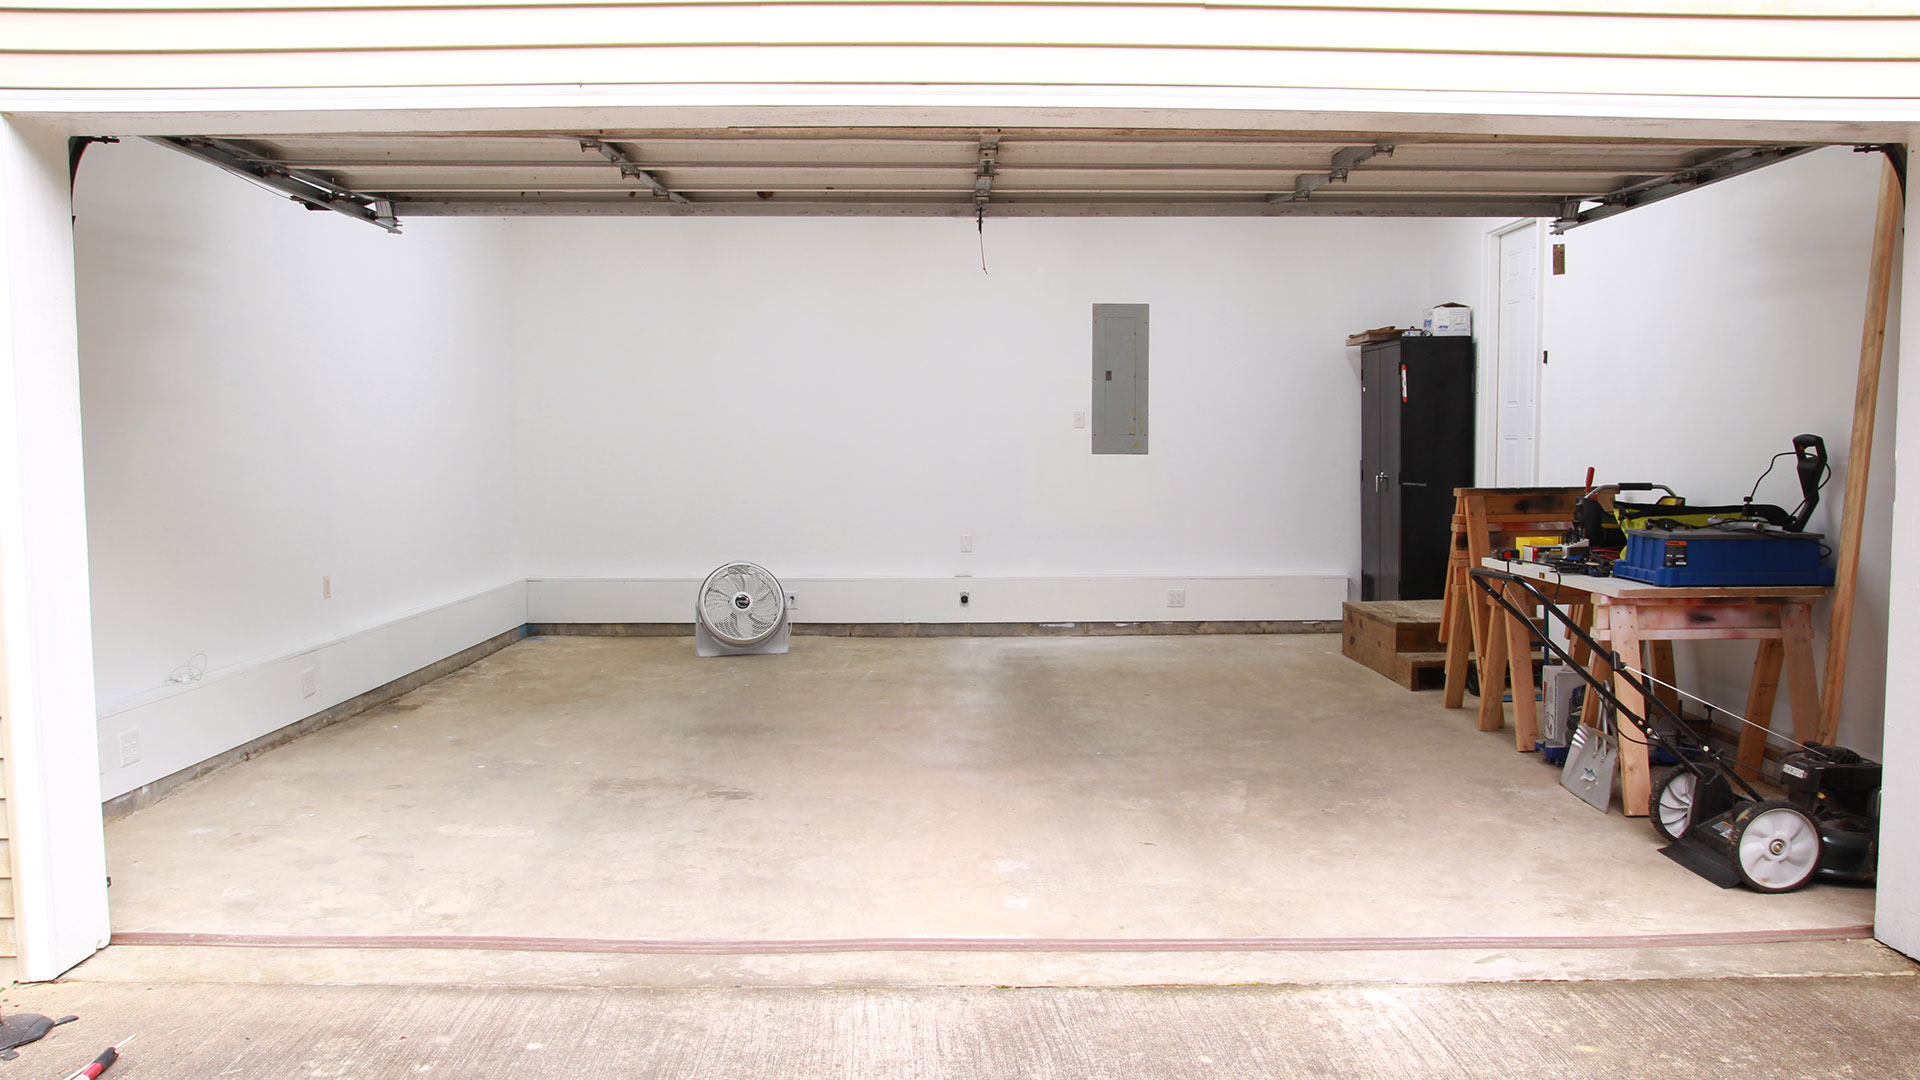
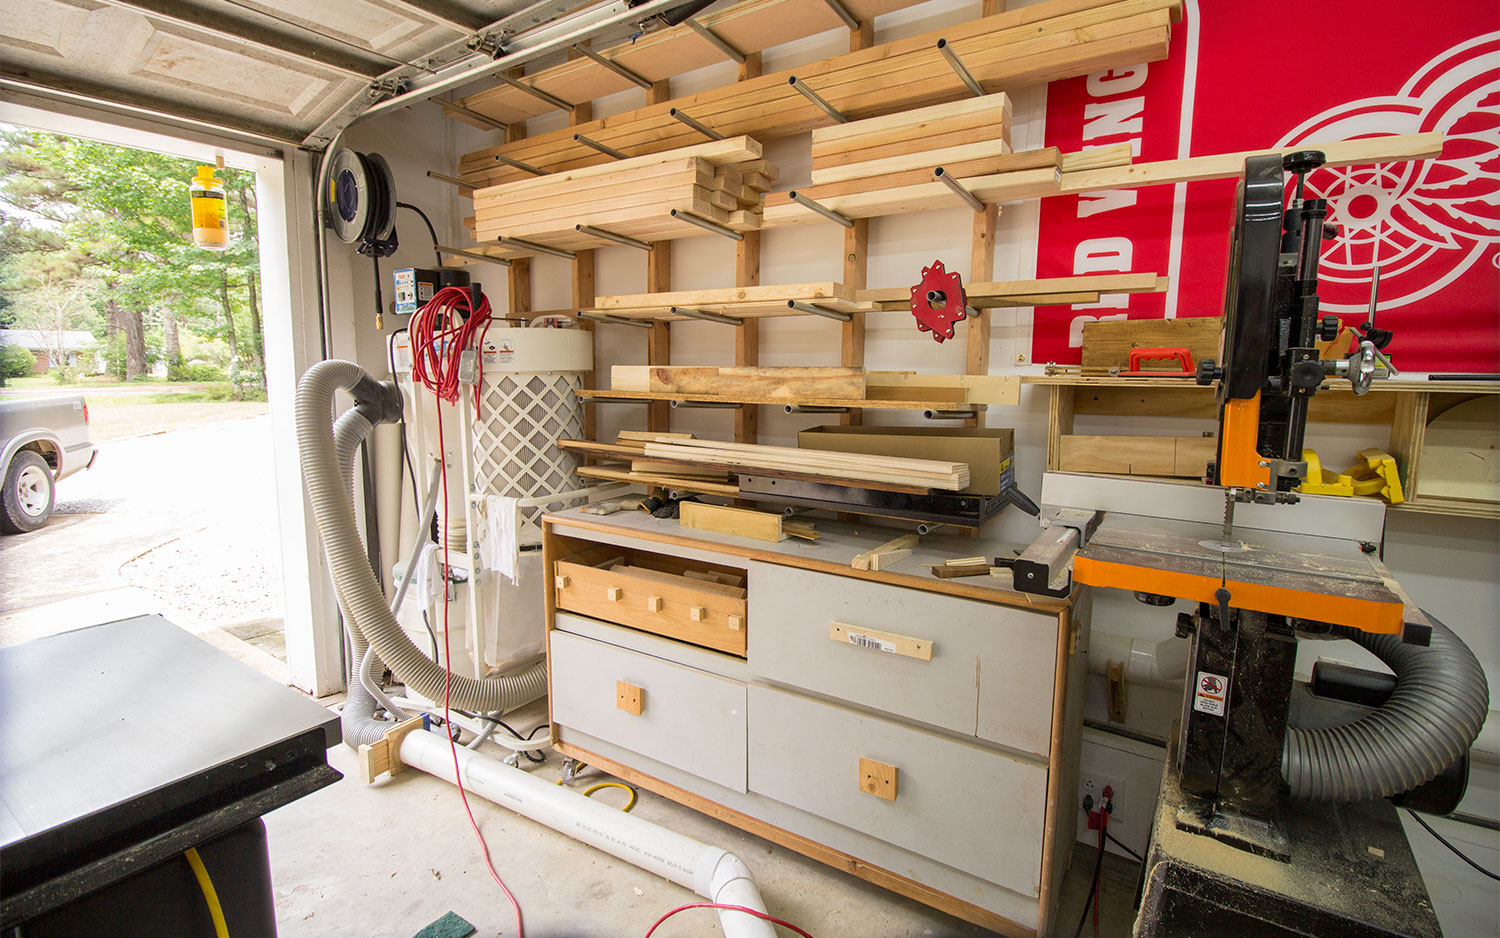
It’s been a solid year since moving into this house and starting my shop. Nearly everything in my shop is on casters for mobility. In my opinion the most important tool in any woodshop is the table saw so lets start there. My table saw is a SawStop PCS with 52” rip capacity. The attention to detail on this machine is phenomenal. I have the industrial mobile base for it which makes the single heaviest item in my shop one of the easiest to move. The base lifts the entire saw, including the extension wing, several inches with ease. It is actually in the up position in the following image. I also spray painted the location of the extension wing supports on the ground so I can easily locate a familiar position when setting up the saw. Because moving it around the shop on the mobile base is effortless I find myself moving it out of the way frequently when I know I’m not going to be using it for a while. I also keep a couple trash cans near the table saw.
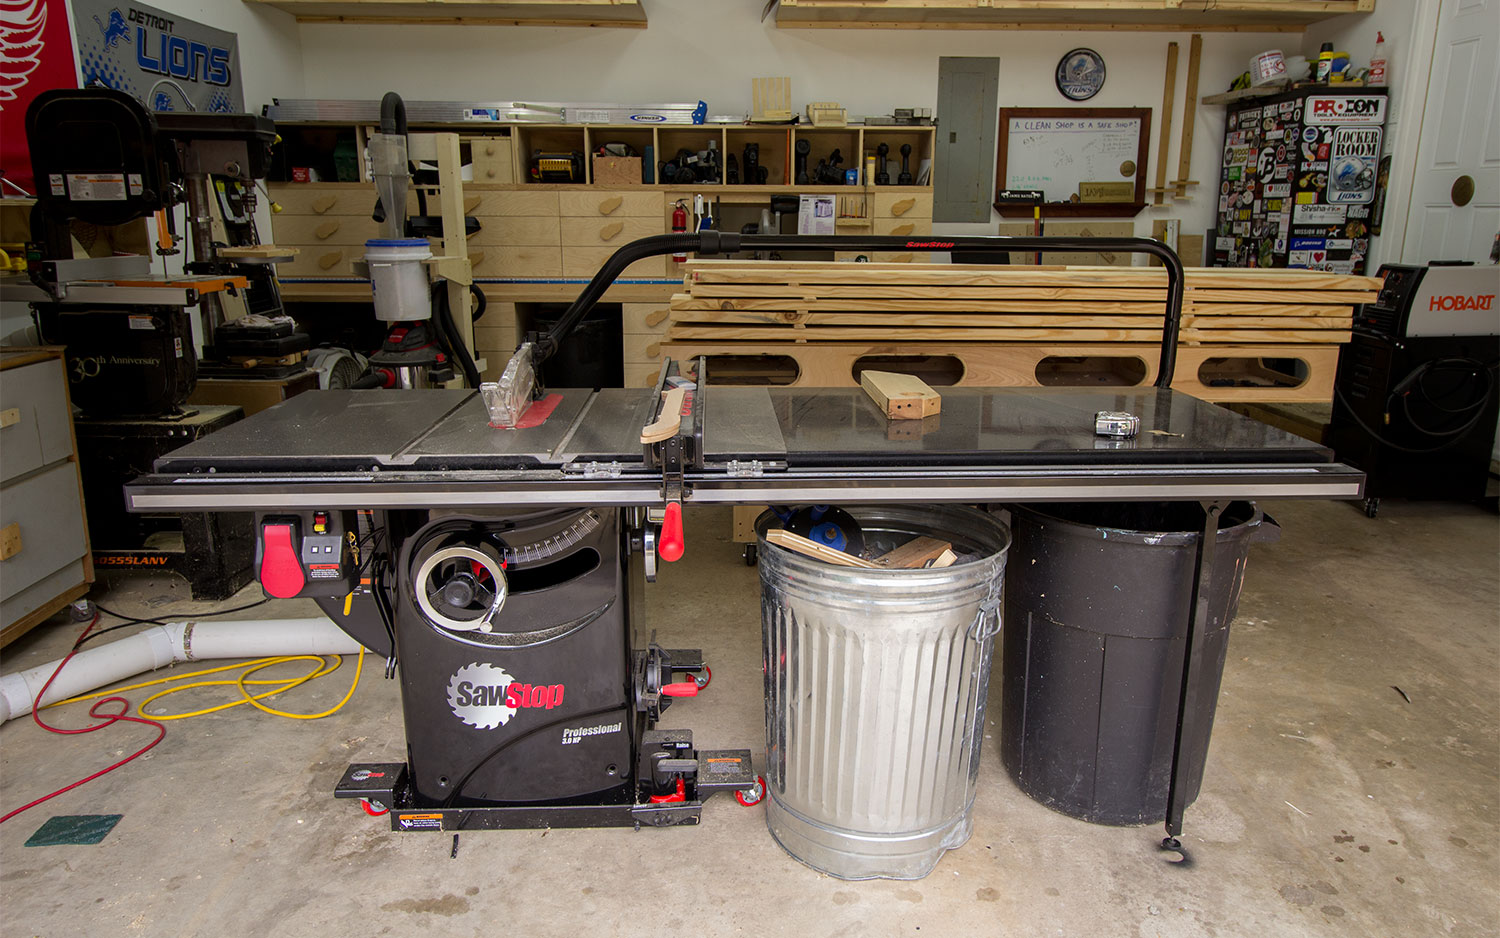
The table saw is always connected to my dust collector with a couple pieces of 4” flex hose and some 4” sewer and drain PVC pipe and a homemade blast gate. The port on the table saw is at the rear of the cabinet and this particular area of the shop sees the least amount of foot traffic so I have no problem just leaving the ducting on the floor. I also always have a few other cords on the floor here. I see this as the same principle as walking onto a porch. You know the steps are there so you pick up your feet. I know the pipe is there so I pick up my feet. Not a trip hazard in my opinion.

Directly behind my table saw is my 4′ x 8′ modified Paulk workbench that I consider my assembly table as well as an outfeed table. Here’s a shot of the back side of it. I currently have a bunch of 2×10 material on it for an upcoming project and really didn’t want to unload it just for the picture. You can see completed pictures of the project with all of my modifications and changes here.

And this is the front side which is where I primarily stand when using the table. The top surface has 3/4” holes on 4” centers to allow clamping material pretty much anywhere on the table. It also features a hollow torsion box design for added stiffness to the top surface and empty space just below the work surface to place hand tools out of the way when working on something.
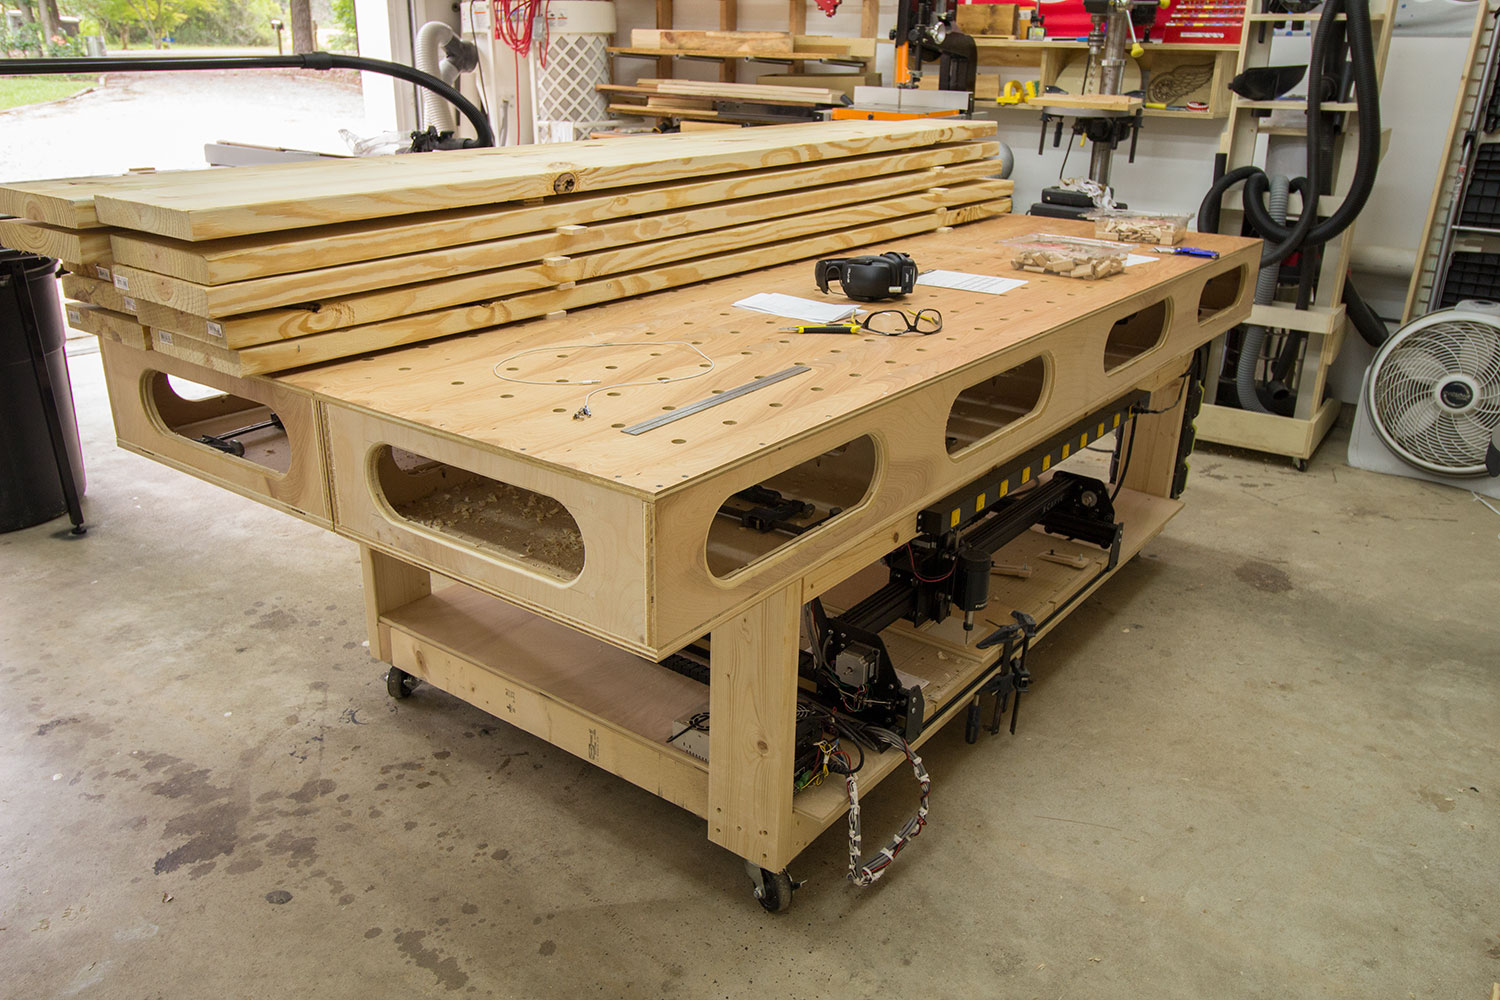
Below the top structure I mounted a long power outlet bar to have a convenient power location for whatever corded tool I am using at the table. Below that is the lower shelf which I built specifically to house my X-Carve CNC machine. This machine has 1000mm rails so making a dedicated cart for it would take up quite a bit of valuable floor space. The idea behind storing it on this shelf was so that I could easily slide it off and place it on the top work surface to use it. However, I haven’t actually removed it from it’s current location yet. I can use it where it is with no problems.

On the far end of the bench I mounted the battery charger for my cordless tools. I recently spray painted all of my Ryobi cordless tools black mainly to reduce the amount of questions I get about Ryobi tools. So far it has worked. But for what it’s worth, I continue to use the tools as I haven’t had any problems out of any of them.

I enjoy working on larger projects more than smaller projects so having a flexible shop layout that will provide more empty floor space when necessary is important to me. Because the table saw and work table are both super easy to move I can quickly gain a lot of floor space as needed for larger assemblies.
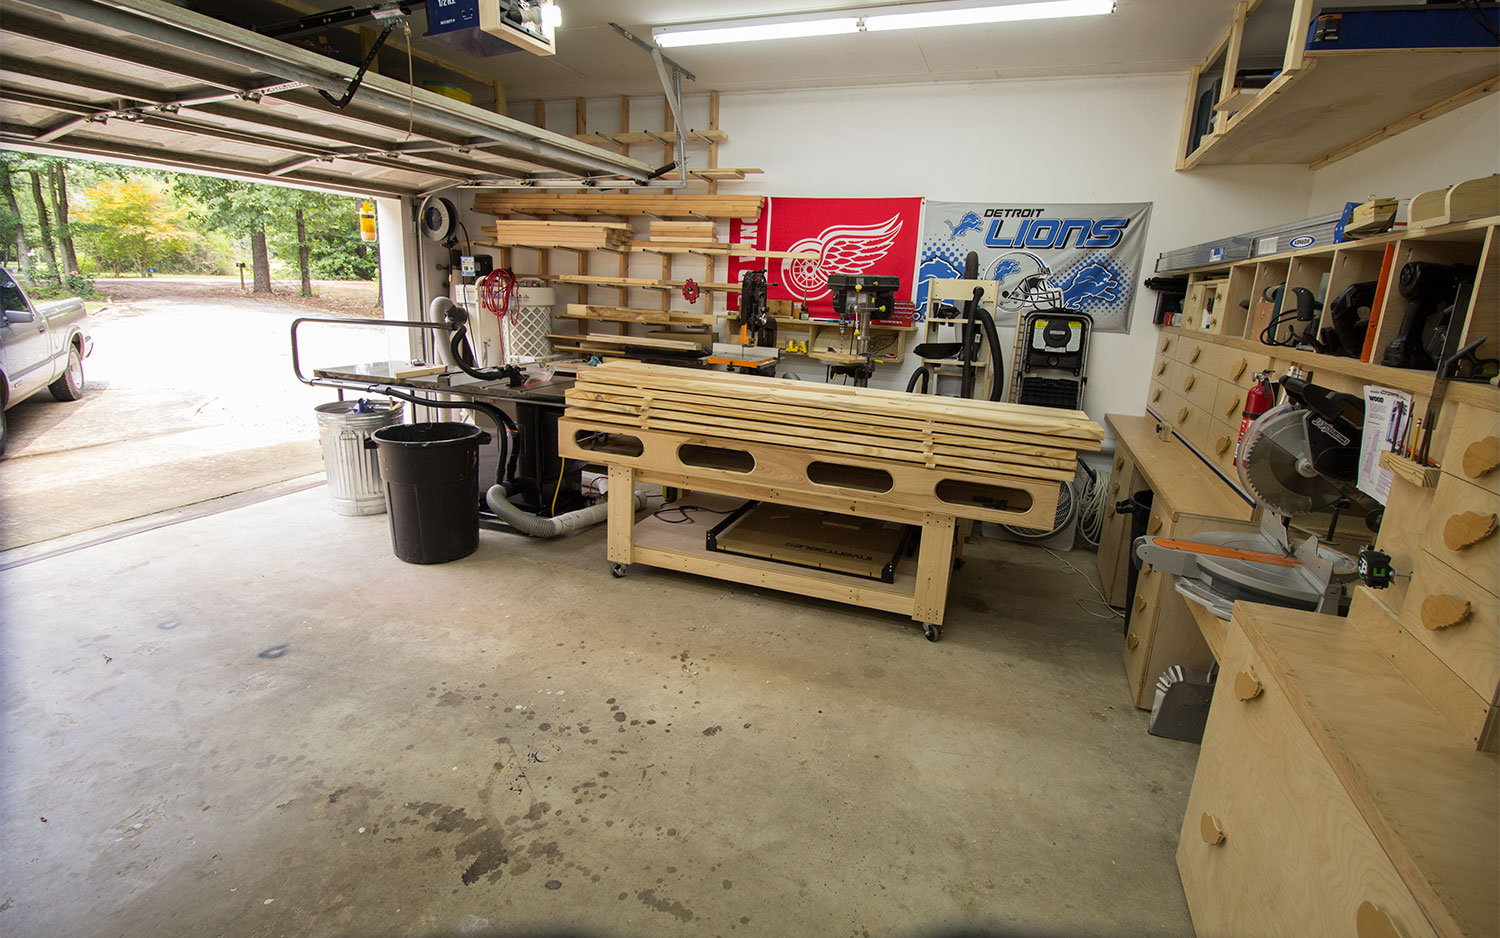
I can even park a car in here. Not saying that will ever happen but just for a size reference. This is also a good shot of the spray paint on the floor to quickly locate the table saw where I primarily use it.
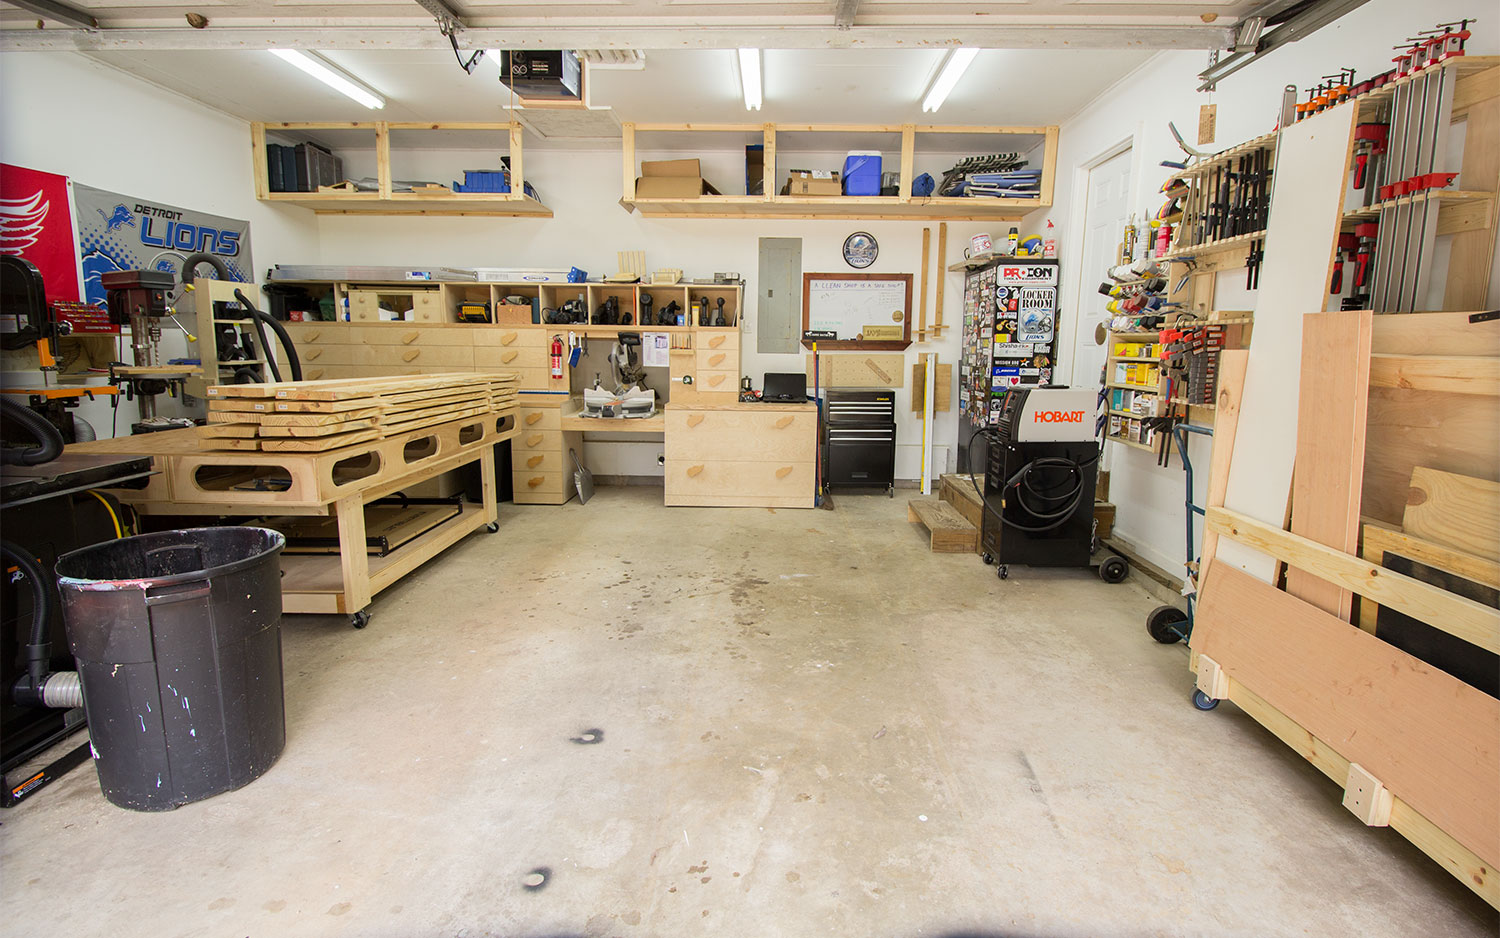
So that takes care of the center of my shop. I’ll work my way around the perimeter starting at the right wall and moving left. The first item is my rolling plywood cart. I built this a few weeks ago to replace my unsuccessful stationary plywood rack. It’s an 8′ plywood cart that stores full sheets of plywood on one side and off-cuts on the other side. Because it’s on casters I can easily push it outside next to my truck to load it up and also push the entire cart behind the table saw to reduce the distance I need to carry full sheets to be cut down. It’s the design in issue 205 of Wood Magazine.
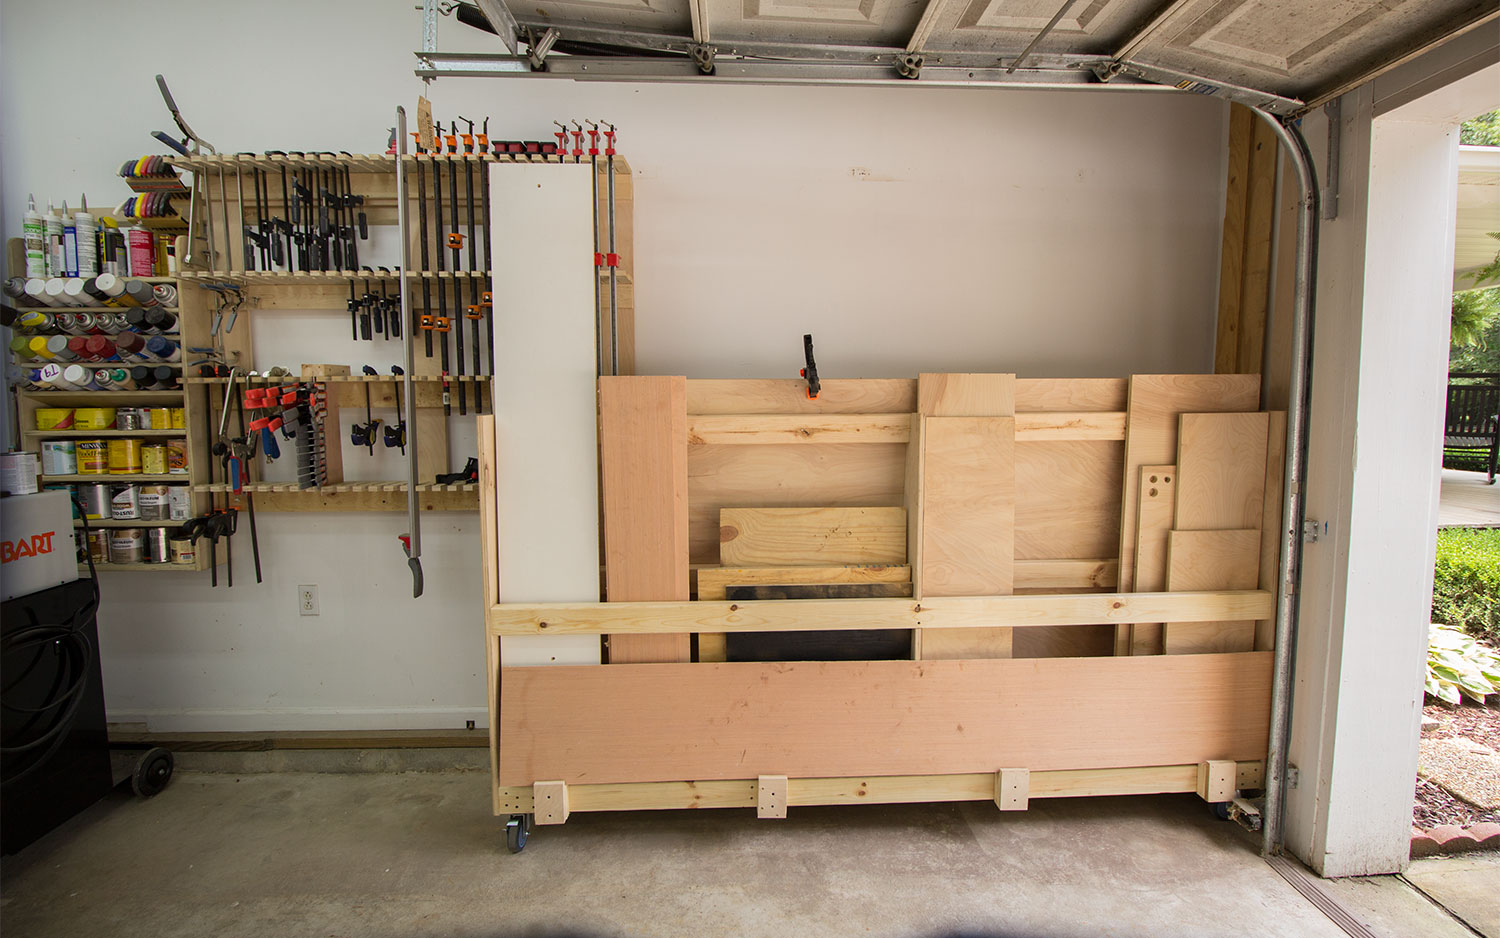
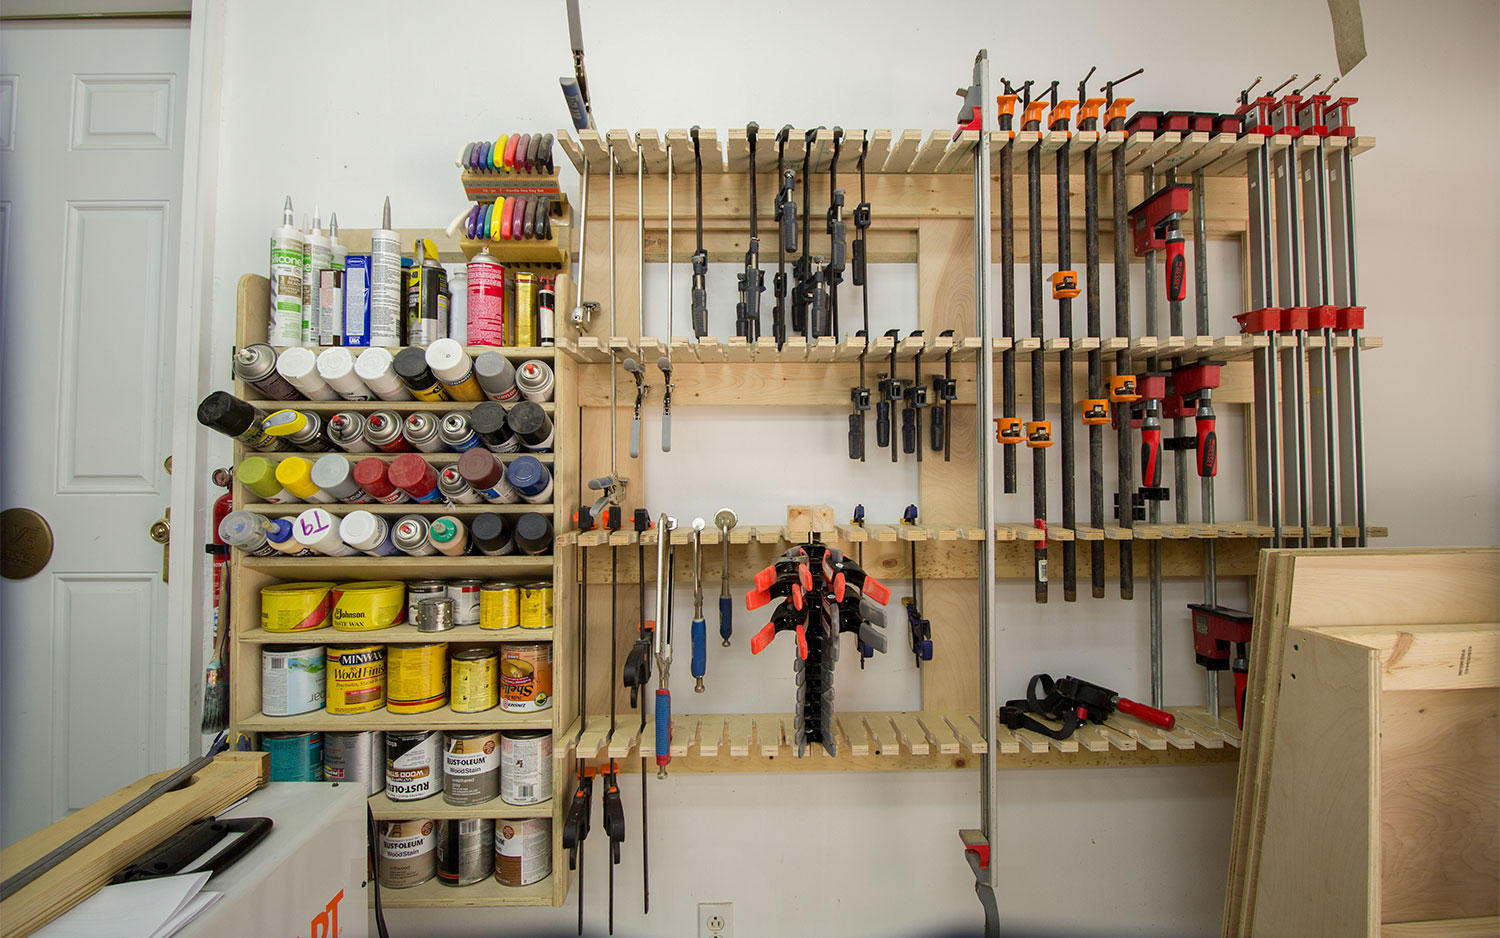
To the left of the cart on the wall is my universal clamp rack and finishing supply rack. They are both mounted to the wall with a french cleat. The clamp rack is a universal design I recently made to hold every one of my clamps without having to make specific profile holders for each style clamp. Having them all in one location is very convenient. My finishing supply rack was made in my previous shop and has served me well. I’ve currently outgrown it slightly but I really like the efficiency of storage for finishing supplies. It has a few short shelves for quart size cans and a few shelves for standard spray size cans. I might make a larger version of this in the future.
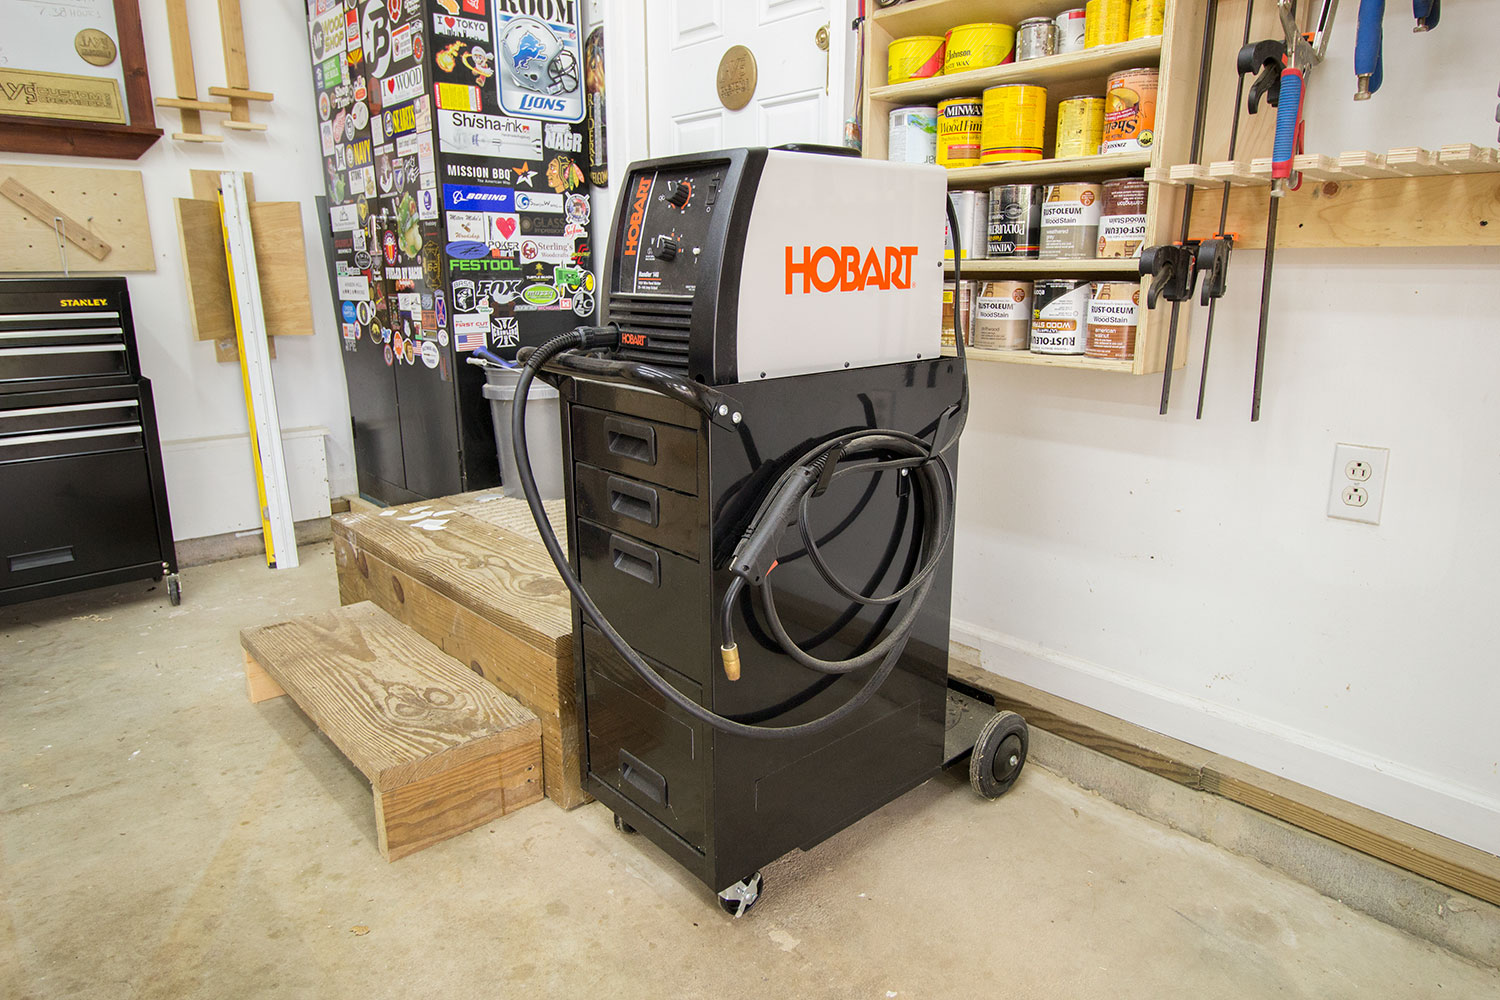
Right in front of my finishing supply rack is my welder and welder cabinet. It’s a Hobart Handler 140 mig or flux core wire feed welder. I learned how to weld several years ago on an old manual adjustment arc welder and I very much like the convenience of the wire feed in this one. It’s sitting on a Harbor Freight welding cabinet. I have only used it in one video so far (metal vise build) but have used it a few times since then on stuff around the house. Having a welder isn’t a necessity but it is very convenient at times.
To the left of the welder is the door into my house and to the left of that is the community sticker cabinet. About six months ago I wanted to start a sticker collage and asked people on my vlog channel if any of them had sticker for their business for sale. Since then I’ve only purchased about six of the stickers on the cabinet and the rest of them have been provided by all of you out there. So basically this is a community sticker collage. It grows every week. It’s a locking metal cabinet that is about 6-1/2′ tall, 18” deep, and 36” wide.
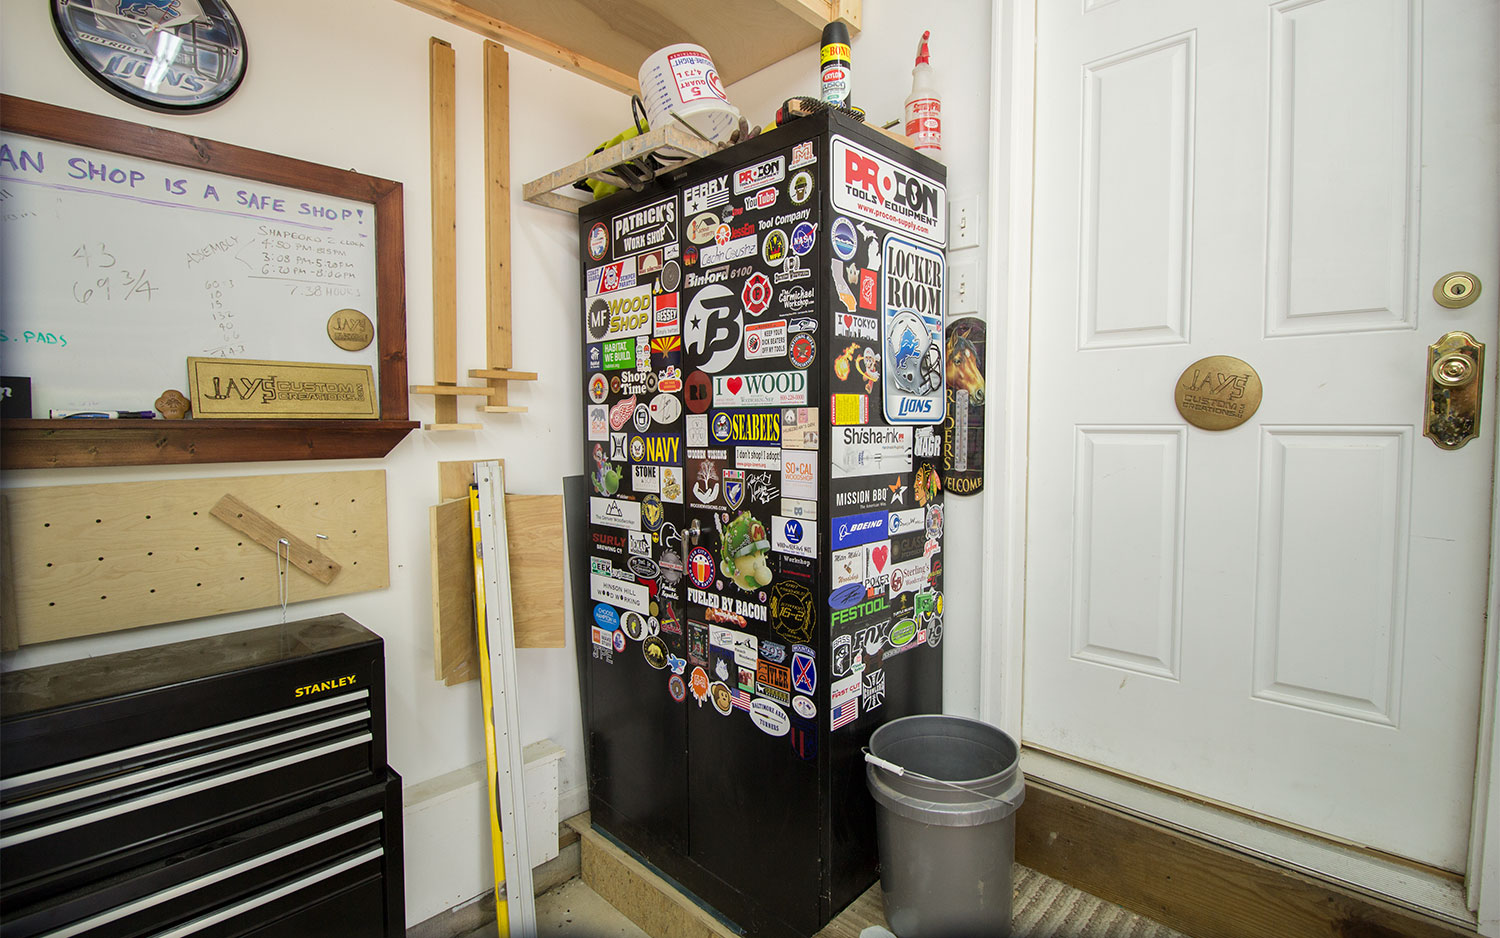
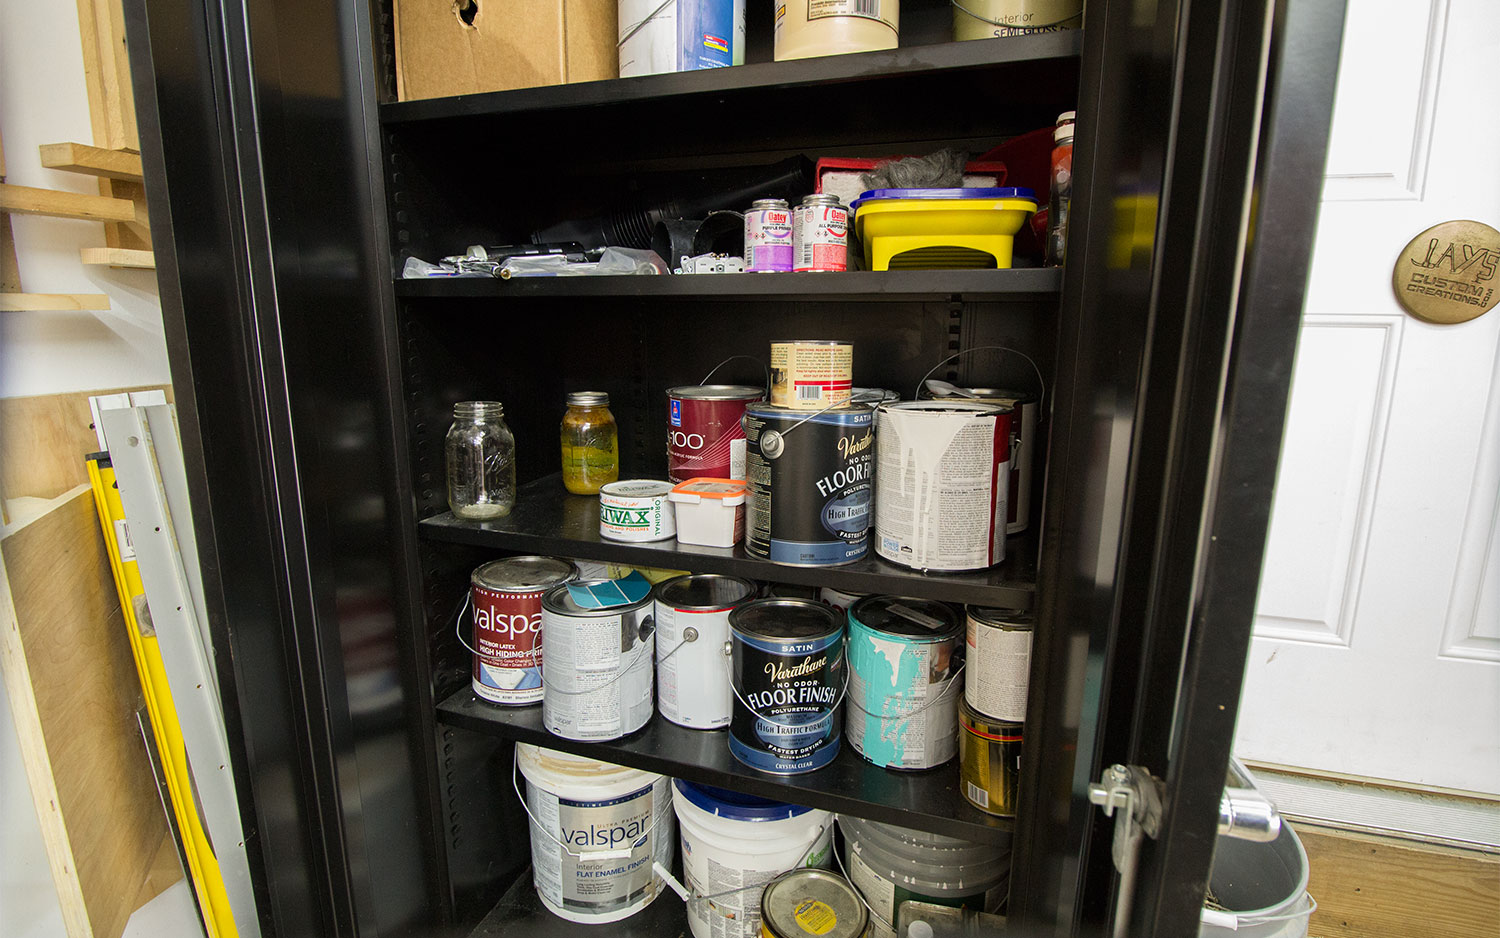
Inside the cabinet is an unorganized pile of paint cans and miscellaneous crap and chemicals.
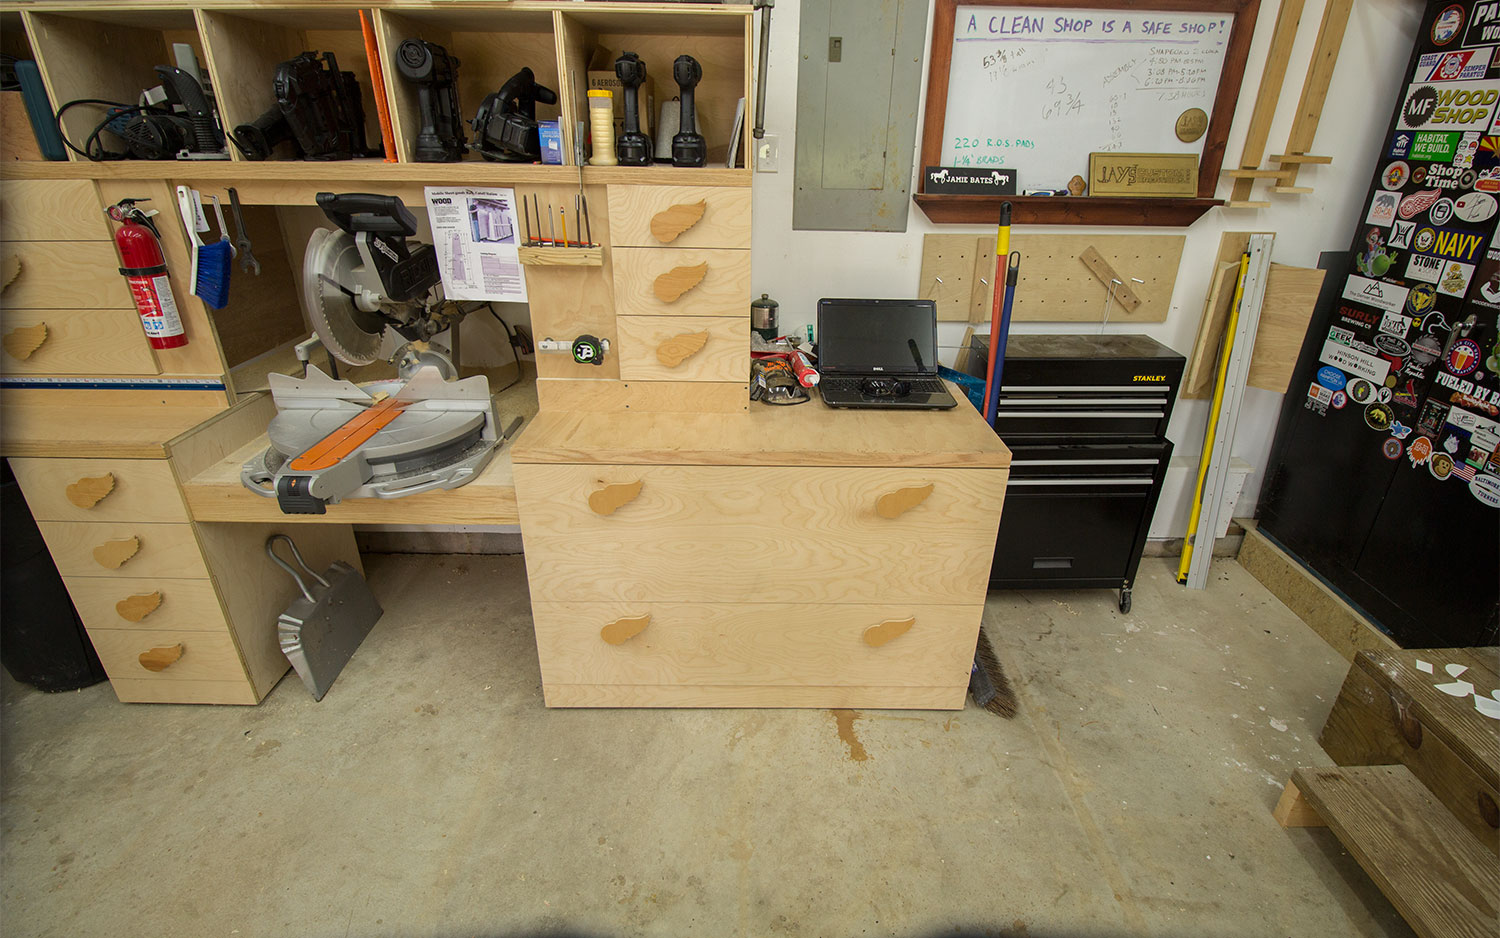
To the left of the cabinet hangs my table saw infeed support arms, my table saw spline jig, multifunction hold down jig, and a dry erase board I made several years ago for my wife. We never put it to use in the house so I put it in my shop. Below that is a rolling mechanics tool box. I store all of my wrenches, sockets, and tools of that nature in it.

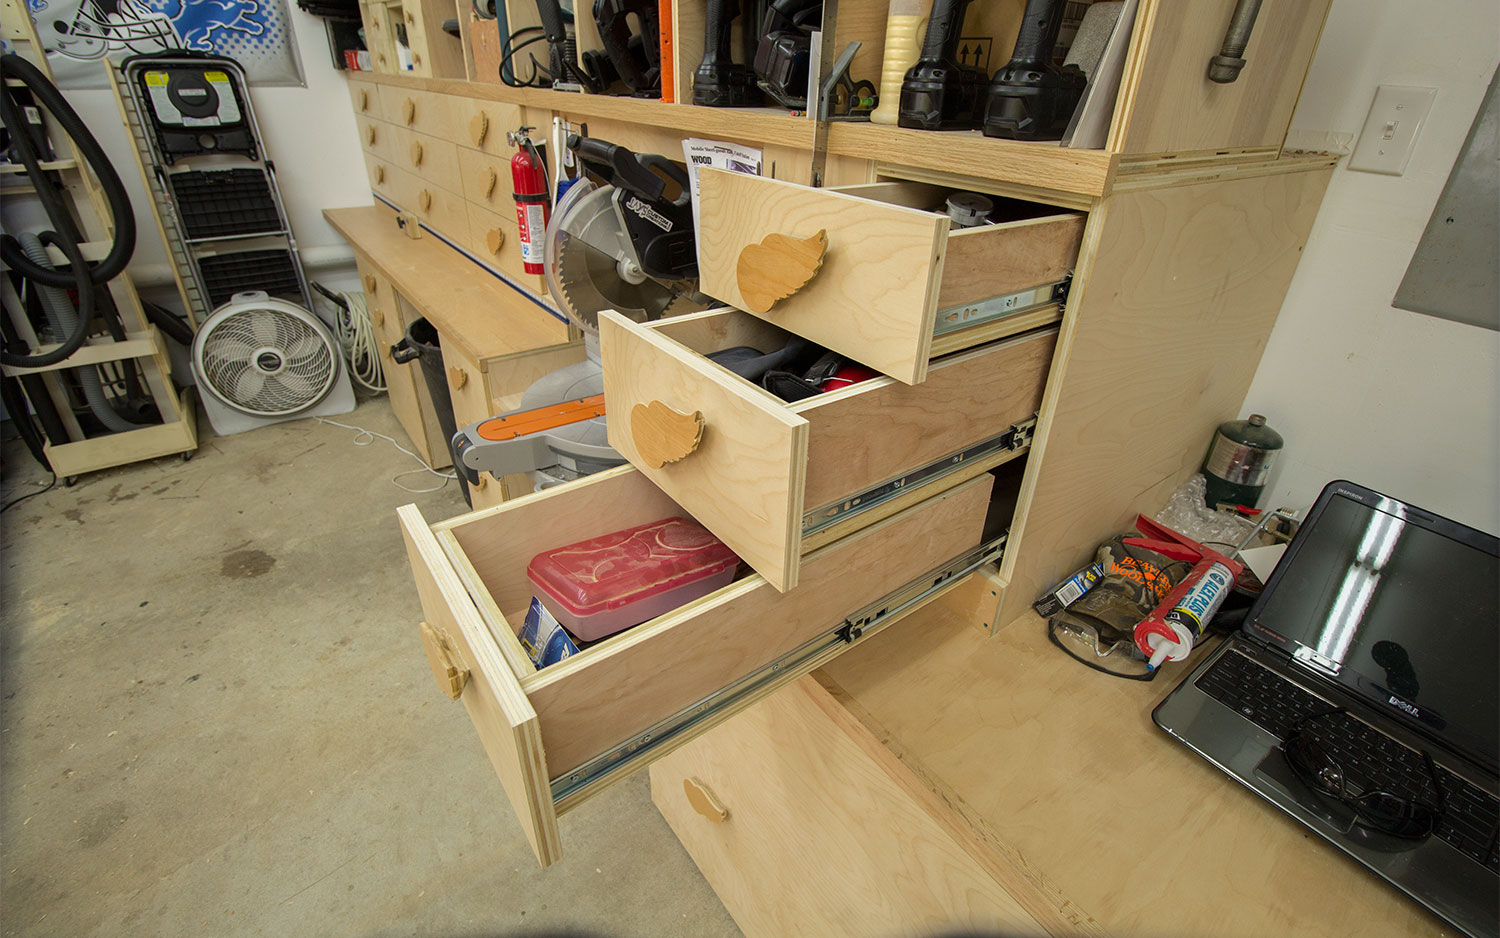
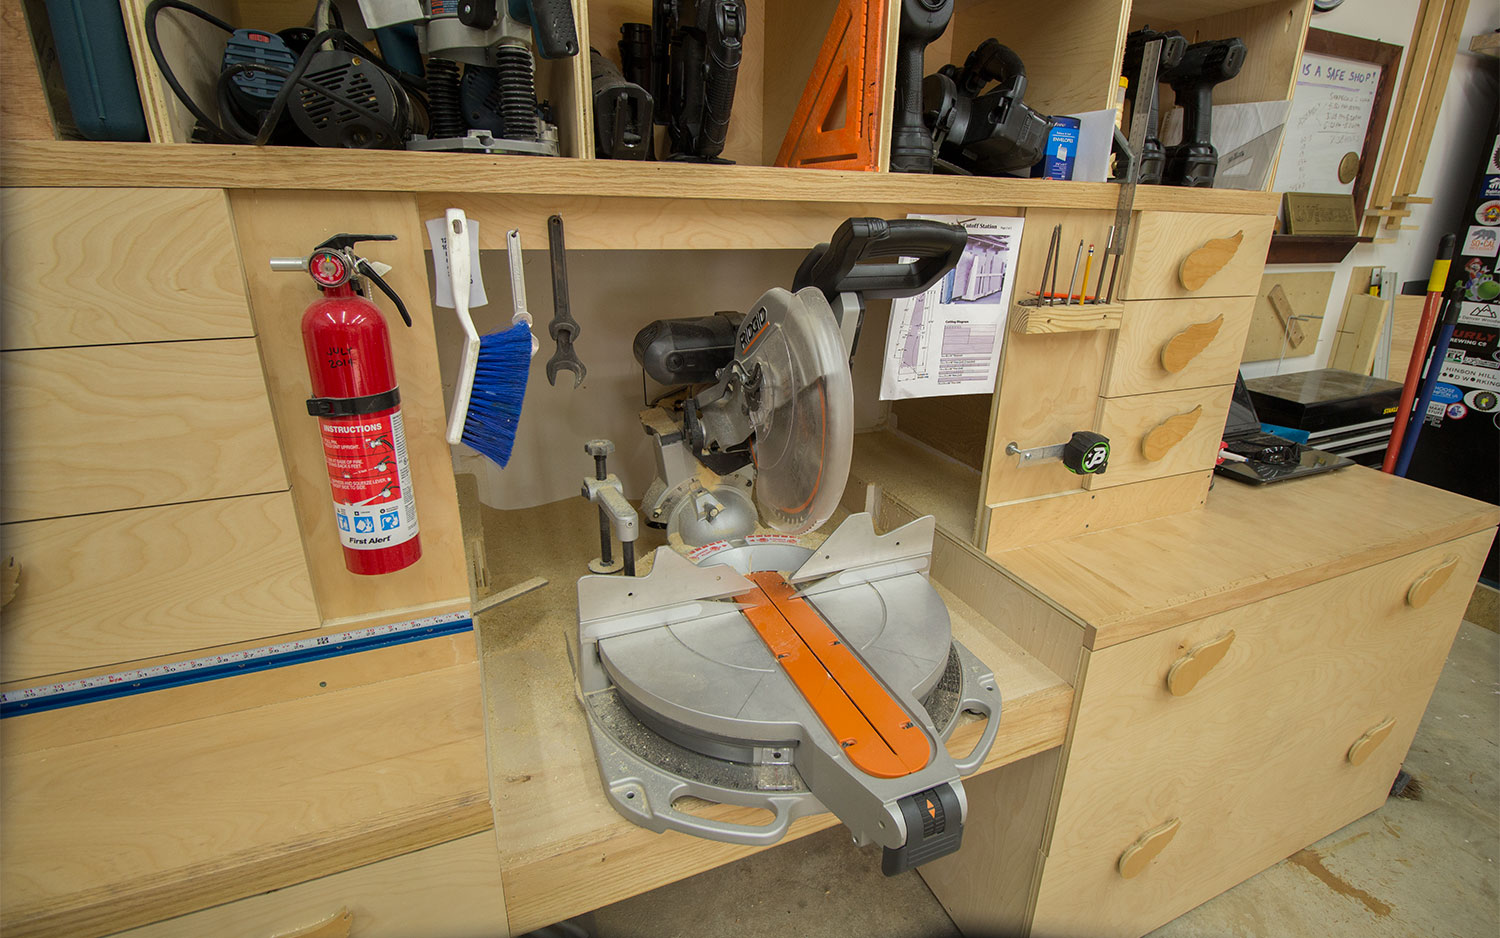
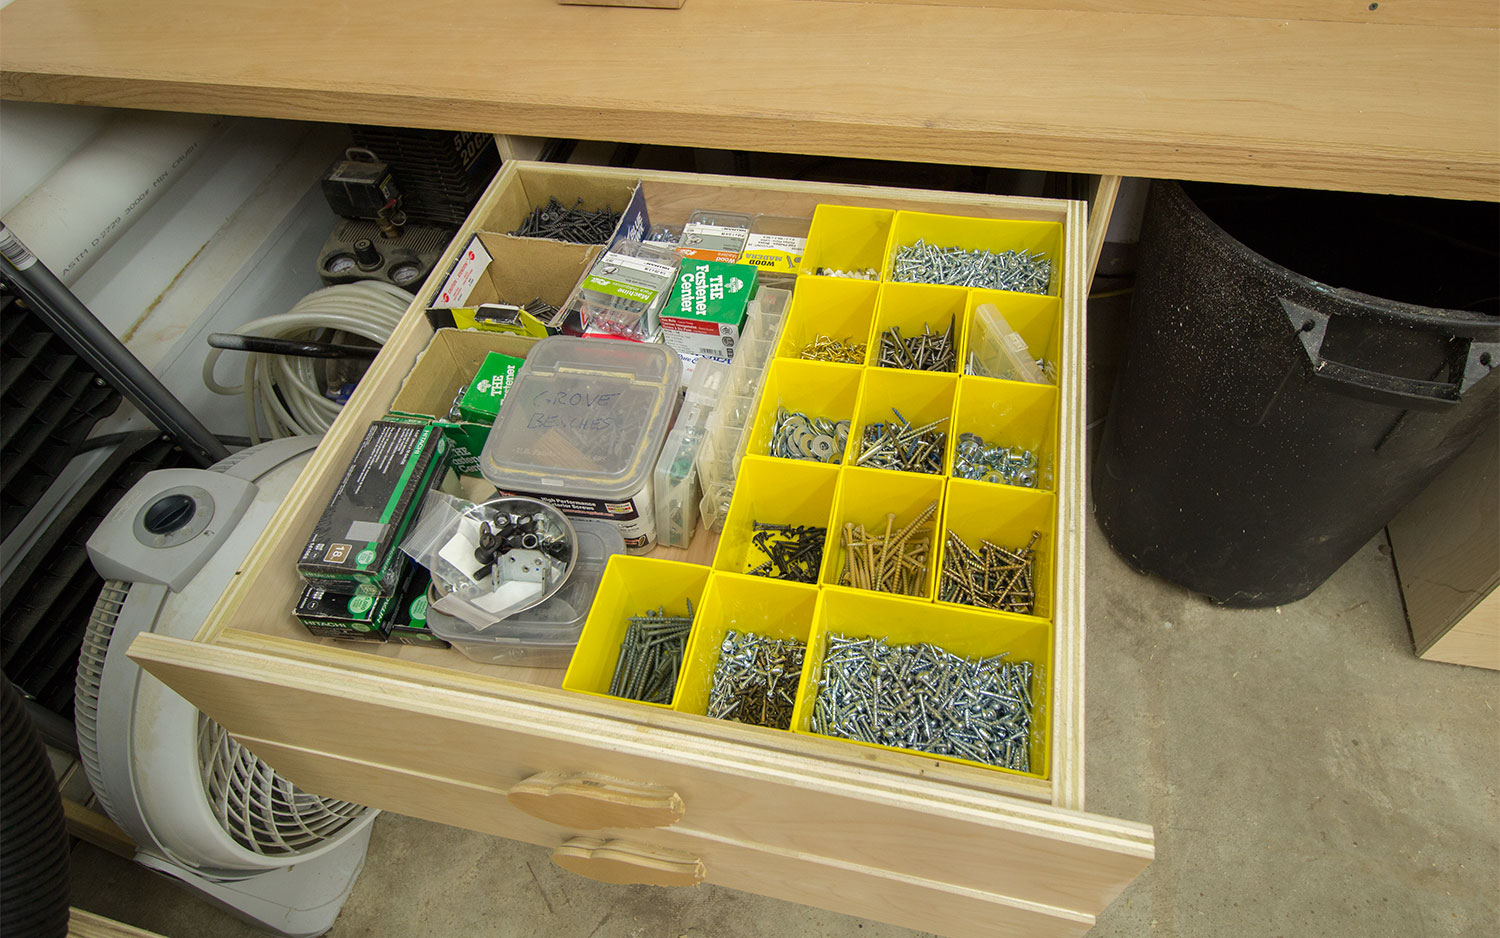
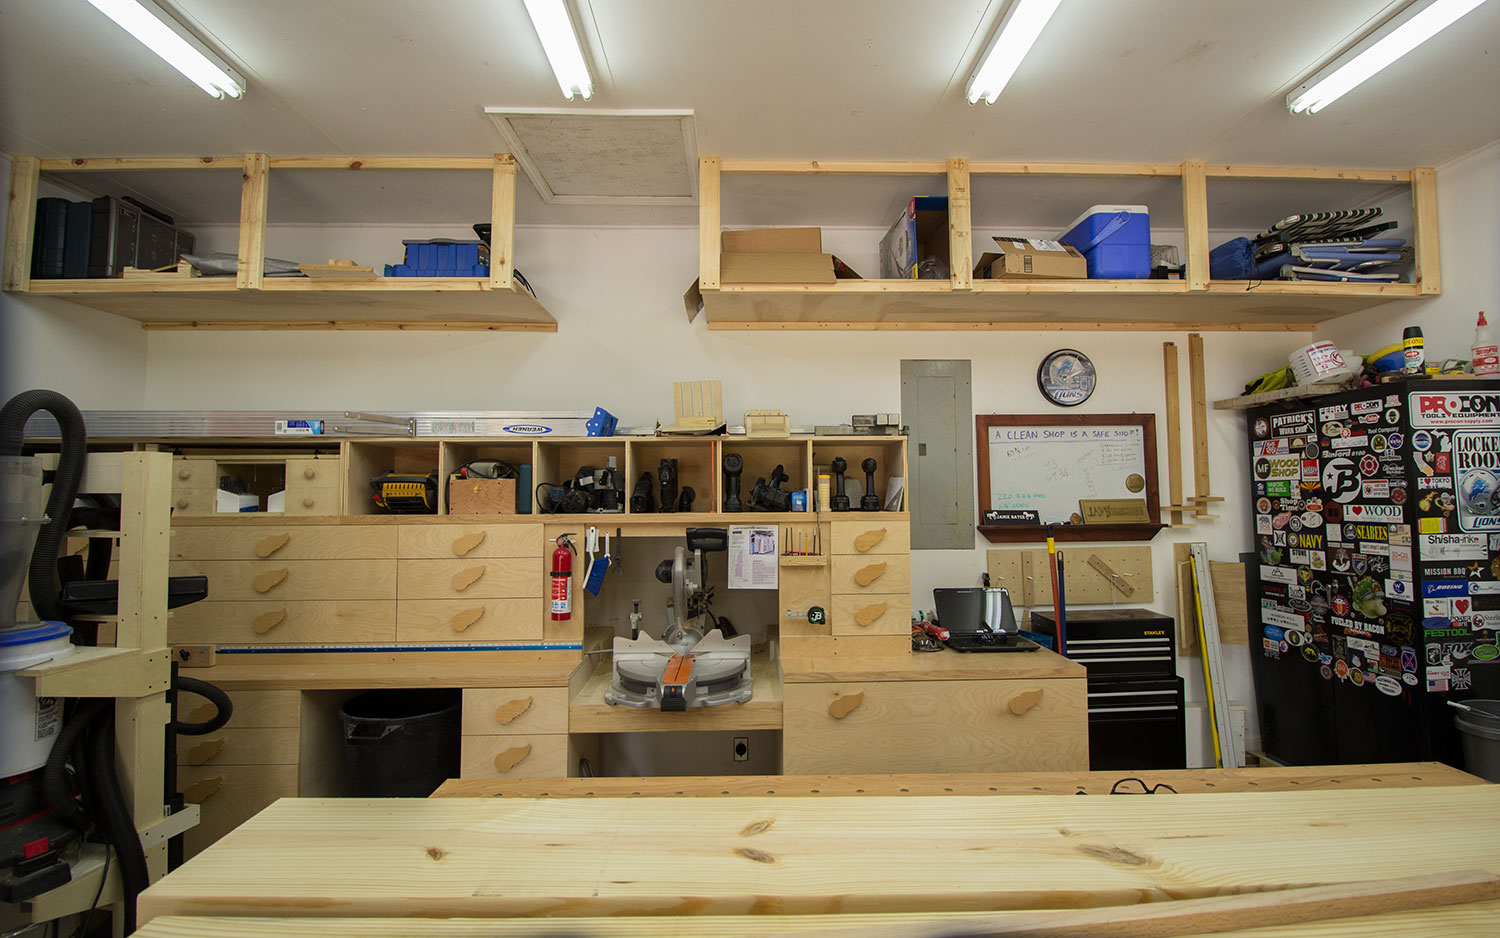
Spanning 14-1/2′ of the back wall is my miter saw station. Completing this has resulted in a huge increase in storage space, organization, and convenience when using the miter saw. It features 20 drawers and a pull out tray for storing my planer out of the way. Eight upper storage bins are for commonly used items such as my cordless tools as well as other items that don’t need to be stored away from dust. There is integrated dust collection for the miter saw and a stop block to the left of the saw with roughly 106” of capacity.
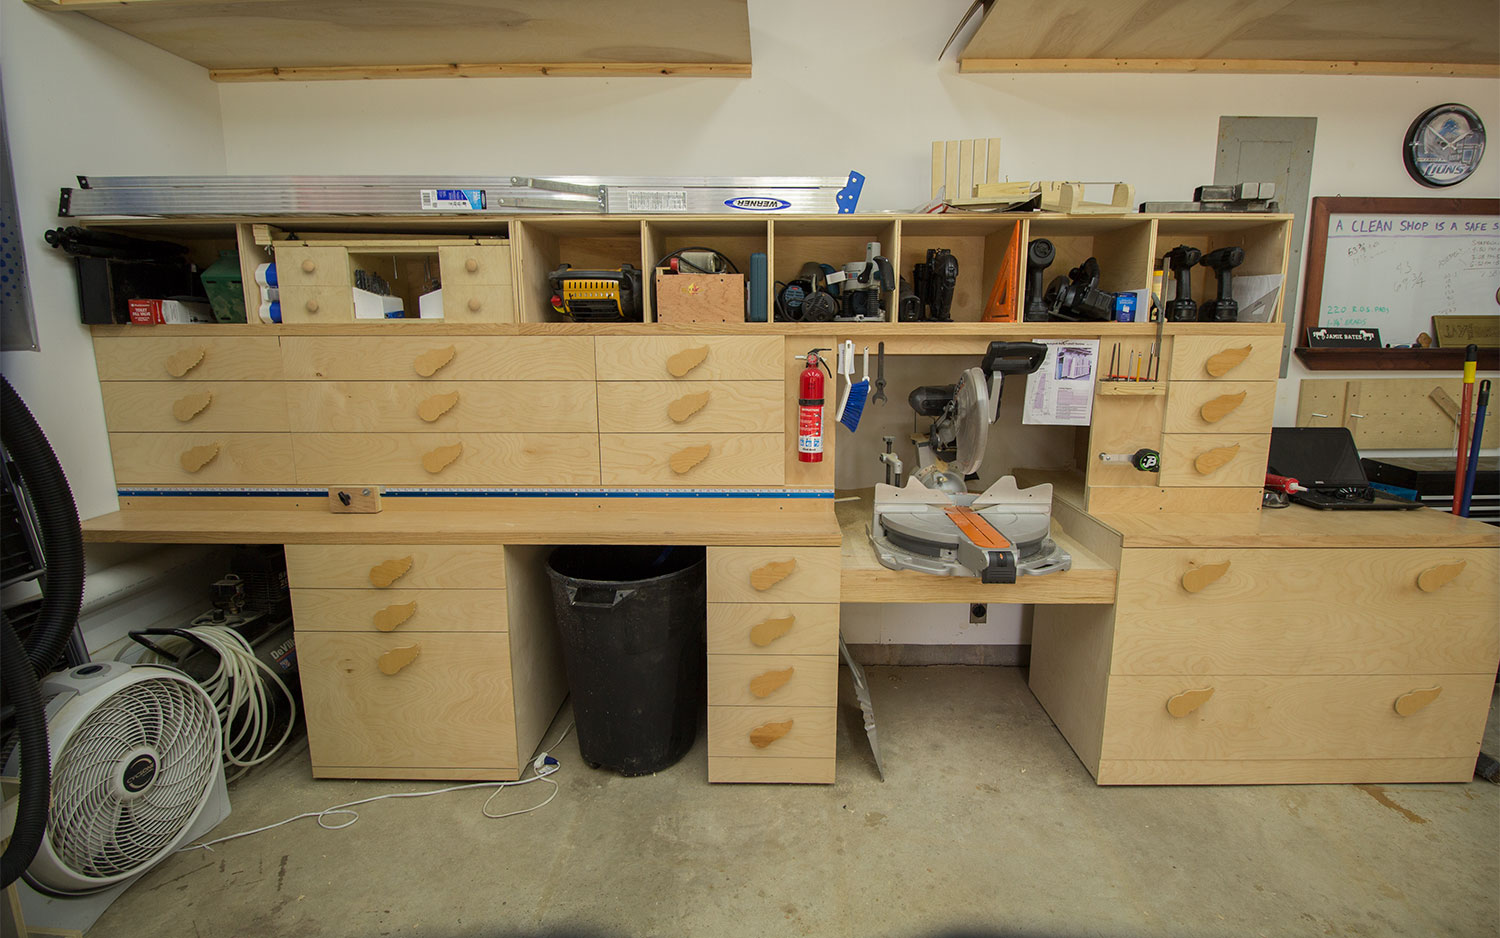
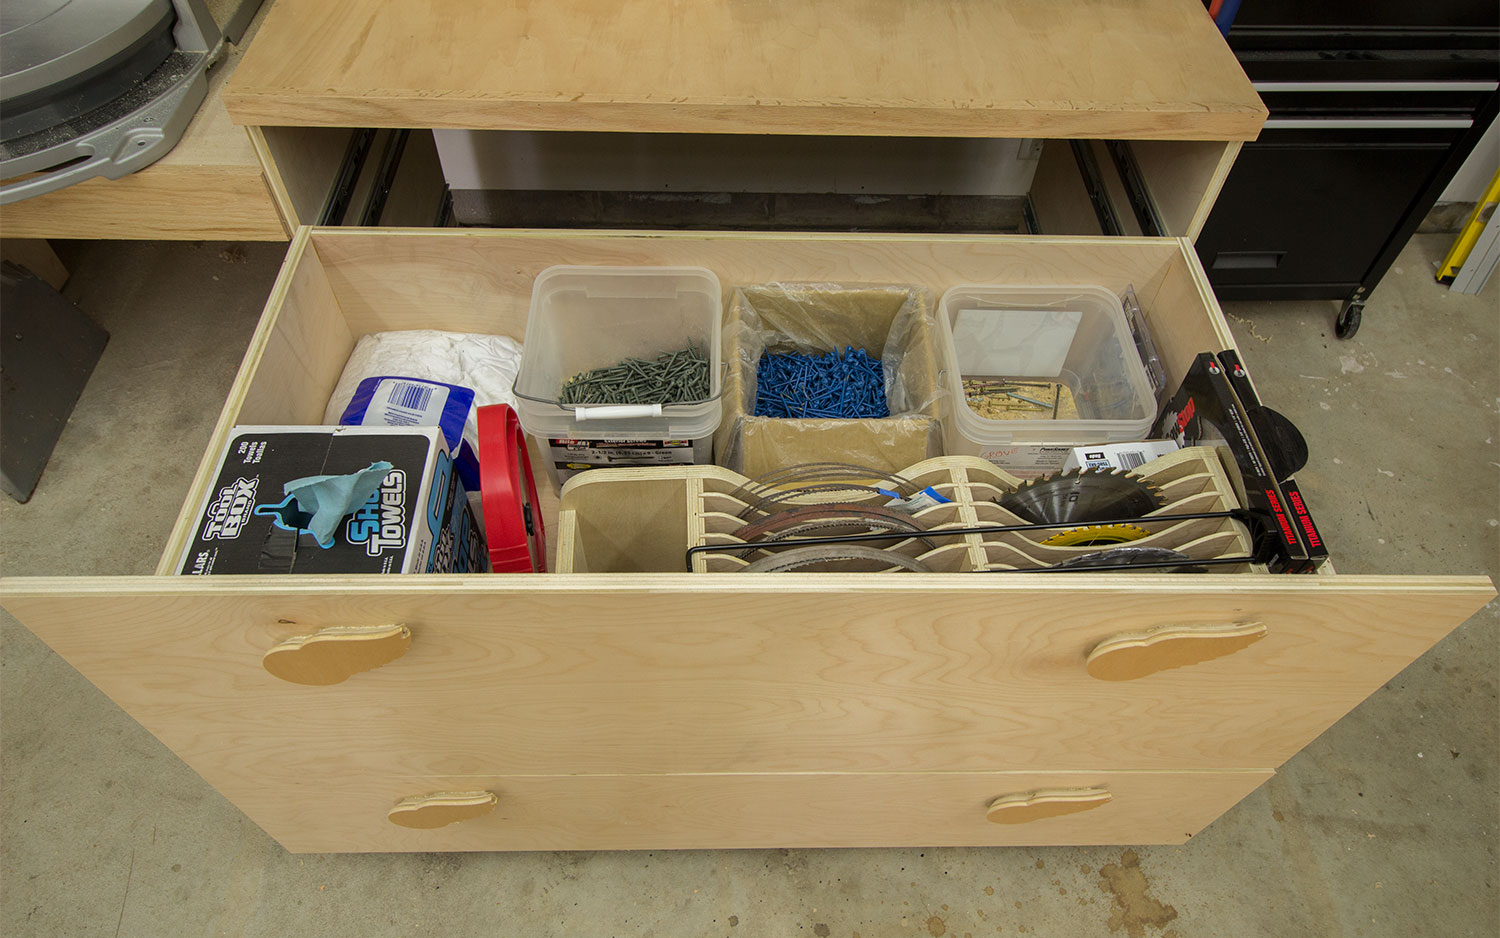
To the bottom right of the miter saw is a 48” long base cabinet. This allows a full 8′ board to be supported to the right of the blade without it tipping over. In the cabinet is two drawers measuring slightly less than 4′ wide and 2′ front to back. These large drawers are strong enough to support my body weight when fully extended.
The bottom drawer houses larger items that I don’t use frequently such as my benchtop grinder, corded circular saw, jigsaw, and drill, and my old bell lights I used in the last shop.

The top drawer houses shop rags, larger bins of screws, and my french cleat saw blade holder. It’s obviously not mounted on a french cleat anymore as I just have it laying down in this cabinet. Around it are the rest of my table saw accessories.
The upper cabinets also house full extension drawers. The far right stack of drawers has (top to bottom) all of my measuring and marking items, my safety gear, and my camera, computer, and CNC items.
The miter saw itself is a Ridgid 12” sliding miter saw. I spray painted the handle and motor housing black to match the rest of my tools but didn’t do anything with the insert plate. I plan on making a few down the road so I didn’t bother with painting it. The station has a passive dust collection box around the saw. There is a 4” port at the bottom of the box to create an air draft that pulls the dusty air into the box. The larger chips collect behind the saw wherever they land. My main objective here was to get rid of the dusty air. All of the larger dust can be pushed into the dust port once or twice a year after it builds up.
The stack of drawers directly lower left of the miter saw is mostly empty. The top drawer is where all of my tape and similar items are stored. Glue gun, twine, twist ties, and zip ties. The next two are empty and the bottom drawer is where my HVLP gun is.

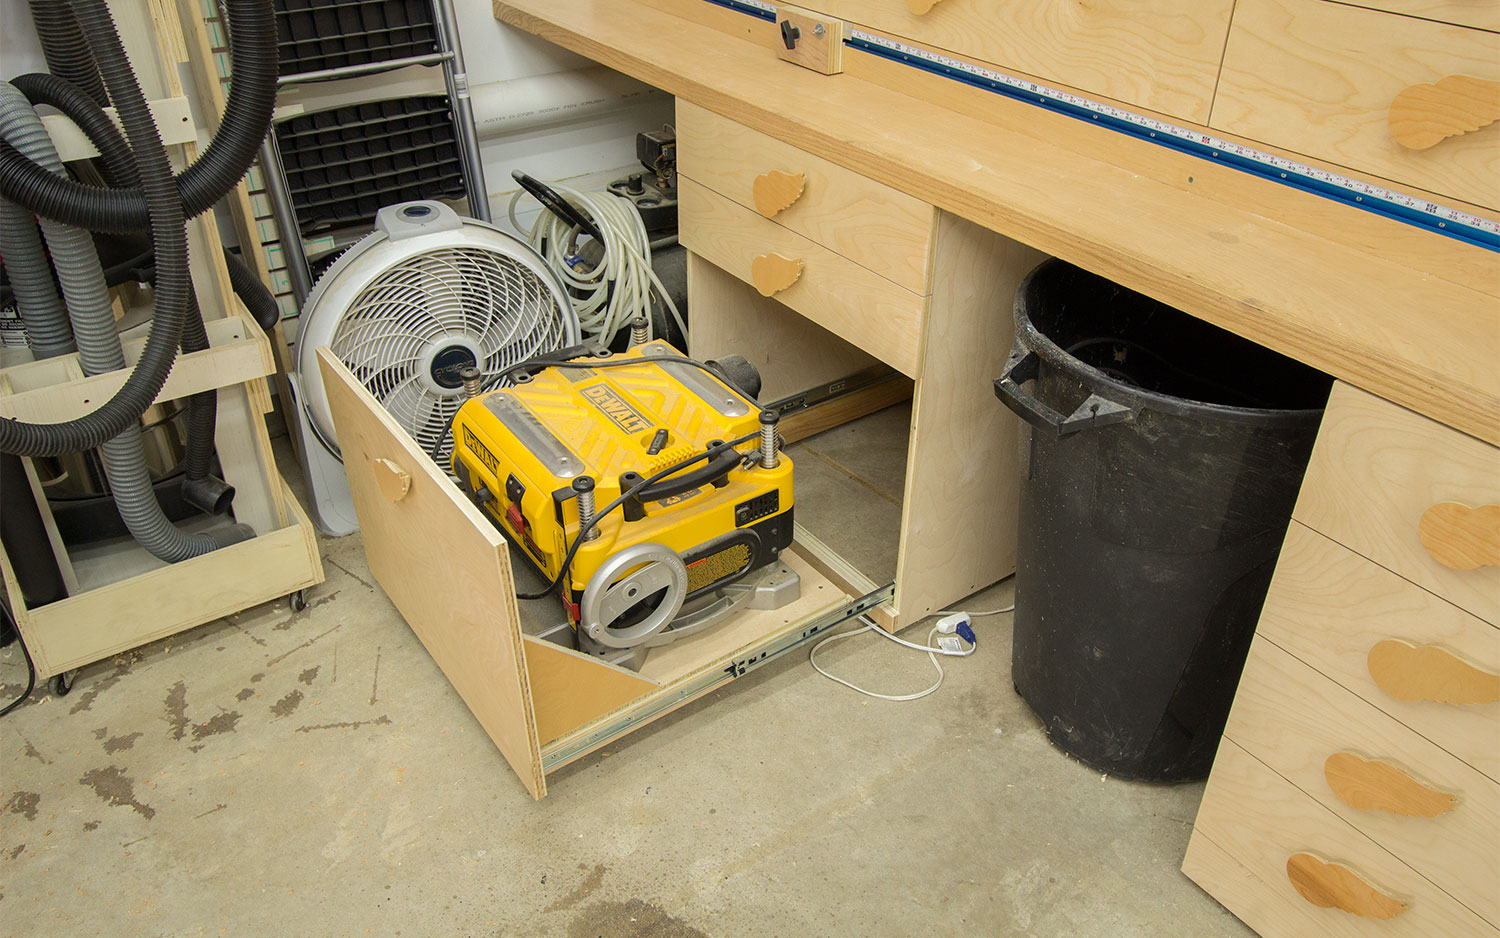
The lower, far left cabinet houses my planer on bottom. Every drawer slide in this miter saw station is a 24” full extension slide except these. To give just a little bit more room when removing the planer for use I opted for 26” full extension slides here. The planer is a DW735 DeWalt planer. When it was in it’s previous setup I gave more info and thoughts on it which can be found here.
The drawer directly above the the planer tray is my #2 hardware drawer. Just miscellaneous hardware with little organization.

Above that is my #1 hardware drawer with all of my fasteners somewhat organized into different bins. I would like to get more of these yellow bins in the future.
There’s nine more drawers that I didn’t take interior pictures of because it’s just generic stuff. But I will go through the contents for you. Top to bottom in the left column is a drawer for manuals, a drawer for every letter that I have received from all of you out there, and a drawer for my electrical tools and supplies. Top to bottom in the center column is a drawer for miscellaneous hand tools that are more general household and carpentry related such as pry bars, putty knives, and drywall tools, a drawer for hammers, mallets and squares, and a drawer for all of my hand held cutting tools like handsaws, knives, and chisels. Top to bottom in the third column is a drawer for all types of brushes, a drawer for all of my sanding tools and supplies, and a drawer for all of my router bits and attachments.
The drawers are far from optimized as there is a lot of wasted space. Greater efficiency and future room can be achieved by making sliding trays which I plan on doing soon.
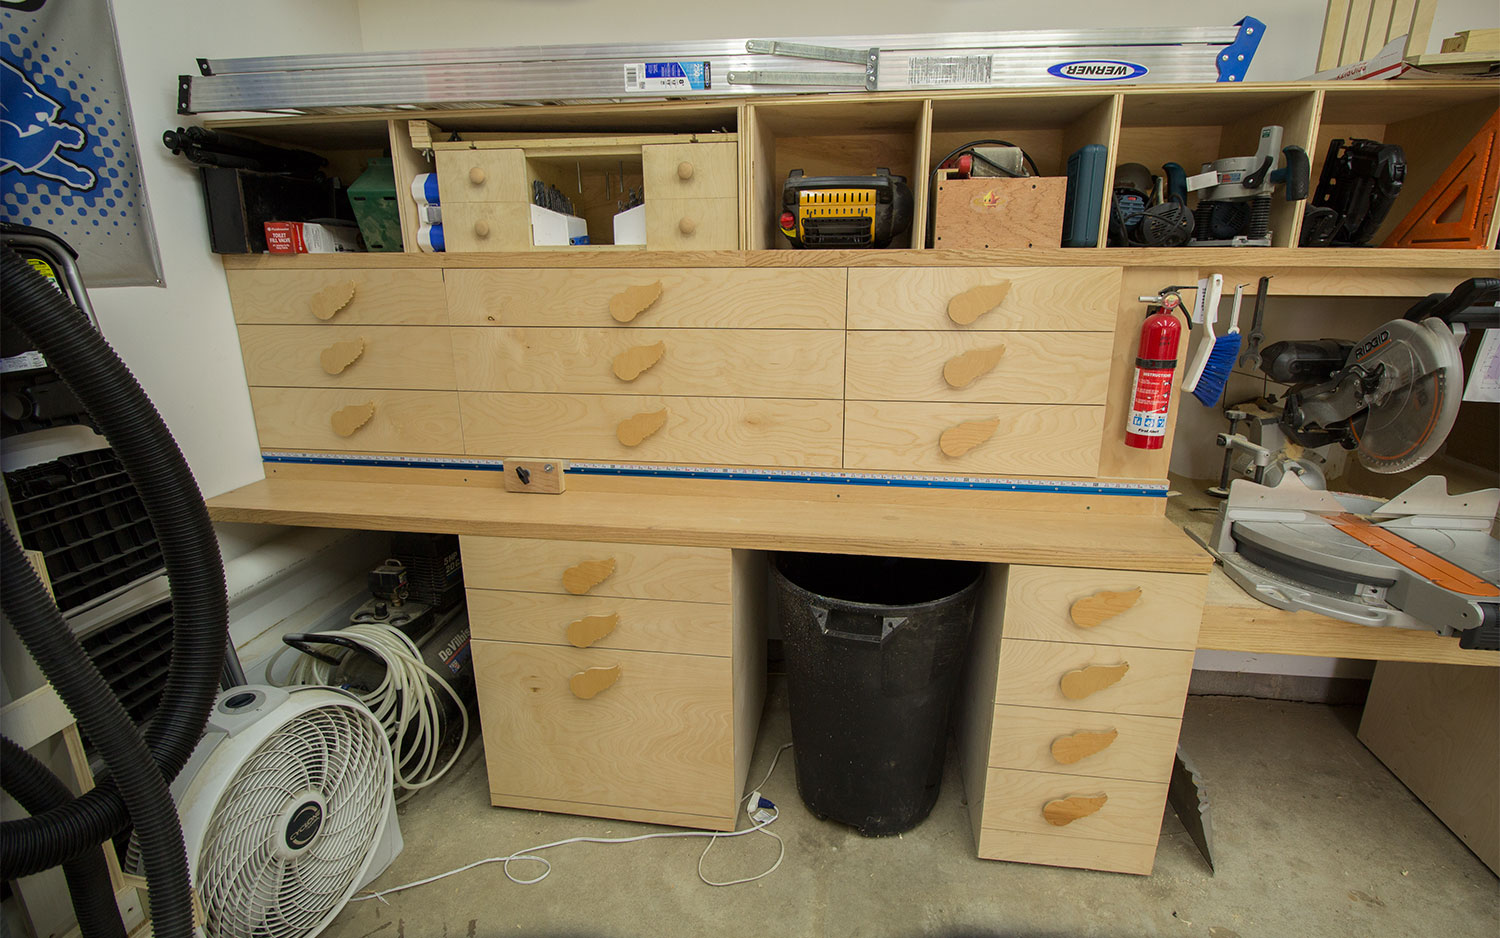
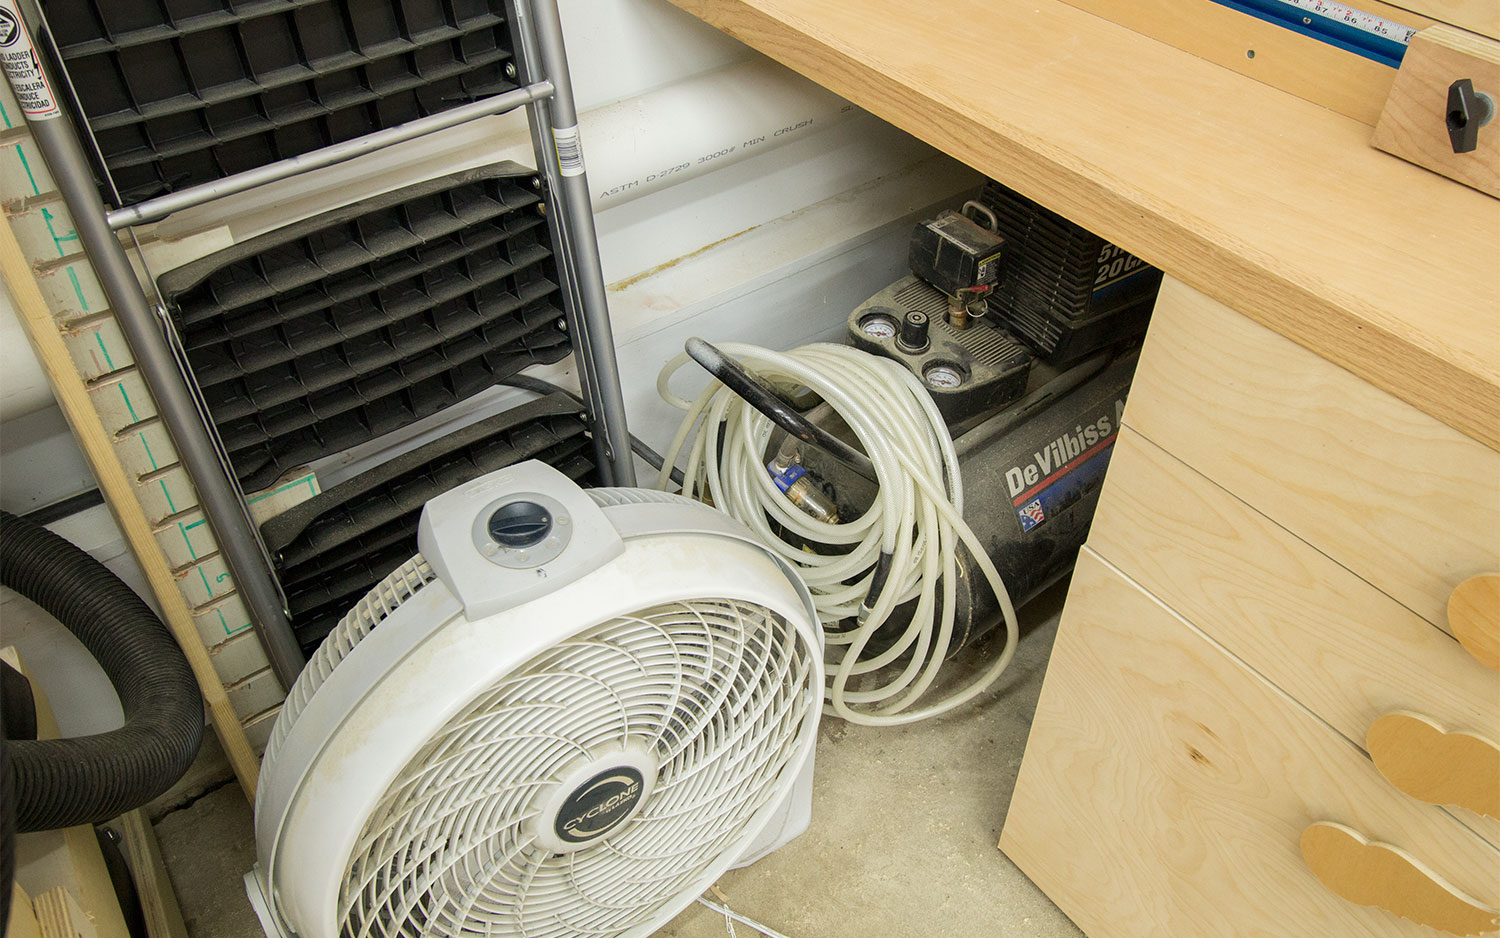
Tucked in the lower left corner of the miter saw station is my DeVilbiss 5hp 20 gallon air compressor. It’s an oil free compressor so it’s loud and obnoxious when running. I don’t use it enough to justify the trouble of making a sound deadening enclosure or putting it outside so for the mean time I’m quite happy with keeping it in here and out of the way. The white hose in the picture is an extra hose that I rarely use. I have the compressor hooked up to a retractable hose reel located just above my dust collector.
Above my miter saw station along the entire length of the back wall minus the area needed to get into my attic are wasted space garage storage shelves. This is where I throw any household items that don’t have a place in the house and I don’t want taking up space in my shop. I also store empty boxes up there for future shipping purposes as needed. This project was a duplicate of what I made above the garage door shortly after moving into the house.
Moving left is my vertical tool area. Most noticeably are the Detroit sports flags on the wall. I grew up just west of Detroit in Livonia Michigan until I was about 14 or 15 when I moved to Mississippi. I absolutely love where I live in Mississippi but you can’t take the sports fan out of a kid. Growing up watching the horrible 1990’s Lions teams really makes me appreciate the current roster.

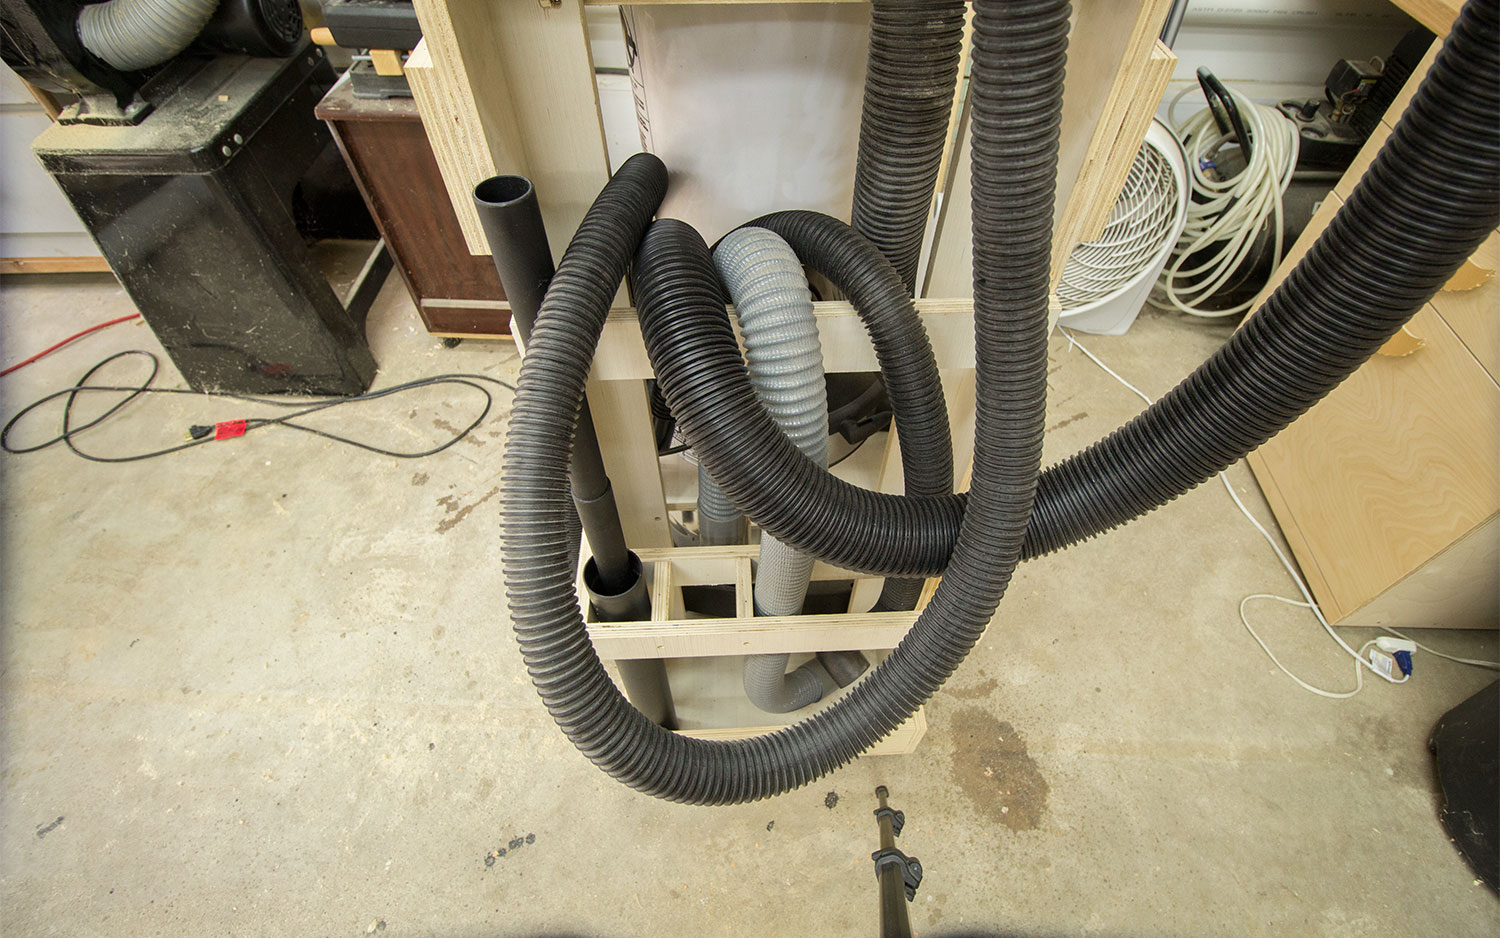
The first vertical tool is my shopvac and cyclone cart. This has proven to be a very handy arrangement. The cyclone and bucket are on top of the shopvac to reduce the footprint compared to the common setup of them sitting side by side.

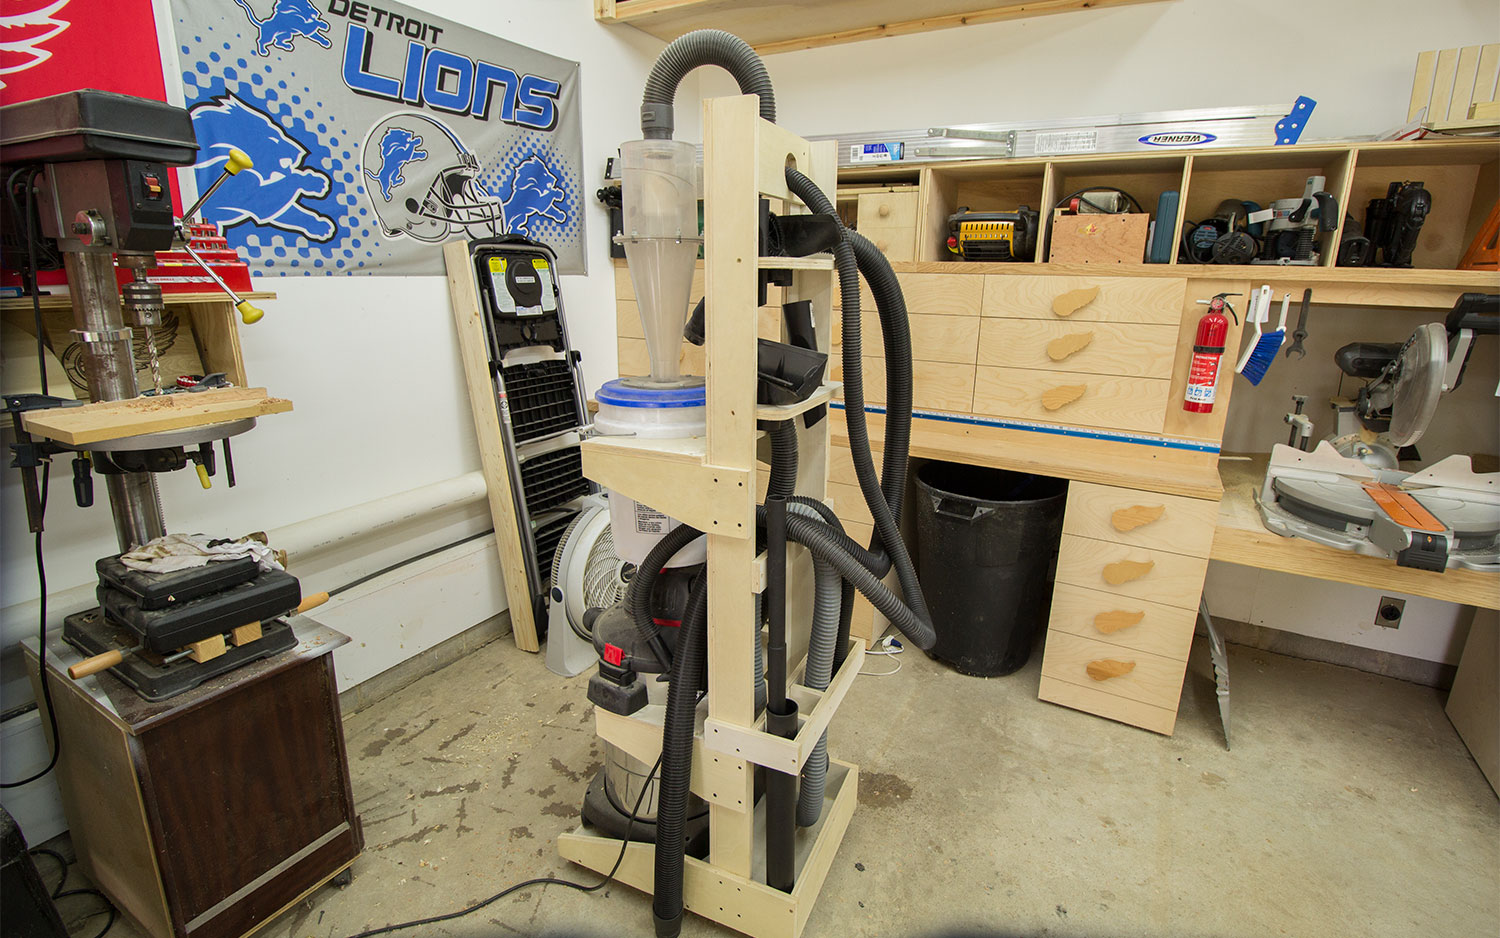
The back of the cart has two chest level tool holders for both sizes of tools.

And the lower part holds on to all of the hoses and extension wands. Having everything right here and always within arms reach is so nice.
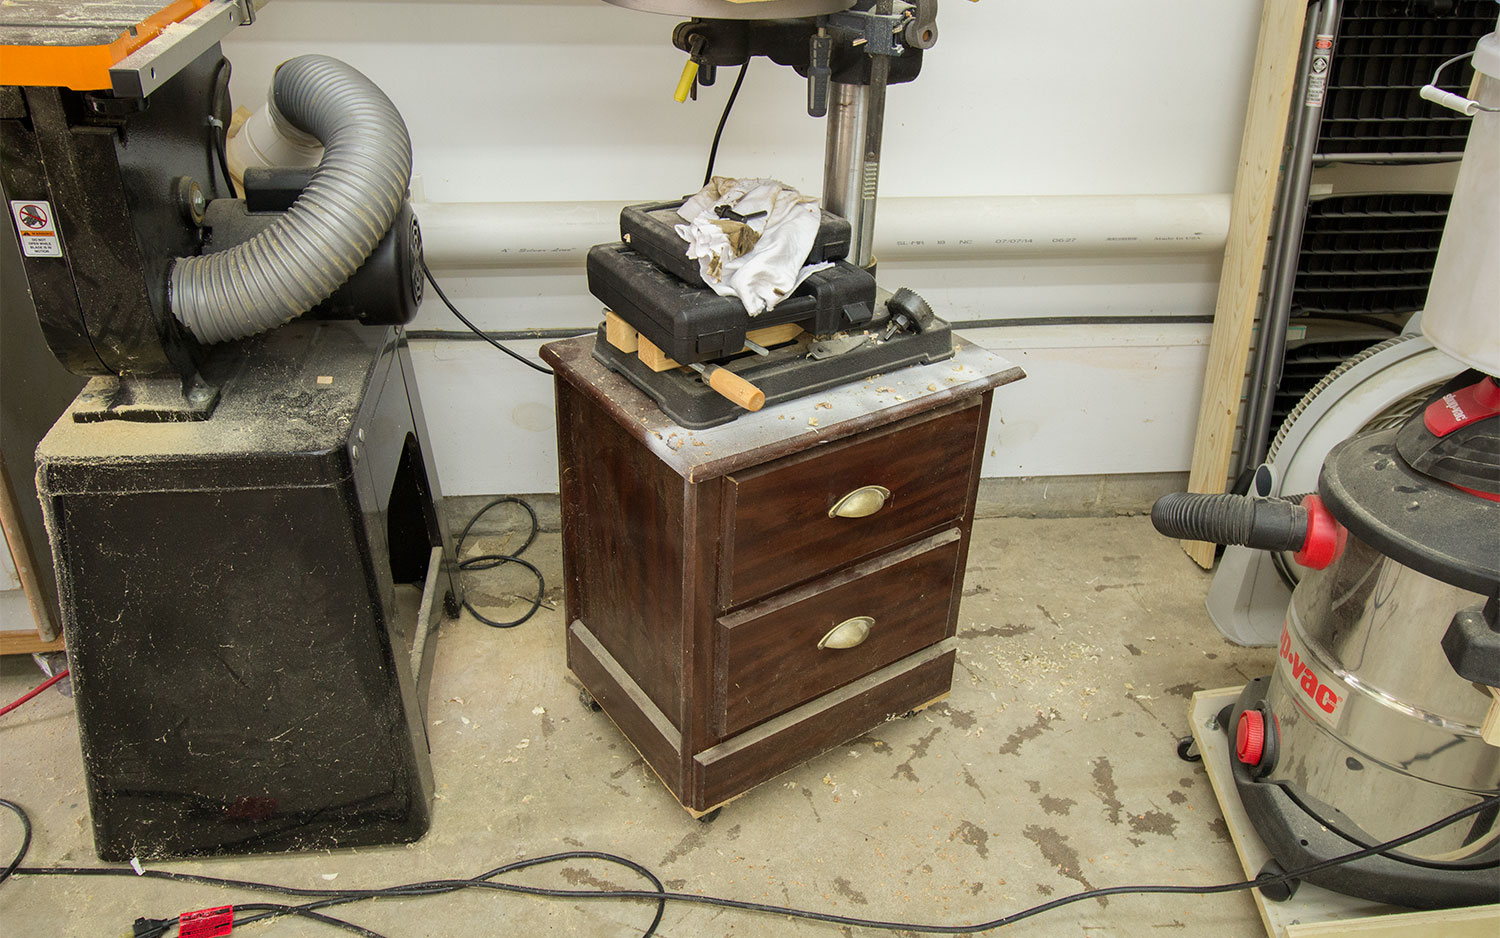
The next vertical tool is my 13” benchtop drill press. It’s a cheap Harbor Freight model that isn’t perfect but isn’t a bad buy either. It has several flaws that I would consider “areas for improvement” and not problems. I would purchase this again if I had to do it over. I have a larger drill pres table with integrated storage drawers for it but find it to be a little too big for where I currently have the drill press in the shop.
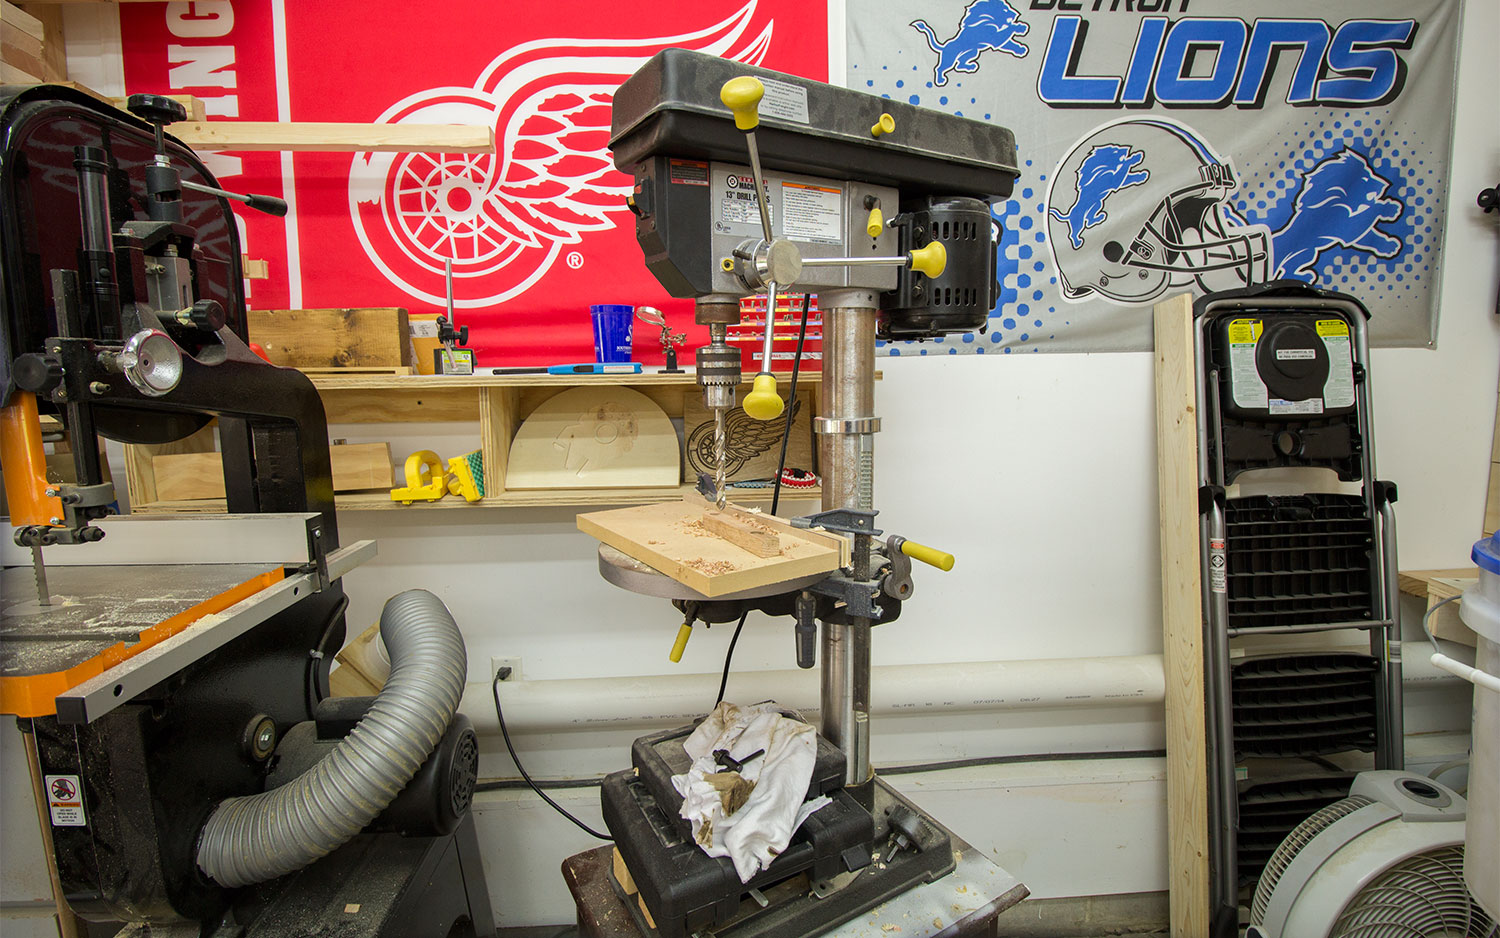
The drill press is sitting on top of a nightstand that I found in the trash. I honestly didn’t expect this nightstand to hold up as long or as well has it has. It’s entirely MDF with a paper thin wallpaper type fake veneer. I put a set of computer chair casters on the bottom of it and it has served me well since.
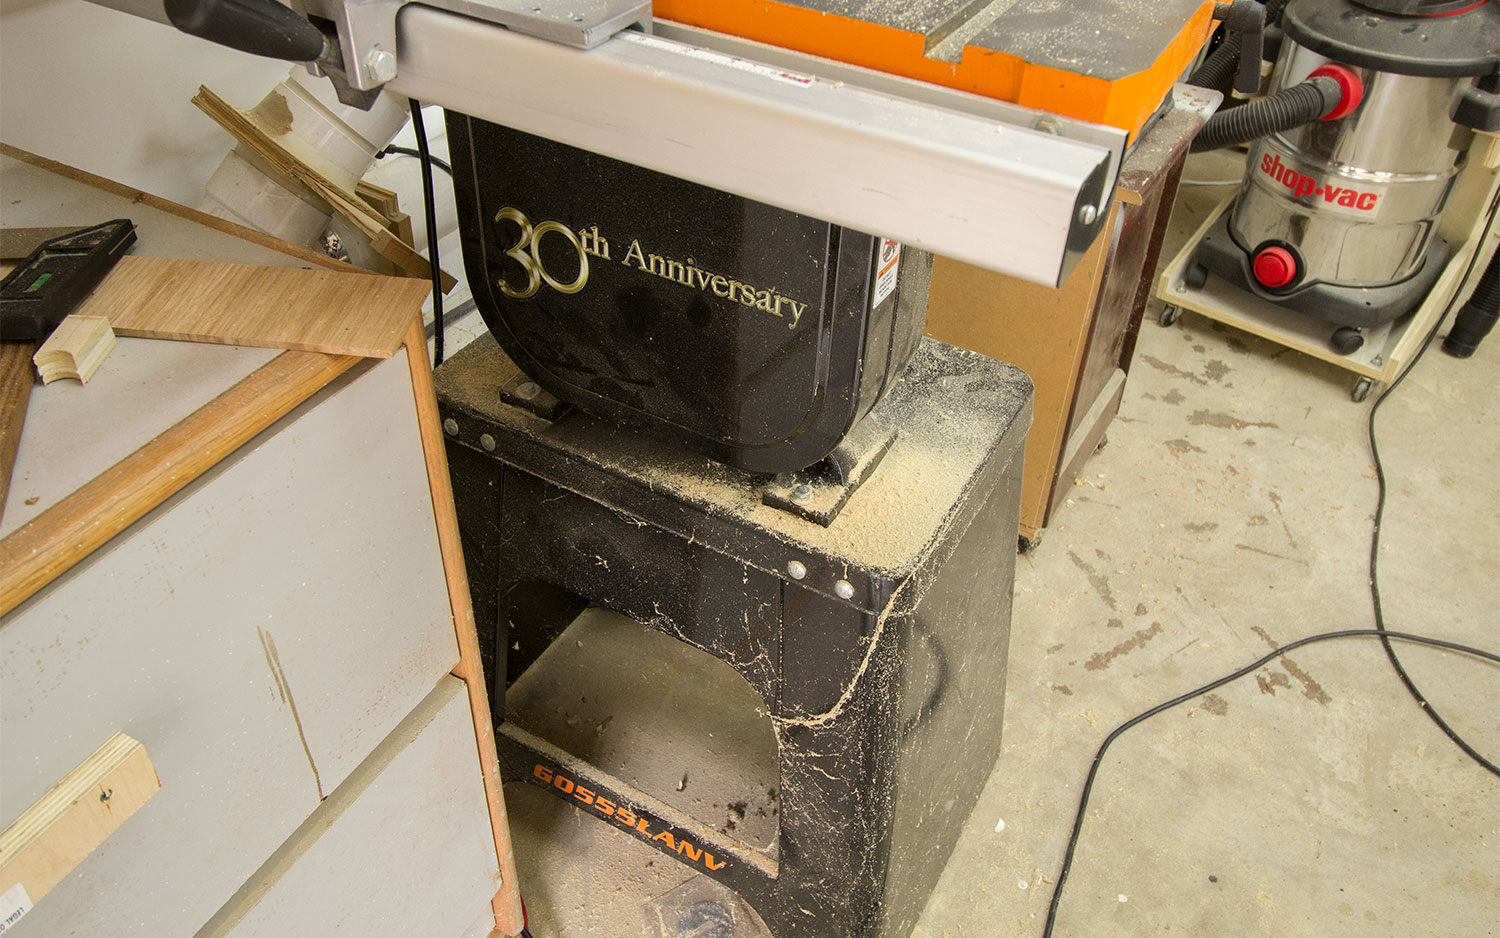
Next up is my Grizzly G0555LANV 14” bandsaw. This has been a great buy. It’s currently the only tool I don’t have on casters so I’ve positioned it so that its out of the way but still usable. Just behind it on the wall is a homemade blast gate and a flexible hose to connect it to the main dust collection line.
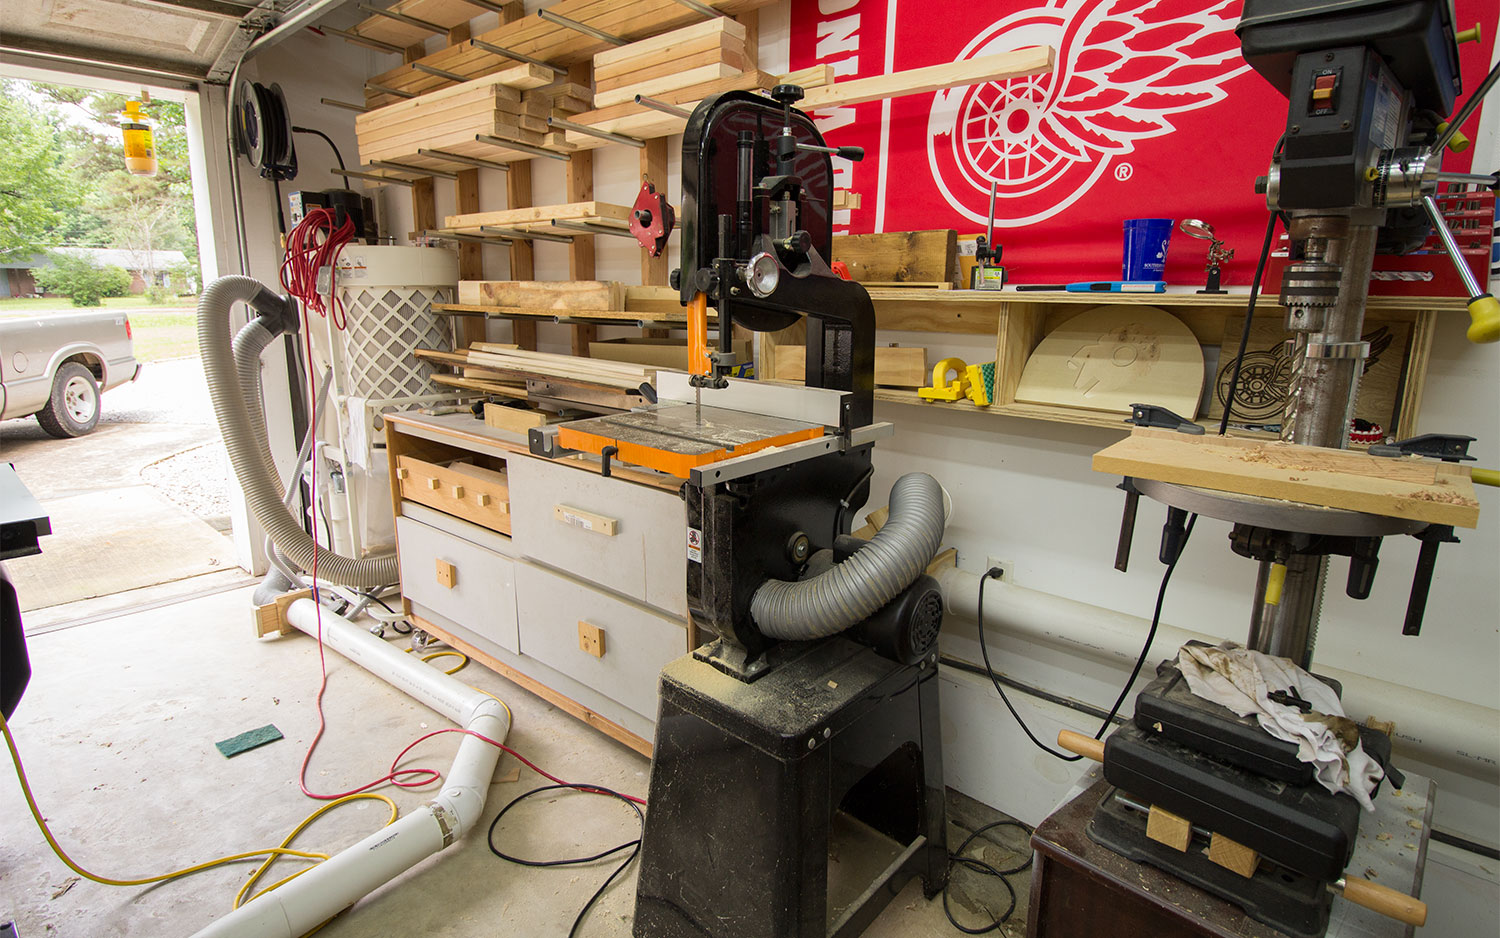
The bandsaw has a 6-3/8” resaw capacity. I find this to be enough for my needs but after recently acquiring some larger chunks of a bradford pear tree that came down in a storm I realized it would be nice to have greater resaw capacity just for getting larger chunks into usable sizes. I don’t think that has justified an upgrade to a larger bandsaw or a riser block kit for me though.
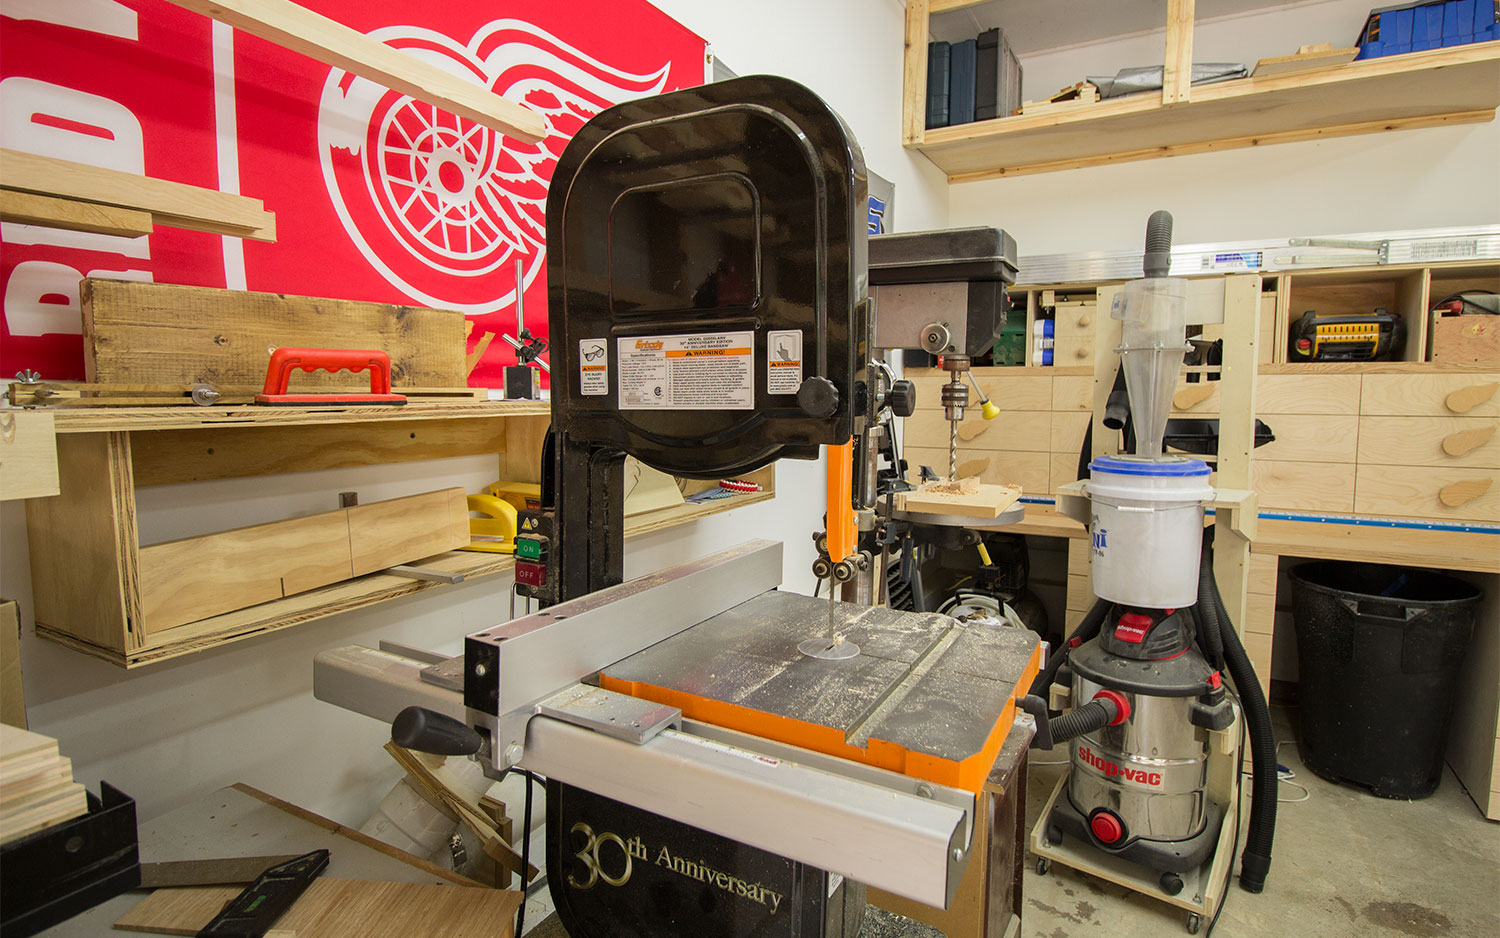
The one complaint I have with this bandsaw is the horrible dust collection. Not a deal breaker for me but I do wish it was better without any modifications.
Continuing along the left wall is my conduit lumber rack and a dresser I found in the trash several years ago. The dresser stores all of my smaller off-cuts of plywood or lumber that are too small to fit in the plywood cart or the lumber rack. If a piece belongs in these drawers but the drawers are full then it gets thrown away or put in my burn pile near my back yard fire pit.
The final corner of my shop houses my Grizzly G0703P mobile dust collector. I upgraded to this unit shortly after setting up this shop as my last dust collector was setup to exhaust air outside. The separator I made for it wasn’t efficient enough to modify again for a canister filter for exhausting air inside the shop. I really didn’t want to deal with modifying my dust collector again so I got this. Above the dust collector is my retractable air hose reel that I mentioned earlier. I like having this here as the only times I use compressed air is to fill up the my vehicle tires or to spray a finish which I do outside.

As with many of you out there I always enjoy checking out a shop tour. I hope you were able to take away at least something from this shop tour. If you would like to see some reader shop tours that have already been featured on this website you can do so here. If you would like your shop to be featured on this website feel free to drop me a line using my contact form. Thanks for stopping by folks and have a great day!


Mate, I started watching you after seeing a kerf cutting dado jig out of a drywall screw and a few pieces of scrape. You have gone from strength to strength. Each project bigger and better. But not unachievable to the average home woodworker. Keep up the good work. Your Scetchup tutorials are so easy to follow. I have learnt heaps watching you. Now a year after your big move your going strong. Thank you Jay
Best regatds.
Tony
Thank you very much for the kind words Tony. They are very much appreciated. The Kerfmaker was a long time ago. Thanks for sticking around that long :)
I love a good shop tour, but it’s super motivating to me to hear you say that you built it all in a few years on good old-fashioned hard work. About 8 years ago, I lost an office job and began working with my hands, first doing siding and windows, and now installing home media systems. It has completely changed my work ethic, and my motto now is, “If you ain’t sweating, you ain’t working.”
Keep up the great projects and videos, and definitely keep promoting the value of hard work!
Awesome Tour Jay!! and Debt Free that is a HUGE accomplishment in today’s society, one that should be followed by all!!! Thanks for the time and attentions you put into this channel.. Happy Independence Day!! Go Blue!
The dust collection on the Grizzly band saw sucks? Hopefully it sucks on the table and miter saw too…
Nice update, has it really been a year already. Time flies.
I really enjoyed this video. I don’t particularly enjoy watching videos every time someone changes the layout of their shop. But, yours is the exception. I know a lot of your fans have probably been asking for a while for you to do a tour of your shop. Glad you waited till it was all finished to do it. You must’ve shot this video before you got your festool tools.
But, there’s nothing wrong with showing people what’s possible if they work their butts off. Too many people expect immediate success when they start an online woodworking channel or website. It truly has to be your passion in order for someone to be successful in it. If they’re only doing YouTube or online stuff expecting to get rich quick or even to earn a little bit of income, I believe they’re in it for the wrong reasons and will get burned out quickly.
Anyway, thanks for all you do and the time you put into your projects and videos. And for taking the time to share them with us and to inspire others.
I have the Grizzly TS you had before you went for the saw Stop. The SS is quite a bit more expensive then the grizzly, would you say all the extra money you paid for the SS went just for the safety the saw offers or is there also is much of an upgrade with the workings of the SS over the Grizzly
The deciding factor was the safety feature. When I had the Grizzly I had zero complaints with the saw. Everything worked as it should and there weren’t any problems. But now that I have had the SawStop for a bit I can say every little feature of the machine is better than the Grizzly. The attention to detail is phenomenal.
I am lucky to have been able to build a 2400 square foot shop when I retired. Space to spread out is nice, but many of your creative storage ideas make sense for organizing equipment and the efficient usage of tools. I can only imagine how much you have spent on the quality plywood you have used. Very well done!
Great video, Jay. I’m slowly working on turning my two-car garage into a workshop and this video provided me with some ideas I’ll try yo include. Kepp up the excellent work.
Jay, You gave some vital advise- not to go into debt over a tool. Unfortunately I do owe a little for some of my things about $300.00 worth, but I went from $60,000/year income down to $25,000/year when I retired due to bone CA I had as a teen.( I was only suppose to live 3 month and I am now 54, so guess they were wrong about that.) But with age comes arthritis in the arek9a of surgery and was force to give up my job as a mail carrier. The income drop was and is huge for me. I have paid cash for 90% of my tools, but some i have had to charge. I really only need one more tool which is a Thickness planer. I’m holding out for a sale on the Rigid Planer which has all the features I want. Enough about me. I have watched your shop grow from the first video to this video and it has come out beautifully and a model for others to follow, especially your Miter station. Anyone with that amount of space could easily make it with your plans,or just watching the build video’s. You have utilized every inch of that garage perfectly, and I love the idea of having a rolling storage rack for sheet goods that can be moved to you truck to unload and move back into place. You have come along way in a years time. Maybe I should start making bigger item and sell them out front on my lawn, instead of on Etsy. Best of luck always Jay. PS.- I’m wearing your shirt that say’s” Nothing works unless you do”. It’s my motto now.~Dolly
Hi Jay. do you still use that circular saw dust collector thing
Nope. Too big of a setup. I used it for cutting MDF when making the toy box but that’s it. Just not practical to use. Too big.
Great up date Jay. Thanks for all you advice on what a shop should be. I am thinking about changing my shop to be more mobile.
Thanks again,
Thats a great shop Mate, You have inspired me to rejig my shed as we say in Australia, Just a side note I have a huge poster of the Brisbane Lions in my “shop” Australian Football (do not confuse it with rugby) and they presently suck…. bottom of the ladder. Its winter here in Australia. Great tube and some salient tips.
Cheers Peter
Melbourne Australia
That is a great shop. I have a single car garage at our main home that Has never had a car in it. Just wooworking equipment.,and wooden boats that I now restore or build. We have a summer home at a lake that I have a 16×24 pole barn that also has never had a car Just wookworking equipment and boats.
Would you share with us what you now do for a living.
I am retired.
Jeff
Great video. Loved the debt free comments at the end.
Hey Jay,
Just wanted to show gratitude for the inspiration and knowledge you’ve given. As a former science teacher AND compositor/animator, I can really get down with your attention to detail, clear views/instructions, editing skills and work ethic. I’ve been watching your vids here and there since the sawhorses, of which I have my 2 sets. Since then I’ve been taking your lead and built the conduit rack, multi-function TS hold-down jig and a few more. I appreciate being able to mold them into a workable set up for my 12×20 shop. It’s great to see your success and I wish you the best. You’re doing good things, man, so keep it up.
Thank you very much, Ked.
Nice shop an tour Jay been watching for awhile an not to long ago subscribed to you newsletter. I’ve been woodworking for 40+ years an it’s always good to see new fresh ideas.
What, no dovetail joints on those drawers? Just kidding :). Thanks for such a great site!
Glad you like the site Seth. Thanks for stopping by :)
What are the inside dimensions of your garage? My two car garage is a bit tight but yours looks like there is tons of room. Maybe it’s just the wide-angle lens. I love all your video’s – they are very well made and inspiring!
I’ve previously stated that it’s 22′ x 22′ but I just measured and it’s 20.5′ x 20.5′. The wide angle lens helps.
Hey Jay,
Great Shop… My wife is hinting at my earliest convenience to start my garage project. We’re changing the one car garage into a half his and half hers… I am a handyman, so i don’t just do one thing. So I am many types of tools…the working space will be 10×13 and have a loft. I have had to take my miter saw with me on occasional jobs, but am thinking about a miter saw station. Any suggestions?
Aaron
My dedicated shop space is about 8′ x 4′, the rest is a one car garage that needs to stay open for my wife’s car. I will sometimes set up some plywood and sawhorses in that space for assembly though. The section that is my dedicated shop has a floor made of 2″x6″ lumber stretched out over joists on top of dirt. It is an old floor filled with knot holes, cracked or broken boards (with temporary plywood screwed over them) and just generally uneven. If I cannot build a shed as my new workshop I will be looking at redoing the floor in my current space. Not sure how I would go about it though.